


Zoom filters for the face are a video conferencing app feature that allows users to apply various effects to their faces during a video call. These filters can include things like virtual hats, glasses, and makeup, as well as more creative effects like changing the color or shape of your face. You can access Zoom facial filters through the app’s settings to add fun and creativity to your video calls. In this article, you will find the top 3 things you need to know about Zoom face filters.
Top 1: Does Zoom Have Video Filters?
Yes, Zoom does have video filters that users can apply to their video during a call. These filters can change the color or lighting of the video, add virtual hats or glasses, or use makeup effects.
With Zoom’s video filters, you can add some fun and creativity to a video call or improve the appearance of the video in other ways. To use the video filters in Zoom, users simply need to click on the “Video” icon in the bottom left corner of the Zoom window, then click on the “Video Settings” option. From there, users can click on the “Video Filters” tab to access and apply the various filters available in the app.
Furthermore, they can help people hide blemishes or improve the appearance of their faces in other ways. Zoom filters, for the beginning, are easy to use and can be applied with just a few clicks, making them a popular feature for personal and professional video calls.
You may also like: Best Alternatives to Zoom Video SDK

Top 2: The Features of Zoom Filters for Face
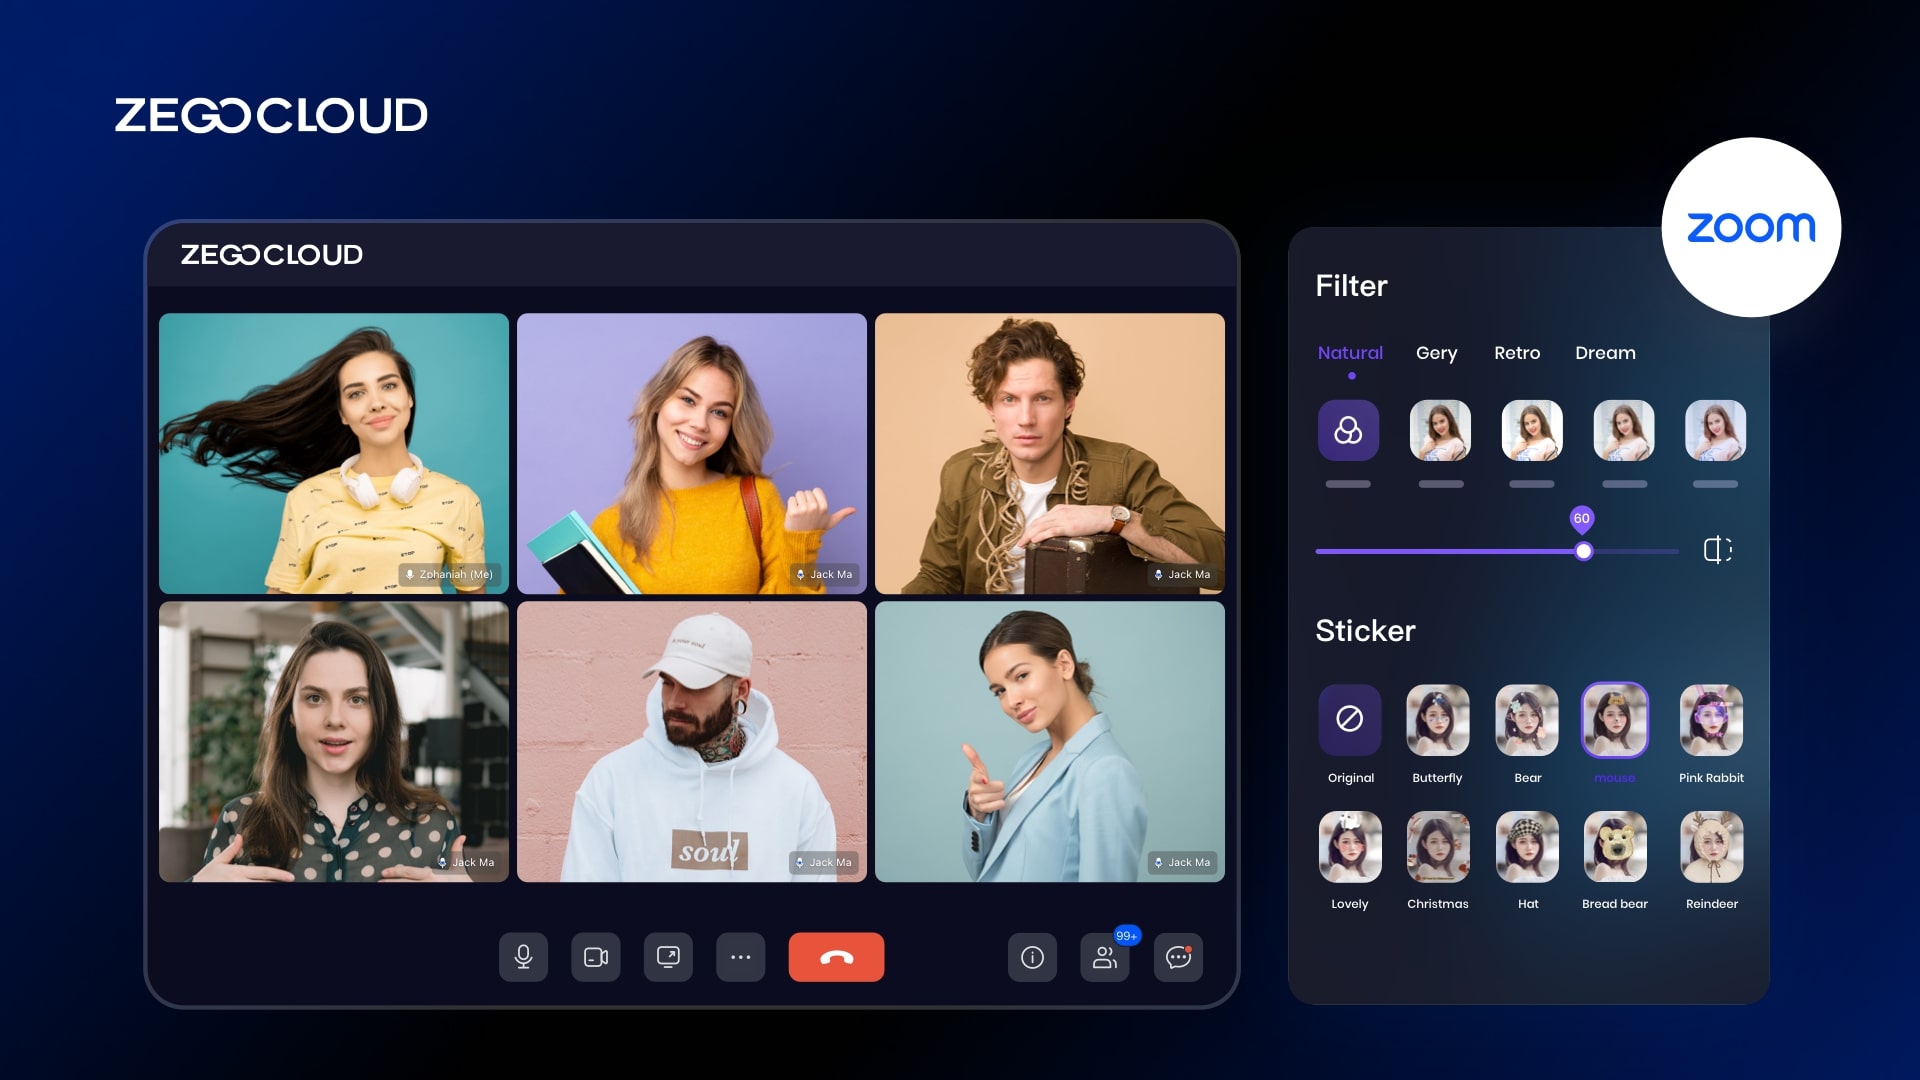
Zoom Filters for Face is a set of visual effects that can be applied to your video feed during a Zoom meeting. These filters can add a fun and creative touch to your video conferences.
Virtual Accessories
Zoom provides several virtual accessories that can enhance your video feed. These include hats, glasses, mustaches, and even whimsical additions like animal ears and noses.
Color Filters
You can apply different color filters to your video feed. These can change the overall color tone of your video, allowing you to appear in black and white, sepia, or other color effects.
Frames
During special occasions or themed meetings, you can use frames to add a festive touch to your video.
Studio Effects (Beta)
This feature allows you to add facial effects such as eyebrows, mustaches, and beards, and you can even change your lip color. These effects remain in place even as you move around in the video.
Ease of Use
Applying and changing filters is straightforward. You must go to the “Video Settings” menu, select “Background & Filters,” and choose the filter you want to apply.
Preview Option
Before applying a filter, Zoom lets you preview how it will look on your video feed. This ensures you can choose the effect that best suits your mood or the nature of the meeting.
Customization
You can combine different filters to create a customized look. For instance, you can use a color filter, frame, and virtual accessory.
Top 3: How Zoom Filters Work
Zoom filters apply various effects to the video feed from a user’s webcam during a video call. These effects can include virtual hats and glasses, makeup, or changes to the color or lighting of the video. To use Zoom filters for face, users must install the Zoom app on their device and be connected to a video call.
Do as follows:
- Open the Zoom app on your device and join a video call.
- Click on the “Video” icon in the bottom left corner of the Zoom window.
- Click on the “Video Settings” option.
- Click on the “Video Filters” tab.
- Browse through the available filters and select the one you want to use.
- Click “Apply” to apply the filter to your video feed.
The filter will be applied to your video feed during the call.
To turn off the filter or choose a different one, simply repeat these steps, select a different one, or turn the filter off.
It’s important to note that Zoom filters for the face are applied locally, meaning they only affect the video feed sent from your device. Other participants in the call will not see the filters unless they have the same filters applied to their own video feed.
How to Build Your Own Zoom Filters for Face
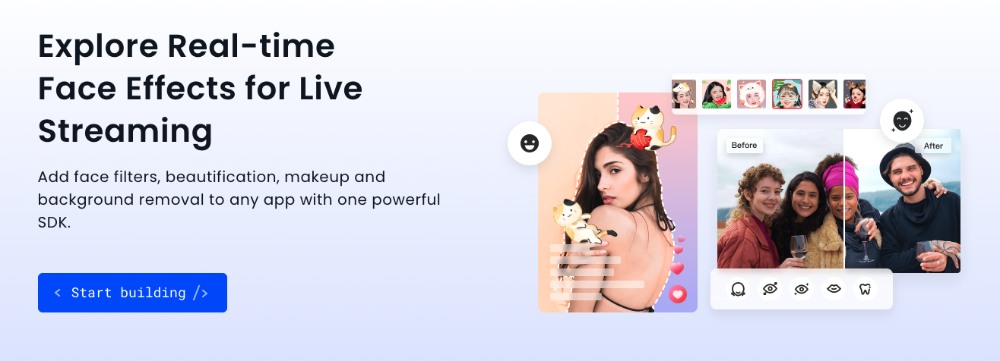
ZEGOCLOUD AI Effects is a Zoom filter alternative that offers a range of virtual effects and filters for developers to apply to their video conferencing app, making it easier and more friendly for users. These effects can include things like virtual hats, glasses, and makeup, as well as more creative effects like changing the color or shape of your face.
One of the main advantages of using the ZEGOCLOUD AI Effects as a Zoom filter alternative is that it uses artificial intelligence (AI) to automatically detect and track the user’s face, ensuring that the effects are applied accurately and smoothly. This can be especially useful for users new to using video filters who may not have the skills or experience to apply them manually.
In addition to its AI-powered effects, ZEGOCLOUD AI Effect offers a range of customization options that allow users to fine-tune the results to their liking. This can include adjusting the intensity of the effect, selecting specific areas of the face to apply the product to, and more.
As one of the best Zoom filters for faces, this SDK offers a range of real-time video and audio effects powered by artificial intelligence, including face beautification, augmented reality effects, image segmentation, and more. You can use these effects in various contexts, such as social and entertainment live streaming, online education, and camera tools.
Why You Should Use ZEGOCLOUD AI Effects
There are several advantages to using ZEGOCLOUD SDK. Some of the main benefits of using the ZegoEffects SDK include the following:
AI-powered face tracking
The ZEGOCLOUD AI Effect SDK uses artificial intelligence (AI) to automatically detect and track the user’s face, ensuring that the effects are applied accurately and smoothly. This can be especially useful for developers who want to offer their users a range of virtual products and filters but may not have the skills or resources to implement them manually.
2. Customization options
The ZEGOCLOUD AI Effect SDK offers a range of customization options that allow developers to fine-tune the effects to their liking. This can include adjusting the intensity of the impact, selecting specific areas of the face to apply the product to, and more.
3. Easy integration
The ZEGOCLOUD AI Effect SDK is designed to be easy to integrate into a wide range of applications, making it a convenient solution for developers who want to add virtual effects and filters to their apps.
4. Cross-platform compatibility
The ZEGOCLOUD AI Effect SDK is compatible with a wide range of platforms, including Android, iOS, and Windows, making it a versatile solution for developers who want to reach a broad audience.
5. Advanced features
The ZEGOCLOUD AI Effect SDK includes advanced features, such as support for multiple faces and automatic skin smoothing, that can enhance the user experience and improve the quality of the virtual effects and filters.
Preparation
- ZEGOCLOUD developer account — Sign up
- Create a project, get the AppID, and get the AppSign.
- Android Studio 2.1 or later.
- a video and audio-capable Android device or emulator
- Basic knowledge of Android app development
How to Use Zoom Facial Filter Alternative
Now that we have discussed the features of the alternative to Zoom face filters — ZEGOCLOUD AI Effects SDK, it’s time to start using them in our project. To do this, we need to integrate the SDK into our app. To incorporate the ZEGOCLOUD AI Effects SDK into your project, follow these steps:
Create a new project.
In Android Studio, to start a new project:
- Start Android Studio and select “File” from the top menu. Then, choose “New Project” from the options.
- In the “New Project” window, enter a name for your application and select a location for the project.
- It is generally recommended to leave the default settings as they are. Once you have entered the necessary information, click “Next” and “Finish.”
Import the SDK
To add SDK files to your project and include them in your build process:
- Create a directory in your project specifically for SDK files. A common location for these files is
app/libs. - Copy the SDK files you wish to use into your created directory.
- Open the
app/build.gradlefile in your project. - Add the following lines to the file:
dependencies {
    implementation fileTree(dir: 'libs', include: ['*.jar'])
}
This will include the SDK files in your project’s build process.
Granting permission
To grant permissions for accessing Android system resources in your app:
- Open the
AndroidManifest.xmlfile located in the app/src/main directory of your project. Add the following lines of code to the file:
<!-- Permissions required by the SDK -->
<uses-permission android:name="android.permission.ACCESS_WIFI_STATE" />
<uses-permission android:name="android.permission.INTERNET" />
<uses-permission android:name="android.permission.ACCESS_NETWORK_STATE" />
2. To avoid obfuscation of class names, open the proguard-rules.pro file and add the following line:
-keep class **.zego.**{*;}This will ensure that the names of the classes used by the SDK are not modified during the build process.
Import resources and models
To use the AI-powered features of the ZegoEffects SDK, you will need to import the necessary resources or models.
- You should import the related resources first for skin tone enhancement, teeth whitening, cheek blusher, and stickers.
- You should import the related models for eye enlarging, face slimming, and portrait segmentation.
Note: Ensure to import the required resources or models before attempting to use the corresponding features of the SDK.
Implementation steps
- Indicate the absolute location of the AI resources or models.
// Specify the resources' absolute path. Specify the resources for skin tone enhancement, teeth whitening, cheek blusher, and stickers. Specify model paths for portrait segmentation, eye enlargement, and facial slimming.
ArrayList<String> aiResourcesInfos = new ArrayList<>();
aiResourcesInfos.add("sdcard/xxx/xxxxx/FaceWhiteningResources.bundle");
aiResourcesInfos.add("sdcard/xxx/xxxxx/PendantResources.bundle");
aiResourcesInfos.add("sdcard/xxx/xxxxx/RosyResources.bundle");
aiResourcesInfos.add("sdcard/xxx/xxxxx/TeethWhiteningResources.bundle");
aiResourcesInfos.add("sdcard/xxx/xxxxx/FaceDetectionModel.model");
aiResourcesInfos.add("sdcard/xxx/xxxxx/Segmentation.model");
Before creating an ZegoEffects object using the create method, ensure that you have set the necessary resource and model paths using the setResources method. This will allow the necessary resources and models to be loaded.
ZegoEffects.setResources(aiResourcesInfos);Implement basic image processing
The diagram below illustrates the API call sequence for basic image processing using the ZegoEffects SDK:
To use the ZegoEffects object to perform image processing with AI features, you need to do the following:
- Import the necessary AI resources or models by calling the
setResourcesmethod and passing in the absolute paths of the relevant models.
// Specify the absolute path of the face recognition model, which is required for various features including Face detection, eyes enlarging, and face slimming.
ArrayList<String> aiModeInfos = new ArrayList<>();
aiModeInfos.add("sdcard/xxx/xxxxx/FaceDetectionModel.bundle");
aiModeInfos.add("sdcard/xxx/xxxxx/Segmentation.bundle");
// Set the list of model paths, which must be called before calling the create method.
ZegoEffects.setResources(aiModeInfos);
2. Create a ZegoEffects object by calling the create method and passing in the content of the license file as the license parameter.
// Create a ZegoEffects object, passing the content of the license file to the `license` parameter.
String license = "xxxxxxx";
ZegoEffects mEffects = ZegoEffects.create(license, applicationContext);
3. Initialize the ZegoEffects object by calling the initEnv method and passing in the width and height of the original image to be processed.
// Initialize the ZegoEffects object, passing in the width and height of the original image to be processed.
mEffects.initEnv(1280, 720);
4. Enable the desired AI features by calling the relevant methods, such as enableWhiten, enableBigEyes, setPortraitSegmentationBackgroundPath, and enablePortraitSegmentation.
// 1. Enable the skin tone enhancement feature.
// 2. Enable the eyes enlargeing feature.
// 3. Enable the AI portrait segmentation feature, passing in the absolute path of the segmented background image.
mEffects.enableWhiten(true)
.enableBigEyes(true)
.setPortraitSegmentationBackgroundPath("MY_BACKGROUND_PATH", ZegoEffectsScaleMode.ASPECT_FILL);
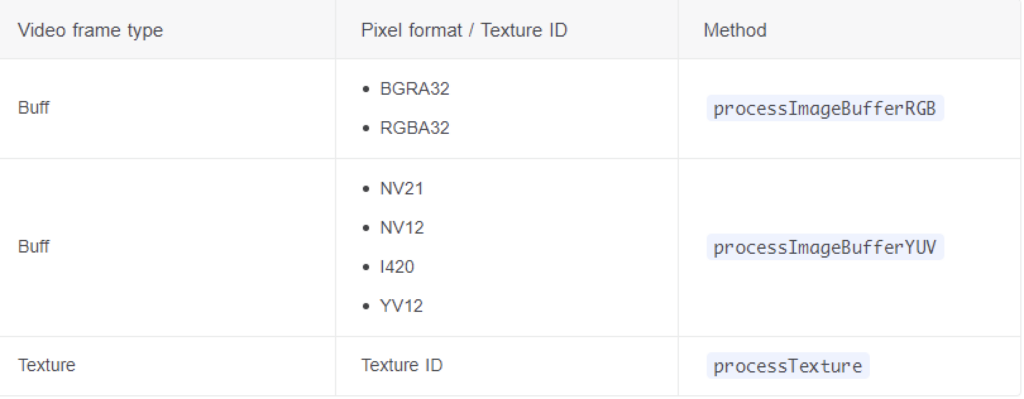
.enablePortraitSegmentation(true);Call the processTexture method to perform image processing on the original image, passing in the texture data. You can also use other formats such as YUV for image processing. You can cheek the table below for more info:
ZegoEffectsVideoFrameParam zegoEffectsVideoFrameParam = new ZegoEffectsVideoFrameParam();
zegoEffectsVideoFrameParam.setFormat(ZegoEffectsVideoFrameFormat.RGBA32);
zegoEffectsVideoFrameParam.setWidth(width);
zegoEffectsVideoFrameParam.setHeight(height);
// Pass in the textureID of the original video frame to be processed, and return the textureID of the processed video frame.
zegoTextureId = mEffects.processTexture(mTextureId, zegoEffectsVideoFrameParam);
Run a demo.
To try out the sample demo in this article, you can simply download it.
You may need to check out our Core SDK if you require more advanced features, such as streaming mix and noise reduction.
Conclusion
In this article, we have discussed the features and capabilities of Zoom filters. The Zoom facial filter is a high-quality option. However, other alternatives, such as ZEGOCLOUD AI Effects, offer similar or superior features.
You may also like:
FAQ on Zoom Filters for Face
Q1: Can I use Zoom Filters for Face on any device?
Zoom Filters for Face are available on both desktop and mobile devices that support the Zoom app. However, the availability of certain filters might vary between devices due to differing hardware and software capabilities.
Q2: How can developers integrate custom Zoom Filters for Face in their app?
Developers can integrate custom Zoom Filters by utilizing Zoom’s SDKs. This involves creating the filter effects externally and then applying them to the video feed through the SDK’s video processing interface before it is sent to the Zoom servers during a call.
Q3: Can Zoom Filters for Face be used in webinars and large meetings?
Yes, Zoom Filters for Face can be used in webinars and large meetings, but it’s essential to consider the formal context of such gatherings before applying filters. The host has the discretion to use or restrict these filters to maintain the meeting’s professionalism.
Let’s Build APP Together
Start building with real-time video, voice & chat SDK for apps today!
