


Efficient communication is the basis of human interactions in any sphere. Technology, such as voice chat, has improved communication, making it faster, more immediate, and cheaper.
The flow of information via the Internet has become the norm. Various methods of communication have flourished, such as e-mail, chat sites, Internet calls, video chat, and voice chat. The latter is popular because of the immediacy and convenience of not having to hold on to waiting for the other party to respond.
Text chats are not enough for many people, video calls can seem excessive, and audio conversations are just about right. With real-time voice chat, users tend to interact longer.
What is Voice Chat?
In general, voice chat refers to online calling services, audio conferencing services used by individuals or businesses, or specialized applications used by online gamers. ‘Voice’ and ‘chat’ may seem redundant since both terms mean talking. However, voice refers to a verbal conversation rather than the short text sequences used in online messaging and chat.
Nowadays, voice chat is also intended to forward recorded voice messages online. To send and receive voice messages, you need the following:
– a phone to record the voice message
– a software application to send the voice chats
– an Internet connection
A voice message is stored in the hardware; you can listen to it again and possibly delete it before sending it. The recipient first downloads the voice message into their hardware and then plays it back.
The positive aspect is that you can send a message to several people at once or even later. The latter element distinguishes them from VoIP calls.
VoIP calls: What difference?
VoIP stands for Voice over Internet Protocol and denotes calls over the Internet that are primarily free worldwide. Because of the Internet, people can now avoid the costs of telephone companies and network organizations.
There are three popular ways to make VoIP calls:
1. ATA: analog telephone adapter works by connecting a standard telephone to a computer or the Internet for use with VoIP
2. IP: via Ethernet connector, phones connect directly to the router and have the necessary hardware and software to make the call. Wi-Fi phones allow subscribers to make VoIP calls from any Wi-Fi hotspot.
3. Computers, using free software, with the help of a microphone, speakers, a sound card, and a good Internet connection.
The main differences between voice chats and VoIP calls include the following:
– feedback time: VoIP calls offer an immediate response and feedback communication system between communicators in a single session; voice calls have a delayed feedback system because of the time it takes to download and listen to the recorded voice message
– storage: the recorded message is saved on the sender’s and recipient’s devices and can be accessed at a later time; in VoIP calls, not, since the communication is live;
– the number of recipients: voice chats are convenient for sending instructions on how to proceed to many recipients; however, some VoIP calls also offer the possibility of talking to more than one person at a time.
Users can always choose between the two methods depending on the speed of response, the number of people they want to communicate with, and whether they want the message to remain available over time.
Voice Chat in Gaming
Chatting through voice is popular among players of multiplayer online games.
Players can broadcast their voices through the game, and other participants can listen to them through a VoIP system built into the game or a separate program.
Pioneering voice chat in games is SegaNet, which released the first compatible browser for Dreamcast in 2000. This web browser integration became a standard in future game consoles.
Sony released in 2001 the network adapter for its PlayStation 2 video game console, enabling voice chat with a headset. In 2002, Microsoft launched the Xbox Live service supporting voice and integrated voice chat functionality into games. After the launch in 2006 of Nintendo Wi-Fi Connection, an online multiplayer service, the first game to allow voice chat through the Nintendo DS microphone was launched. Over the years, voice chat in gaming has been refined to today’s formal virtual rooms. There are many software and voice chat services in the gaming industry today.
Voice in Messenger Apps
All instant messaging apps allow always-on voice chat. The success of voice chat apps has caused the VoIP market to reach $30 billion, with a CAGR of 15% by 2027.
With them, they can access better quality and unlimited voice calls. Voice chats work parallel with existing text and media communication, adding a conversation layer. They become virtual offices for groups or informal lounges for any group or community. Who doesn’t have a family or friends group where people talk through voice messages?
While voice chats are not group calls, they achieve the same utility while offering flexibility.
Popular ones include Telegram, Skype, Element, New Team, and WhatsApp. Also, Facebook’s Messenger and Instagram DM allow verbal messages and voice chat. All also allow online voice calls.
An excellent voice chat service requires equally great SDKs and APIs today. There are many offerings in the marketplace from competent vendors. Calls shall not stop abruptly, thanks to the voice API. There is no interference or latency during voice calls, so audio communication is more transparent and crisp.
Best 10 Voice Chat Apps of 2026
These apps listed below have covered you, from conducting business meetings to chatting with friends.
1. Discord
Discord is a voice and text chat app that allows users to create and join servers to communicate with other members in real-time. Since its launch in 2015, the app has become one of the most popular communication platforms for gamers, students, businesses, and communities of all types.
In addition, Discord also offers a wide range of text chat and file-sharing features. Users can create channels for text-based conversations and share images, videos, and other files. The app also can integrate with other apps like Spotify, so users can share what they’re listening to with other server members.
Features of Discord Voice Chat
- High-quality using low-latency, Opus-encoded audio
- Push-to-talk and noise suppression
- Echo cancellation
- Text chat and file sharing
- Channel creation for text-based conversations
- Spotify integration
- Animated avatar (in Nitro subscription)
- Larger file upload limit (in Nitro subscription)
Compatible Platforms:
- Windows
- Mac
- iOS
- Android
- Linux
- Web Browsers
Pricing:
Basic features are free to use
Nitro Subscription: A paid subscription that includes additional features such as animated avatars and larger file upload limits. It costs $9.99 per month.
2. Mumble Voice Chat

Mumble is a low-latency, high-quality app widely considered one of the best in 2024. It’s open-source, cross-platform, and designed specifically for gamers, but it has evolved to be widely used by all users.
The app’s low latency, noise suppression, and echo cancellation capabilities are some of the best in the market, making it an excellent option for real-time voice communication and collaboration. Mumble’s simple and easy-to-use interface makes it accessible for everyone to use and set up. Mumble’s strong and active community continues to develop and improve the app, making it a solid choice for voice communication needs in 2024.
Features of Mumble:
- Low-latency, high-quality voice chat
- Noise suppression and echo cancellation
- Open-source
- Cross-platform
- Simple and easy-to-use interface
Compatible platforms
Mumble is a cross-platform app. It can be used on various operating systems, including Windows, Mac, Linux, iOS and Android.
Pricing: Mumble is open-source and completely free to use.
3. Element
Element is an online voice chat app known for its security, ease of use, and powerful collaboration features. Its open-source and cross-platform nature allows users to communicate and collaborate with anyone from anywhere.
End-to-end encryption, it keeps users’ conversations secure. Its user-friendly interface and strong community support make it a reliable option for anyone needing real-time communication, meetings, and collaborations in 2024.
Element Voice Chat features :
- End-to-end encryption
- Easy integration with other Matrix-compatible apps
- The high degree of customization through API
- Group and private chat
- Voice and video call
- File sharing
- Advanced permission systems
Compatible platforms
iOS, Android, Windows, macOS, Linux, and web browser
Pricing
Element is open-source and free to use.
4. Steam Chat
Steam Chat is an in-built communication feature on the Steam platform that allows gamers to chat with their friends and teammates while playing games. Its ease of use makes it an ideal quick, real-time communication option. Steam Chat’s integration with Steam also makes it easy for users to see which friends are online and playing games and join voice chats with them.
Using the Steam overlay feature, Steam Chat also allows users to join voice chats even when they are not in-game. Furthermore, Steam Chat also offers the capability for text and video chats, making it a complete communication package for Steam users.
Steam Voice Chat features:
- Text and voice chat with Steam friends.
- Send voice and text messages to non-Steam friends using a linked phone number
- Group and private chat
- Sending media files, emojis, and more.
Compatible platforms
Windows, macOS, Linux
Pricing
Free to use with a Steam account
5. Teamspeak 3
TeamSpeak 3 is a simple app tailored for gamers and businesses to facilitate real-time communication. It is known for its low latency and high-quality voice chat, as well as its advanced customization options and administrative tools. Its client allows users to connect to multiple servers simultaneously and offers the flexibility to join or create channels on the fly. It also includes text chat and file transfer features, making it a robust communication platform.
TeamSpeak 3 features:
- Low latency audio
- Advanced permission systems
- Customizable server setup
- Multiple channels support
- Text chat
- File transfers
Compatible platforms
Windows, macOS, Linux
Pricing: Free to download and use, but users must rent a server or host one themselves. Some providers offer hosted servers for a monthly fee.
6. NuovoTeam Voice Chat
This NuovoTeam voice and text chat app is designed for remote teams. It offers collaboration tools such as screen sharing, file sharing, and task management to boost productivity and communication. The feature-rich app includes video conferencing, calendar integration, and virtual meeting rooms. It integrates with other apps like Google Drive, Dropbox, Slack, etc., making it a one-stop solution for remote teams.
NuovoTeam features:
- Group and private chat
- Task management
- File sharing
- Voice and video conferencing
- Calendar scheduling
- Screen sharing
- Time tracking
Compatible platforms
Windows, macOS, Linux, iOS, Android
Pricing: NuovoTeam offers a free plan, and a range of paid plans starting from $3 per user/month, billed annually.
7. Blizzard Voice Chat
Blizzard Voice Chat is an in-built communication feature on the Blizzard platform that allows players to chat with friends and teammates while playing games. It includes features such as push-to-talk, noise suppression, and echo cancellation, providing a seamless experience for players. It also makes it easy to see which friends are online and playing games, allowing players to join voice chats quickly.
Furthermore, Blizzard voice chat allows players to join voice channels within a game without leaving the game, making it more convenient to communicate with teammates during gameplay.
Features of Blizzard Voice Chat:
- In-game voice chat for Blizzard games
- Communication with party or raid group members
- Push-to-talk functionality
- Built-in mute and volume controls
Compatible platforms: Windows, macOS
Pricing: Free to use with a Blizzard account and a game that has built-in voice chat such as World of Warcraft or Overwatch.
8. Ventrilo

Ventrilo is a voice chat app used for gaming and professional communication. It’s known for its low latency and high-quality voice chat, as well as its advanced customization options and administrative tools. Its ability to handle many users on a single server makes it perfect for gaming communities and guilds. The app offers text chat and file transfer features and a user-friendly interface.
Features of Ventrilo Voice Chat:
- Low-latency voice chat
- Customizable server setup
- Push-to-talk functionality
- Built-in mute and volume controls
- Text chat
- Multiple channels support
Compatible platforms
Windows, macOS, Linux, and Web
Pricing: Free to download and use, but users must rent a server or host one. Some providers offer hosted servers for a monthly fee of about $9/month for 15 slots.
9. Overtone

Overtone is a voice chat app designed for gamers and online communities. The app offers advanced features such as noise suppression, echo cancellation, and 3D sound that enhance the voice chat experience. It also includes customization options that allow users to personalize their voice chat experience. In addition, Overtone has built-in voice activity detection, which automatically mutes a user’s microphone when they are not speaking, reducing background noise.
Overtone features:
- Low-latency voice chat
- Push-to-talk functionality
- Built-in mute and volume controls
- Built-in YouTube and Twitch streaming
- Text chat
Compatible platforms
Windows
Pricing: Free to use
10. Viber Voice Chat
Viber is a cross-platform voice and video chat app that can be used for personal and professional communication. It has voice and video calls, text messaging, and file-sharing features, making it a good option for personal and business use. Viber’s interface is user-friendly, making it a reliable and easy-to-use tool for communication. Additionally, Viber also offers end-to-end encryption for secure communication. It also includes group chat, location sharing, and the option to make international calls at a low cost.
Features of Viber
- Voice and video calls
- Exchange text messages
- Share files and locations
- End-to-end encryption
- Group and private chat
- Sticker and emoji support
- Push notifications
Compatible platforms
iOS, Android, Windows, macOS, Linux, and web browsers.
Pricing: Free to download and use, with some additional paid features like calling to non-Viber numbers or sending messages to non-Viber users.
These apps are available on mobile and desktop platforms, and many are free. While many apps have overlapping features and functionality, each has its unique set of features that make it more suitable for certain types of use cases. It’s recommended to check their features and try the ones that best suit your needs.
ZEGOCLOUD Voice Chat Solutions
Creating crystal-clear and engaging voice conversations is possible through a tremendous technical foundation. ZEGOCLOUD offers an audio SDK, which is fully customizable and easy to integrate, to quickly create high-quality, scalable voice calls in mobile, web, and desktop applications.
ZEGOCLOUD’s Voice SDK enables engaging real-time voice experiences for various scenarios. It has solutions, including 1-to-1 voice calls, group voice chats, voice chat rooms, and online karaoke. With 20+ prebuilt UIKits, building apps or integrating voice chat features into existing apps is faster.
Key Features:
- Boost user engagement with fascinating audio effects
- Stay connected anywhere in the world
- Deliver interactive, real-time voice with outstanding audio quality
- Voice recording feature
Preparation for Voice Call SDK to Make Voice Chat Apps
- A ZEGOCLOUD developer account Sign up
- A Windows or macOS device that is connected to the internet with audio and video support
- Examine browser compatibility (check browser compatibility).
- Basic understanding of web development
SDK for Free Voice Call Integration Guide
Integrating ZEGOCLOUD’s voice chat API is very easy. Just follow the steps below:
Step1: Create a new project
- Create a project with an
index.html, anindex.css, and anindex.jsfile. The folder structure should look like the one in the image below:
├── index.html
├── js
│   └── index.js
└── css
└── index.css- Copy the following code to the
index.htmlfile:
<!DOCTYPE html>
<html>
<head>
    <meta charset="UTF-8">
    <title>Zego RTC Video Call</title>
    <link rel="stylesheet" href="./css/index.css">
</head>
<body>
    <h1>
        Zego RTC Video Call
    </h1>
    <h4>Local video</h4>
    <video id="local-video" autoplay muted playsinline controls></video>
    <h4>Remote video</h4>
    <video id="remote-video" autoplay muted playsinline controls></video>
    <script src="./js/index.js"></script>
</body>
</html>- Copy the following code to the index.css file:
*{
    font-family: sans-serif;
}
h1,h4{
    text-align: center;
}
video {
    width: 300px;
    height: auto;
}
#local-video{
    position: relative;
    margin: 0 auto;
    display: block;
}

#remote-video{
    display: flex;
    height: auto;
    margin: auto;
    position: relative !important;
}- Run and test out your project on the local Web server.
You can do this using the life-server extension. Run the command below to install life-server if you don’t have it installed:
npm i live-server -gStep 2: Import the SDK
We’re done creating our project. The next step is importing the SDK into our project. You can import the audio call SDK by following the steps below:
- Execute the
npm i zego-express-engine-webrtccommand to install the dependencies. - Import the SDK in the index.js file.
var ZegoExpressEngine = require('zego-express-engine-webrtc').ZegoExpressEngineHow to Implement a Basic Voice Call Online
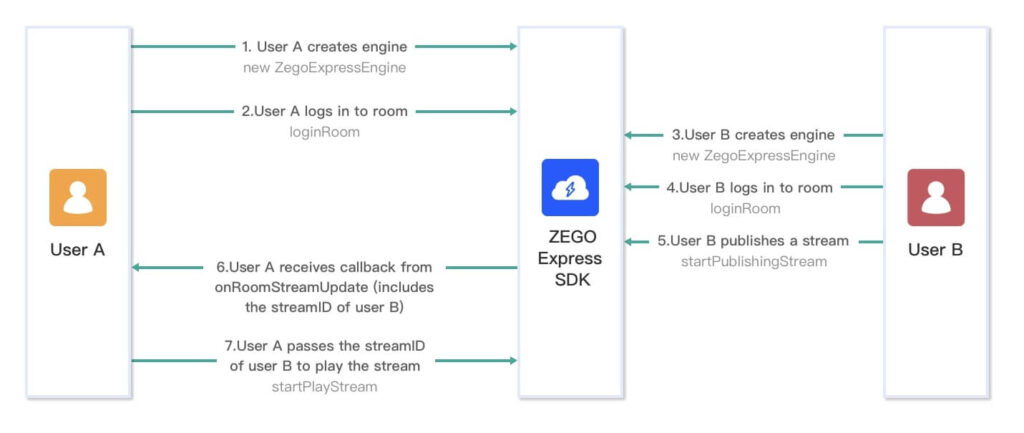
We have imported our SDK into the online voice call project. We can now proceed with the implementation of voice call functionality. The image below shows the working principle of User A playing a stream published by User B:
Follow the steps below to implement a basic voice calling feature:
Step 1: Make a new ZegoExpressEngine instance
Before clients A and B can publish and play streams, the ZegoExpressEngine SDK needs to be initialized. This can be done by simply creating a ZegoExpressEngine instance and passing in your AppID as the appID parameter and the Server URL as the Server parameter. You can obtain the credentials from the ZegoCloud Admin Console.
// Initialize the ZegoExpressEngine instance
const zg = new ZegoExpressEngine(appID, server);
Step 2: Check your browser’s WebRTC support
We’ll be testing our app in a web browser. Unfortunately, ZEGOCLOUD’s Express Audio supports all browsers. The good news is that you can always run the browser’s WebRTC compatibility test to know if it’s supported.
To do so, run the codes below:
const result = await zg.checkSystemRequirements();
// The [result] indicates whether it is compatible. It indicates WebRTC is supported when the [webRTC] is [true]. For more results, see the API documents.
console.log(result);
// {
//   webRTC: true,
//   customCapture: true,
//   camera: true,
//   microphone: true,
//   videoCodec: { H264: true, H265: false, VP8: true, VP9: true },
//   screenSharing: true,
//   errInfo: {}
// }
For more information about the browser versions supported by the SDK, seeBrowser compatibility.
Step 3: Log in to a room
We have finished creating a ZegoExpressEngine instance. It’s now time to log in to a room. To do so, call the loginRoom with the following parameters:
- a unique room ID as the
roomIDparameter. - The login token you obtained in the previous step is the token parameter.
- The user ID and user name are the
roomIDanduserNameparameters.
// Log in to a room. It returns `true` if the login is successful.
// The roomUserUpdate callback is disabled by default. To receive this callback, you must set the `userUpdate` property to `true` when logging in to a room.
const result = await zg.loginRoom(roomID, token, {userID, userName}, {userUpdate: true});
Note: If the roomID you entered does not exist, a new room will be created, and you will be logged in automatically when you call the loginRoom method.
You can view the room’s status with callbacks. Use the code below to implement the following callbacks:
roomStateUpdate: Callback for updates on the current user’s room connection status.
// Callback for updates on the current user's room connection status.
zg.on('roomStateUpdate', (roomID,state,errorCode,extendedData) => {
    if (state == 'DISCONNECTED') {
        // Disconnected from the room
    }

    if (state == 'CONNECTING') {
        // Connecting to the room
    }

    if (state == 'CONNECTED') {
        // Connected to the room
    }
})
roomUserUpdate: A callback function that receives updates on the status of other users in the room.
 // Callback for updates on the status of the users in the room.
zg.on('roomUserUpdate', (roomID, updateType, userList) => {
    console.warn(
        `roomUserUpdate: room ${roomID}, user ${updateType === 'ADD' ? 'added' : 'left'}`,
        JSON.stringify(userList),
    );
});
roomStreamUpdate: A callback that receives status updates for the streams in the room.
// Callback for updates on the status of the streams in the room.
zg.on('roomStreamUpdate', async (roomID, updateType, streamList, extendedData) => {
    if (updateType == 'ADD') {
        // New stream added, start playing the stream.
    } else if (updateType == 'DELETE') {
        // Stream deleted, stop playing the stream.
    }
});
Step 4: Publishing Streams
To create a local audio and video stream, call the createStream method. By default, the engine captures audio and video data from the microphone.
// After calling the CreateStream method, you need to wait for the ZEGOCLOUD server to return the local stream object before any further operation.
const localStream = await zg.createStream({camera :{audio:true,video:false}});
// Get the audio tag.
const localAudio = document.getElementById('local-audio');
// The local stream is a MediaStream object. You can render audio by assigning the local stream to the srcObject property of video or audio.
localAudio.srcObject = localStream;
To start publishing a local audio and video stream to remote users, call the startPublishingStreammethod with the following parameters:
- a stream ID as the
streamIDparameter - The media stream object was obtained in the previous step as a
localStreamparameter.
// localStream is the MediaStream object created by calling creatStream in the previous step.
zg.startPublishingStream(streamID, localStream)
To check the status and information of a published stream, use the callbacks listed below:
publisherStateUpdate: A callback that receives updates on the status of stream publishing.
zg.on('publisherStateUpdate', result => {
    // Callback for updates on stream publishing status.
})
publishQualityUpdate: A callback for reporting the quality of stream publishing.
zg.on('publishQualityUpdate', (streamID, stats) => {
    // Callback for reporting stream publishing quality.
})
Step 5: Playing Streams
We published an audio stream in the previous section. We can play the stream by calling the startPlayingStream method with the corresponding stream ID passed to the streamID parameter.
const remoteStream = await zg.startPlayingStream(streamID);

// The remoteVideo object is the <video> or <audio> element on your webpage.
remoteAudio.srcObject = remoteStream;
The following are some common event callbacks related to streaming:
playerStateUpdate: A callback that receives updates on the stream’s playing status.
zg.on('playerStateUpdate', result => {
    // Callback for updates on stream playing status.
})
playQualityUpdate: A callback for reporting the quality of the stream’s playback.After stream playback starts, the SDK sends out the streaming quality data (resolution, frame rate, bit rate, etc.) through this callback.
zg.on('playQualityUpdate', (streamID,stats) => {
    // Callback for reporting stream playing quality.
})
Step 6: Stop publishing streams
To stop publishing a local audio and video stream to remote users, call the stopPublishingStreammethod with the stream ID to be stopped in the streamID parameter.
zg.stopPublishingStream(streamID)Step 7: Destroy Stream
To destroy a local media stream, call the destroyStream method.
// localStream is the MediaStream object created when calling the createStream method.
zg.destroyStream(localStream)
Step 8: Stop playing stream
To stop playing a remote audio and video stream, call the stopPlayingStreammethod with the corresponding stream ID passed to the streamID parameter.
zg.stopPlayingStream(streamID)Step 9: Log out of a room
To log out of a room, call the logoutRoom the method with the corresponding room ID passed to the roomIDparameter.
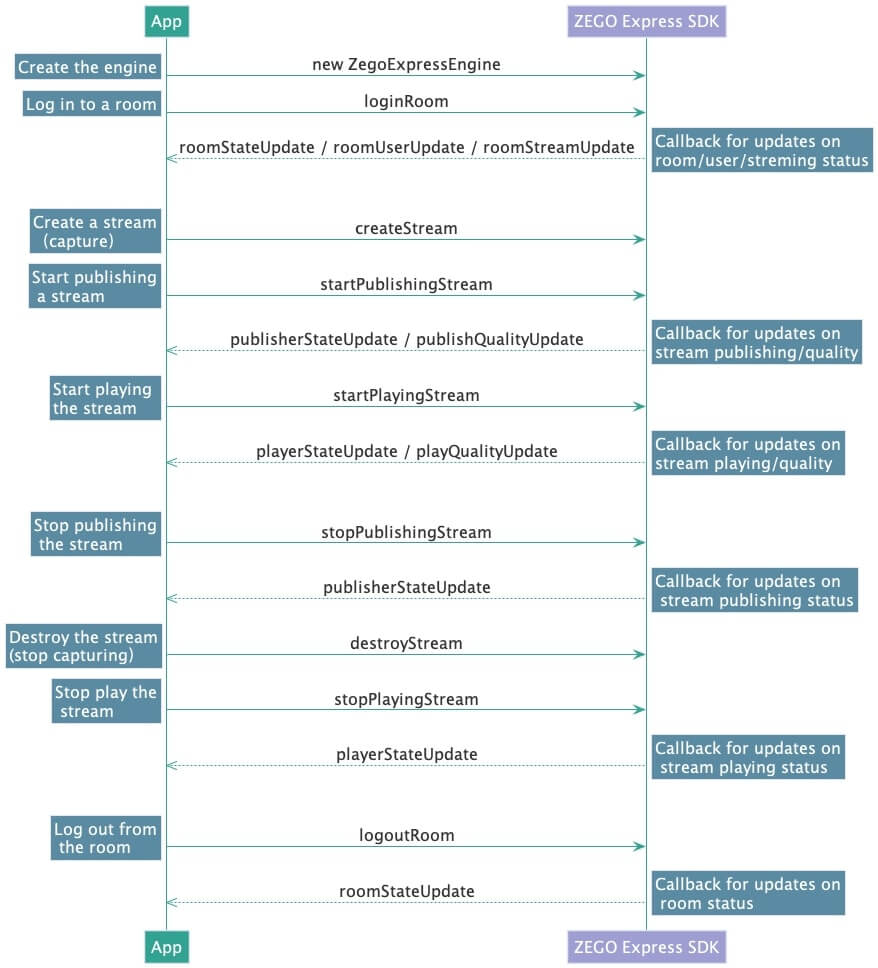
zg.logoutRoom(roomID)The diagram below shows the API sequence of callbacks for this voice call app.
Run a demo
To test our real-time audio call features, visit the ZEGO Express Web Demo and enter the same AppID, Server, and RoomID to join the same room.
The voice call SDK is designed in a straightforward pattern. You can implement voice call and voice call recording features with ease. In this approach, to make AI integration simpler, you don’t have to spend a lot of time studying the use of APIs and low-level programming; all you have to do is focus on the implementation of business logic.
Read more:
Let’s Build APP Together
Start building with real-time video, voice & chat SDK for apps today!
