


In the wake of the COVID-19 pandemic, more and more offline calling situations are being moved online. So you might be wondering about how to add voice or video chat features to build your video call app? And I think you’ll know the answer when you’re done reading this.
Why Video Call App is important
Video call apps are important because they allow individuals and businesses to communicate and collaborate more effectively and efficiently. With the increasing trend of remote work and the need for virtual meetings, video call apps have become an essential tool for people to stay connected with each other, regardless of their location.
Video call apps provide several benefits, including the ability to see and hear each other in real-time, which helps to build stronger relationships. They also allow for sharing screens and documents, which facilitates collaboration and helps to increase productivity. Additionally, video call apps are cost-effective, as they eliminate the need for travel and reduce the expenses associated with physical meetings.
Overall, video call apps offer a convenient and reliable way for people to communicate and collaborate, making them an important tool in today’s fast-paced and globalized world.
3 Types of Video Call Apps
There are several types of video call apps available in the market, but here are three popular categories:
- Standalone video call apps – These are apps that are designed specifically for video calling and usually offer high-quality video and audio. Examples include Zoom, Skype, Google Meet, and FaceTime.
- Social media video call apps – These are apps that are integrated with social media platforms and allow users to make video calls with their contacts. Examples include WhatsApp, Facebook Messenger, and Instagram.
- Business video call apps – These are apps designed for businesses and offer features such as screen sharing, virtual backgrounds, and recording. Examples include Microsoft Teams, Cisco Webex, and GoToMeeting.
5 Best Video Call Apps
Exploring the best video call apps of 2024, here are five top contenders, each with distinct features and capabilities catering to various user needs:
1. Zoom
Zoom has become synonymous with video calling, serving both business and personal communication needs. Its widespread adoption was propelled by its reliability for hosting large video calls and a suite of features facilitating virtual meetings.
Key Features:
- Hosts up to 100 participants in its free version, with options for more in paid plans.
- Unlimited one-to-one meetings with a generous time limit for group meetings in the free tier.
- Features like screen sharing, virtual backgrounds, and meeting recording.
2. Google Meet
Seamlessly integrated with Google Workspace, Google Meet offers a straightforward solution for users deeply embedded in Google’s ecosystem, providing an accessible and efficient platform for professional-grade video conferencing.
Key Features:
- Integration with Google Calendar and other Workspace apps for streamlined scheduling and management.
- Live captioning for increased accessibility.
- Large meetings capacity, suitable for sizable team gatherings.
3. Microsoft Teams
Designed as a comprehensive collaboration suite, Microsoft Teams combines robust chat, video conferencing, and file storage functionalities, making it an ideal choice for businesses looking for an all-in-one communication solution.
Key Features:
- Deep integration with Office 365 tools for real-time collaboration on documents.
- Extensive meeting and collaboration features, including breakout rooms and virtual “Together mode”.
- Advanced security and compliance capabilities, fitting for enterprise use.
4. Webex Meetings
Focused on delivering high-quality video and audio, Webex Meetings is a powerful tool for professionals requiring reliable and secure communication channels for virtual meetings, webinars, and collaborative projects.
Key Features:
- HD video and superior audio quality, supporting extensive participant numbers.
- Screen sharing, polling, and Q&A features for interactive meetings.
- Strong security measures, including end-to-end encryption.
5. Skype
A pioneer in the realm of video calling, Skype offers a versatile platform for personal and business communication, featuring text, voice, and video options. Its accessibility across devices and operating systems makes it a reliable choice for millions worldwide.
Key Features:
- Free instant messaging, voice, and video calls to other Skype users.
- Ability to call landlines and mobile numbers at competitive rates.
- Screen sharing, call recording, and real-time translation for over 50 languages.
What are the Essential Features of the Video Call App
The essential features of a video call app can significantly influence its functionality and user satisfaction. Drawing from various sources, here’s a consolidated list of these key features:
- High-Quality Audio and Video: The primary purpose of a video call app is to provide clear and stable audio and video communication. This demands optimization for various network conditions to ensure consistent quality.
- User Authentication: Implementing secure login processes is crucial for user privacy and data protection. This ensures that access is limited to authorized users only.
- Text Messaging: Including a feature for users to send messages during a call adds flexibility to the communication options, allowing for information to be shared without interrupting the flow of conversation.
- Screen Sharing: Essential for presentations, collaborative work, or sharing content during a call, screen sharing enhances the app’s utility beyond simple video chats.
- Call Recording: This feature is invaluable for users who wish to review meetings, share them with others, or document discussions for future reference.
- Cross-Platform Compatibility: Ensuring the app works seamlessly across different operating systems and devices expands its accessibility, making it a more versatile communication tool.
How Can ZEGOCLOUD SDK Help Video Call App Development
ZEGOCLOUD SDK can significantly streamline the development of a video call app, catering to a broad range of needs from simple one-on-one calls to complex multiparty video interactions.
Here’s how it can assist in video call app development:
- Comprehensive Features: ZEGOCLOUD Video Call SDK includes a variety of functionalities essential for modern video calling apps, such as screen sharing, recording, virtual avatars, instant messaging, and more. This extensive feature set allows developers to create rich, interactive video experiences tailored to their specific needs.
- Ease of Integration: With ZEGOCLOUD, integrating video call capabilities into your app is straightforward, regardless of the platform you’re working with. The SDK supports a wide range of programming environments and platforms, including iOS, Android, Web, Flutter, React Native, Unity3D, and more, ensuring that you can easily incorporate video calling features into your application regardless of the underlying technology.
- High-Quality Communication: ZEGOCLOUD prioritizes ultra-high-quality audio and video communication, ensuring that your app provides a seamless and efficient communication experience. This focus on quality can help to enhance user satisfaction and engagement with your app.
- Customization and Control: Whether you’re looking for complete control over the app development process or seeking a more straightforward, budget-friendly solution, ZEGOCLOUD offers two types of SDKs to match your development phase and requirements. The Video Call SDK is perfect for those wanting to develop or upgrade features with maximum control, while the UIKits offer rapid development options for startups or those in the testing phase.
- Step-by-Step Guidance: ZEGOCLOUD provides detailed documentation and step-by-step guides to help developers through the integration process. For example, developers can quickly start a project using React or Flutter, authenticate users, create and manage video streams, and render video on the screen with just a few lines of code. This support significantly reduces development time and complexity, allowing you to focus on creating a user-friendly video-calling experience.
When is ZEGOCall SDK needed?
- For a developer who has never worked on a project before.
- For a business that needs to build an audio chat/ video chat app.
- For an existing app that needs a voice call/video call feature.
ZEGOCall SDK has a layered architecture so that it can meet different needs. Check out the figure below:

The demo app of ZEGOCall has already integrated the features required by a video call application, you can compile it directly into an app and make it go live.
We also provide two different SDKs for you: the CallUIKit and the Call SDK.
Choose to integrate the CallUIKit: If you want to customize the business logic and maintain the user list independently. Voice/video call interactions and UI are implemented by the CallUIKit.
Choose to integrate the Call SDK: If you want to customize the UI on your own. The transmission of underlying data, voice/video call connection, and others are implemented by the Call SDK.
How to Use ZEGOCLOUD for Video Call App
Step 1. Create a ZEGOCLOUD account
- Create an account in ZEGOCLOUD Official.
Step 2. Create a new project
- Create a project in ZEGOCLOUD Admin Console.
Step 3. Create a Firebase project
Create a Firebase project in the Firebase console. For more details, see Firebase Documentation.
Step 4. Deploy the Firebase Cloud Functions
ZEGO Call uses the Firebase Cloud Functions as the business server by default, we recommend you activate and deploy it before integrating the ZEGOCall SDK.
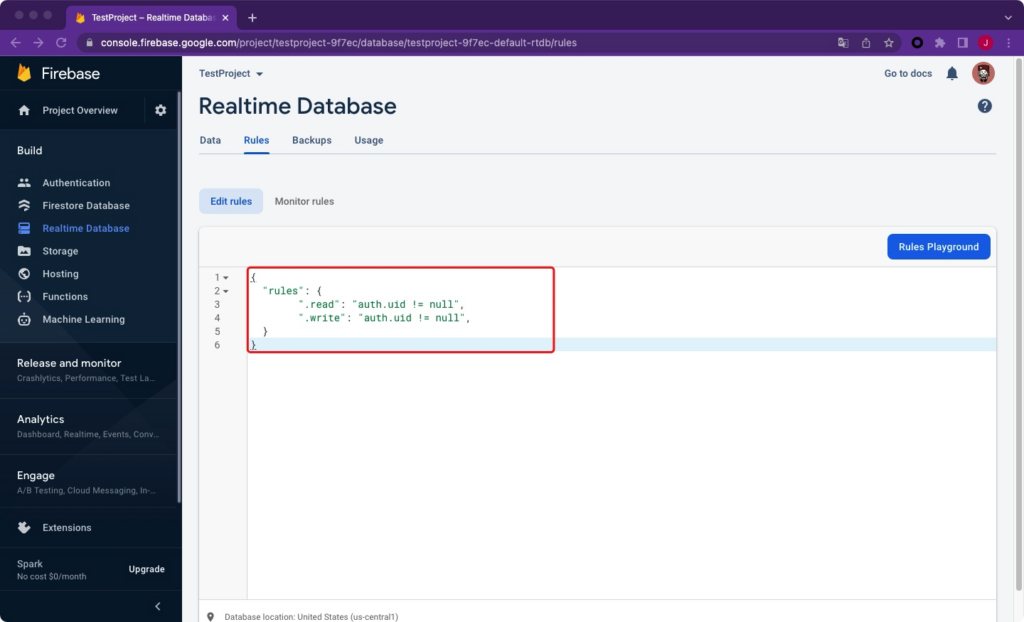
1 Create a new Realtime Database in Firebase.
2 Edit the rules of the Realtime Database by adding the following:
{
  "rules": {
        ".read": "auth.uid != null",
        ".write": "auth.uid != null",
  }
}
3 Install the CLI via npm.
npm install -g firebase-tools
4 Run the firebase login to log in via the browser and authenticate the firebase tool.
5 Run firebase init functions. The tool gives you an option to install dependencies with npm. It is safe to decline if you want to manage dependencies in another way, though if you do decline you’ll need to run npm install before emulating or deploying your functions.
6 Download the Cloud function sample code.
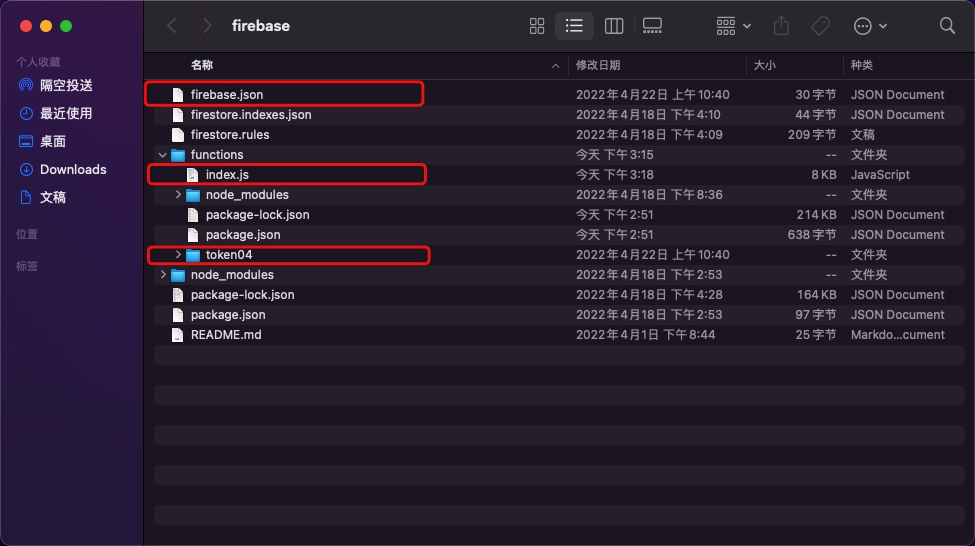
7 Copy the firebase.json, functions\index.js files and functions\token04 folder in the sample code to your cloud function project, overwrite files with the same name.
8 Modify the index.js file, fill in the AppID and ServerSecret you get from ZEGOCLOUD Admin Console correctly.
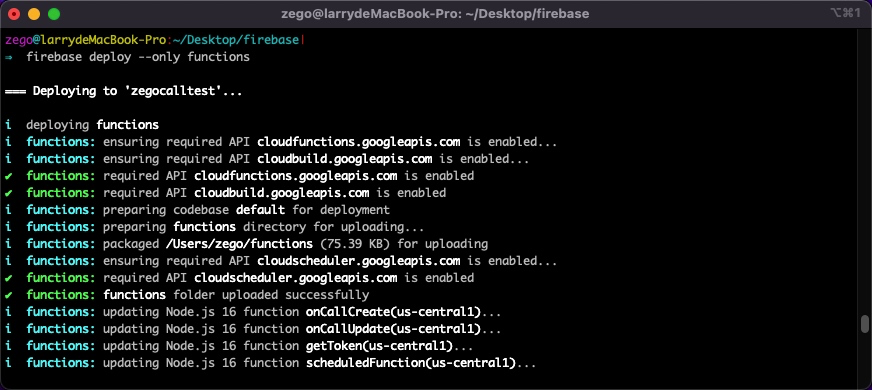
9 In Firebase CLI, run the firebase deploy --only functions command to deploy the cloud functions.
Step 5: Copy file into the project
Follow these steps to integrate the ZEGOCallUIKit:
1 Download the Sample codes, import the zegocall and zegocalluikit modules to your project root directory (Create a new project if you don’t have an existing project).
2 Add the following code to the settings.gradle file:
    include ':zegocall'
    include ':zegocalluikit'
3 Modify the build.gradle file of your application (in the app folder), add the following code:
    ...
    apply plugin: 'com.google.gms.google-services'
    apply plugin: 'com.google.firebase.crashlytics'

    android {
        ...
    }

    dependencies {
        ...

        // Google Sign In SDK (only required for Google Sign In)
        implementation 'com.google.android.gms:play-services-auth:20.1.0'
        implementation project(path: ':zegocalluikit')
    }
4 Modify the build.gradle file of your project, add the following code:
    buildscript {
        repositories {
            maven { url 'https://www.jitpack.io' }
            ...
        }
        dependencies {
            ...
            classpath 'com.google.gms:google-services:4.3.10'
            classpath 'com.google.firebase:firebase-crashlytics-gradle:2.8.1'
        }
    }
5 Add Firebase to your project by referring to the Add Firebase to your Android project: Step 2-3, and make sure you have downloaded and added the google-services.json file to your app directory.
6 Click Sync now.
Step 6: Initialize ZEGOCallUIKit
To initialize the ZEGOCallUIKit, get the ZegoCallManager instance, pass the AppID of your project.
// Initialize the ZEGOCallUIKit. We recommend you call this method when the application starts.
// appID is the AppID you get from ZEGOCLOUD Admin Console.
// The last parameter refers to the Application object of the this project.
ZegoCallManager.getInstance().init(appID, this, new ZegoTokenProvider() {
    @Override
    public void getToken(String userID, ZegoTokenCallback callback) {
     //imply with your own methed to get zego RTC token
     // String rtcToken = "";
    //  callback.onTokenCallback(errorCode, rtcToken);
        }
    });
Step 7: Get a token
After deploying the Firebase Cloud Functions, here we get a Token by calling the client API methods of Firebase Cloud Functions:
private void getTokenFromCloudFunction(String userID, long effectiveTime) {
    Map<String, Object> data = new HashMap<>();
    data.put("id", userID);
    data.put("effective_time", effectiveTime);

    FirebaseFunctions.getInstance().getHttpsCallable("getToken")
        .call(data)
        .continueWith(new Continuation<HttpsCallableResult, Object>() {
            @Override
            public Object then(@NonNull Task<HttpsCallableResult> task) throws Exception {
                return task.getResult().getData();
            }
        })
        .addOnCompleteListener(new OnCompleteListener<Object>() {
            @Override
            public void onComplete(@NonNull Task<Object> task) {
                if (!task.isSuccessful()) {
                    Exception e = task.getException();
                    if (e instanceof FirebaseFunctionsException) {
                        FirebaseFunctionsException ffe = (FirebaseFunctionsException) e;
                        FirebaseFunctionsException.Code code = ffe.getCode();
                        Object details = ffe.getDetails();
                    }
                    return;
                }
                HashMap<String, String> result = (HashMap<String, String>) task.getResult();
                String token = result.get("token");
            }
        });
}
Step 8: User login
ZEGOCall does not provide user management capabilities yet. You will need to have users log in to Firebase and then call the setLocalUser method to set user information to CallUIKit based on the login result.
Firebase provides multiple login authentication modes. The following uses Google login as an example.
For more modes, refer to the Firebase official.
// init google sign in
GoogleSignInOptions gso = new GoogleSignInOptions.Builder(GoogleSignInOptions.DEFAULT_SIGN_IN)
        .requestIdToken(CLIENT_ID)
        .requestEmail()
        .build();
GoogleSignInClient mGoogleSignInClient = GoogleSignIn.getClient(this, gso);

// when button is clicked,invoke this
private void signIn() {
    Intent signInIntent = mGoogleSignInClient.getSignInIntent();
    startActivityForResult(signInIntent, RC_SIGN_IN);
}

// overwrite onActivityResult to get google sign in result
@Override
public void onActivityResult(int requestCode, int resultCode, Intent data) {
    super.onActivityResult(requestCode, resultCode, data);

    // Result returned from launching the Intent from GoogleSignInApi.getSignInIntent(...);
    if (requestCode == RC_SIGN_IN) {
        Task<GoogleSignInAccount> task = GoogleSignIn.getSignedInAccountFromIntent(data);
        try {
            // Google Sign In was successful, authenticate with Firebase
            GoogleSignInAccount account = task.getResult(ApiException.class);
            AuthCredential credential = GoogleAuthProvider.getCredential(account.getIdToken(), null);
            FirebaseAuth.getInstance().signInWithCredential(credential)
                .addOnCompleteListener(new OnCompleteListener<AuthResult>() {
                    @Override
                    public void onComplete(@NonNull Task<AuthResult> task) {
                    if (task.isSuccessful()) {
                        // Sign in success, update UI with the signed-in user's information
                        Log.d(TAG, "signInWithCredential:success");
                        FirebaseUser currentUser = FirebaseAuth.getInstance().getCurrentUser();
                        ZegoCallManager.getInstance().setLocalUser(currentUser.getUid(), currentUser.getDisplayName());
                    } else {
                        // If sign in fails, display a message to the user.
                        Log.w(TAG, "signInWithCredential:failure", task.getException());
                    }
                }
            });
        } catch (ApiException e) {
            // Google Sign In failed, update UI appropriately
            Log.w(TAG, "Google sign in failed", e);
        }
    }
}
Step 9: Make outbound calls
To make an outbound voice call, call the callUser method and set the zegoCallType parameter to ZegoCallType.Voice.
// shows how to request camera and audio permission at run time
String[] permissionNeeded = {
        "android.permission.CAMERA",
        "android.permission.RECORD_AUDIO"};

if (Build.VERSION.SDK_INT >= Build.VERSION_CODES.M) {
    if (ContextCompat.checkSelfPermission(this, "android.permission.CAMERA") != PackageManager.PERMISSION_GRANTED ||
        ContextCompat.checkSelfPermission(this, "android.permission.RECORD_AUDIO") != PackageManager.PERMISSION_GRANTED) {
        requestPermissions(permissionNeeded, 101);
    }
}
You can make a call after getting the access permission of the camera and microphone.
// userInfo refers to the user info(ID and name) of the user you want call.
// ZegoCallType.Voice indicates that you make a voice call.
ZegoCallManager.getInstance().callUser(userInfo, ZegoCallType.Voice);
To make an outbound video call, call the callUser method and set the zegoCallType parameter to ZegoCallType.Video.
// userInfo refers to the user info(ID and name) of the user you want call.
// ZegoCallType.Video indicates that you make a video call.
ZegoCallManager.getInstance().callUser(userInfo, ZegoCallType.Video);
After making a call, the CallUIKit shows the UI of the current state automatically for both the callee and caller (integrated the CallUIKit is required), and, you can operate on the UI for further operations.
Step 10: Take incoming calls
To receive in-time notifications when receiving incoming calls, call the startListen method to listen for the call invitations. The corresponding UI displays and you can operate on the UI for further calling responses.
// Listen for the call invitations.
// Pass the current Activity.
ZegoCallManager.getInstance().startListen(this);
When the app is running in the front: the following black pop-up prompts automatically when the callee receives an incoming call (make a voice call for illustration)
When the app is running in the background, the callee sees the following black pop-up after giving the app permission to send offline notifications. Read the document canDrawOverlays to learn more. Different phone brands, like OPPO and Vivo, may need different settings depending on the operating system and version.
Step 11: End incoming calls
To stop listening for incoming calls, call the stopListen method. You won’t receive notifications after calling this method.
// Stop listening for the incoming calls.
// Pass the same Activity that you used to start listening for the incoming calls.
ZegoCallManager.getInstance().stopListen(this);
Step 12: Offline notifications
The Firebase Cloud Functions has implemented the offline notifications of the Firebase cloud message, and it sends a data type fcm message when making outbound calls. For clients to receive offline notifications, integrate the Firebase cloud message, and start the app when receiving the offline notifications:
@Override
public void onMessageReceived(RemoteMessage remoteMessage) {

    Map<String, String> data = remoteMessage.getData();

    boolean isAppNotStart = !AppUtils.isAppForeground() && ActivityUtils.getActivityList().isEmpty();
    boolean isDeviceRestart = AppUtils.isAppForeground() && ActivityUtils.getActivityList().isEmpty();
    if (isAppNotStart || isDeviceRestart) {
        if (data.size() > 0) {
            AppUtils.relaunchApp();
        }
    }
}
Step 13: Upload logs
When you encounter problems when using your app, call the uploadLog method to upload logs for us to locate and help you faster.
ZegoCallManager.getInstance().uploadLog(errorCode -> {
    // Callback for the result of upload SDK logs.
});
Step 14: Deinitialize ZEGOCallUIKit
After finishing using the ZEGO Call, call the unInit method to deinitialize the SDK.
ZegoCallManager.getInstance().unInit();As you have discovered some great techniques and directions to build a video call app with Firebase, you will be able to designate the complete procedure in no time. Moreover, combined with the compelling features, ZEGOCLOUD provides its users with all the necessary requirements. Influenced by quality, the user experience can be exceptional with ZEGOCLOUD video call SDK.
Subsequently, this article has provided a complete overview of how the process concludes. Build the perfect video call app with the help of the extensive services offered by ZEGOCLOUD.
Read more:
FAQ for Video Call APP
Q1: How can I ensure high-quality audio and video in my video call app?
High-quality audio and video can be ensured by optimizing the app’s performance across various network conditions. Implement adaptive bitrate streaming, which dynamically adjusts the video quality based on the user’s internet speed. Additionally, leverage hardware acceleration when available, use efficient codecs like H.264 for video and Opus for audio and implement noise suppression and echo cancellation techniques for clearer audio.
Q2: How do I manage user authentication and privacy in a video call app?
User authentication and privacy can be managed by implementing secure login mechanisms such as OAuth or token-based authentication. Ensure all data transmission is encrypted using protocols like TLS or SSL. Also, adopt end-to-end encryption for video and audio streams to protect user privacy. Regularly update your app’s security measures to address new vulnerabilities.
Q3: How can I handle network variations to maintain call stability in my video call app?
To handle network variations and maintain call stability, implement network quality checks, and adapt the call quality accordingly. Use techniques like packet loss concealment and jitter buffering to minimize the impact of poor network conditions. Offering users the option to switch to audio-only mode during low bandwidth conditions can also help maintain call continuity.
Q4: What are the best practices for UI/UX design in a video call app?
Best practices for UI/UX design in a video call app include ensuring a simple and intuitive interface, making key features easily accessible, and providing visual cues for call status (e.g., connecting, in-call). Also, consider mobile-first design, accommodate different screen sizes, and provide customizable video layouts. Accessibility features, such as captioning and voice commands, can enhance the user experience for all.
Q5: How can I scale my video call app to support more users?
Scaling your video call app to support more users involves optimizing your server infrastructure for high concurrency, utilizing cloud services for scalability, and implementing load-balancing techniques. Consider using a Content Delivery Network (CDN) to reduce latency and distribute load. Employing efficient data routing and reducing unnecessary data transmission can also help in scaling your app effectively.
Let’s Build APP Together
Start building with real-time video, voice & chat SDK for apps today!
