


In today’s digital landscape, real-time communication is more important than ever, and WebRTC has become a go-to technology for building seamless video call applications. With ZEGOCLOUD’s WebRTC SDK, developers can easily integrate high-quality, low-latency video calling features into their apps without the complexity of managing peer-to-peer connections from scratch. This guide will walk you through the key steps to get started, from setting up your environment to implementing a fully functional video call feature.
What is WebRTC?
WebRTC (Web Real-Time Communication) is an open-source technology that enables real-time communication of audio, video, and data directly between browsers and devices, without requiring plugins or additional software. It allows for peer-to-peer connections, making it ideal for applications like video calls, voice chats, file sharing, and live streaming.
WebRTC works by capturing media from a user’s device, establishing a peer-to-peer connection for streaming audio and video, and enabling data transmission between users. Its ability to provide low-latency, secure communication makes WebRTC a powerful tool for building interactive, real-time applications across web and mobile platforms.
How Does WebRTC Work?
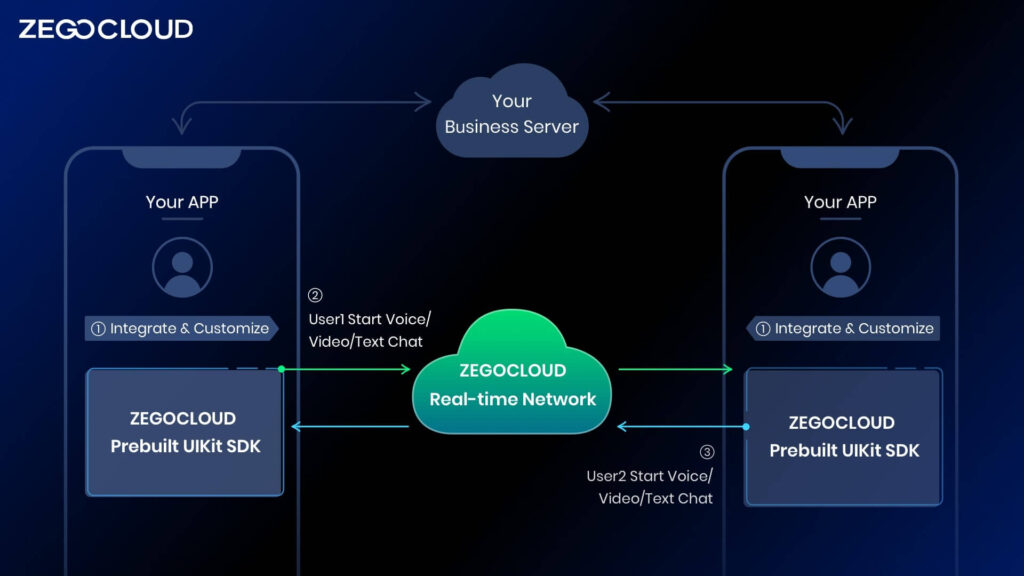
WebRTC works by enabling real-time communication between two or more devices through peer-to-peer connections, allowing users to share audio, video, and data directly. The process starts with media capture, where WebRTC accesses the user’s camera and microphone using the browser’s getUserMedia API.
Once the media is captured, WebRTC establishes a peer-to-peer connection through the RTCPeerConnection API. To create this connection, the two peers exchange network information and connection details (such as IP addresses) via a signaling server. WebRTC then handles NAT traversal using ICE (Interactive Connectivity Establishment) to find the best path for data to travel between devices, even when they are behind firewalls or NATs.
After the connection is established, media (audio and video) and data are streamed directly between the peers using encrypted communication channels, ensuring privacy and security. For sending non-media data, WebRTC also uses the RTCDataChannel, which allows for real-time data sharing, such as file transfers or gaming data. This architecture minimizes latency and reduces the need for intermediaries, making WebRTC ideal for live, real-time interactions like video calls, conferencing, and streaming.
Flow of a WebRTC Video Call
The flow of a WebRTC video call involves several steps, from establishing a connection to maintaining real-time communication between peers. Here’s an overview of the key stages in the process:
1. Media Capture:
The process starts by using the getUserMedia() API to access the user’s camera and microphone, capturing audio and video streams.
2. Signaling:
Peers exchange connection information (like SDP and ICE candidates) through a signaling server, such as WebSockets, to establish communication.
3. Peer Connection:
WebRTC uses RTCPeerConnection and ICE to find the best path for a peer-to-peer connection, even behind firewalls or NATs.
4. Media Streaming:
Once connected, audio and video are streamed directly between peers using RTP, ensuring real-time, low-latency communication. RTCDataChannel can also be used for data sharing.
5. Connection Maintenance and Termination:
WebRTC adapts to network conditions during the call, and once the call ends, the connection is closed and resources are released.
How to Make a WebRTC Video Calling App with ZEGOCLOUD
Creating a video calling app from scratch using WebRTC can be complex, requiring careful attention to peer-to-peer connections, media streaming, and real-time communication protocols. However, with ZEGOCLOUD’s WebRTC video call SDK, building a video calling app becomes much simpler, as it handles the heavy lifting involved in WebRTC implementation, allowing developers to focus on the core functionalities of their app. In this guide, we’ll walk you through how to make a video calling app with WebRTC using ZEGOCLOUD.
Why Use ZEGOCLOUD for WebRTC Video Calling?
ZEGOCLOUD offers a powerful WebRTC SDK that simplifies the process of building a video calling app. Instead of managing the intricate details of WebRTC—such as connection setup, media streaming, and security—you can leverage ZEGOCLOUD’s easy-to-use SDK to accelerate development. Here are some key advantages:
- Scalability: ZEGOCLOUD supports one-on-one video calls and multi-party conferencing, making it ideal for both personal and business applications.
- Low Latency: ZEGOCLOUD provides a high-quality, low-latency video experience, ensuring smooth communication.
- Cross-platform Compatibility: Build your app for web, iOS, and Android with a unified SDK that works across platforms.
- Pre-built UIKits: ZEGOCLOUD offers customizable UIKits for video calls, so you don’t need to design interfaces from scratch.
Preparation for WebRTC SDK
- A ZEGOCLOUD developer account–Sign up
- The latest version of Chrome.
- Basic understanding of Web development
ZEGOCLOUD SDK Integration for WebRTC Video Calling
Importer Call Kit SDK
- Create a new HTML file and add the following code to the file.
- Then, replace the
appIDandserverSecretparameters in the following code with theAppIDandServer Secretof your project.
<html>
  <head>
    <style>
      #root {
        width: 100vw;
        height: 100vh;
      }
    </style>
  </head>

  <body>
    <div id="root"></div>
  </body>
  <script src="https://unpkg.com/@zegocloud/zego-uikit-prebuilt/zego-uikit-prebuilt.js"></script>
  <script>
    function getUrlParams(url = window.location.href) {
      let urlStr = url.split("?")[1];
      return new URLSearchParams(urlStr);
    }
    // Generate a Kit Token by calling a method.
    // @param 1: appID
    // @param 2: serverSecret
    // @param 3: Room ID
    // @param 4: User ID
    // @param 5: Username
    const roomID =
      getUrlParams().get("roomID") ||
      "room_" + Math.floor(Math.random() * 1000);
    const userID = Math.floor(Math.random() * 10000) + "";
    const userName = "userName" + userID;
    const appID = 221417685;
    const serverSecret = "be15e8ea06d70c26c704f87ed661b6aa";
    const kitToken = ZegoUIKitPrebuilt.generateKitTokenForTest(
      appID,
      serverSecret,
      roomID,
      userID,
      userName
    );

    const zp = ZegoUIKitPrebuilt.create(kitToken);
    zp.joinRoom({
      container: document.querySelector("#root"),
      sharedLinks: [
        {
          url:
            window.location.origin +
            window.location.pathname +
            "?roomID=" +
            roomID,
        },
      ],
      scenario: {
        mode: ZegoUIKitPrebuilt.OneONoneCallGroupCall,
      },
    });
  </script>
</html>
Group-call configuration
Group-call scenarios can be implemented by configuring the parameters of the joinRoom function.
- Set
scenario.modetoZegoUIKitPrebuilt.GroupCall
// ...
zp.joinRoom({
        //...
        scenario: {
           mode: ZegoUIKitPrebuilt.GroupCall
        },
        //...
});
//...
Audio-only call configuration
Audio-only call scenarios can also be implemented by configuring the parameters of the join room function.
- Set the
turnOnCameraWhenJoiningtofalseto turn off the camera. - Set the
showMyCameraToggleButtontofalseto hide the toggle button forenabling/disablingthe camera. - Set the
showAudioVideoSettingsButtontofalseto hide the advanced setting button for audio and video. - Set the
showScreenSharingButtontofalseto hide the screen-sharing button.
// ....
zp.joinRoom({
     // ...,
    turnOnCameraWhenJoining: false,
    showMyCameraToggleButton: false,
    showAudioVideoSettingsButton: false,
    showScreenSharingButton: false;
     // ...
});
Run a Demo
Using the Web Server for Chrome plugin or any web server, start the html created in the previous step.
Conclusion
WebRTC has revolutionized real-time communication, offering seamless video and audio call experiences with low latency and high reliability. Whether you’re building a video conferencing app or integrating real-time features into your platform, WebRTC provides a solid foundation. For developers seeking advanced tools and simplified integration, platforms like ZEGOCLOUD enhance WebRTC capabilities with pre-built UIKits, global scalability, and robust support, making it easier than ever to create outstanding video call applications.
Read More:
FAQ
Q1: Is WebRTC good for video calls?
Yes, WebRTC is excellent for video calls. It provides low-latency, real-time communication capabilities, making it ideal for high-quality video calls. It supports peer-to-peer connections, reducing server dependency, and is widely adopted in applications like video conferencing, telehealth, and gaming.
Q2: What is WebRTC calling?
WebRTC calling refers to real-time audio and video communication between devices using WebRTC (Web Real-Time Communication) technology. It enables direct peer-to-peer connections, allowing users to make video and voice calls directly through their web browsers or apps without requiring additional plugins.
Q3: How does WebRTC video work?
WebRTC video works by establishing a secure, peer-to-peer connection between devices using protocols like ICE (Interactive Connectivity Establishment) for network traversal. Media streams, such as video and audio, are captured locally, encoded, and transmitted in real-time to the remote peer. WebRTC handles signaling, media negotiation, and encryption to ensure smooth and secure video communication.
Q4: Can WebRTC be used for messaging?
Yes, WebRTC can be used for messaging. While its primary use is for real-time video and audio communication, it also supports data channels that allow text and file sharing between peers. This makes it versatile for applications requiring both messaging and media communication.
Let’s Build APP Together
Start building with real-time video, voice & chat SDK for apps today!
