


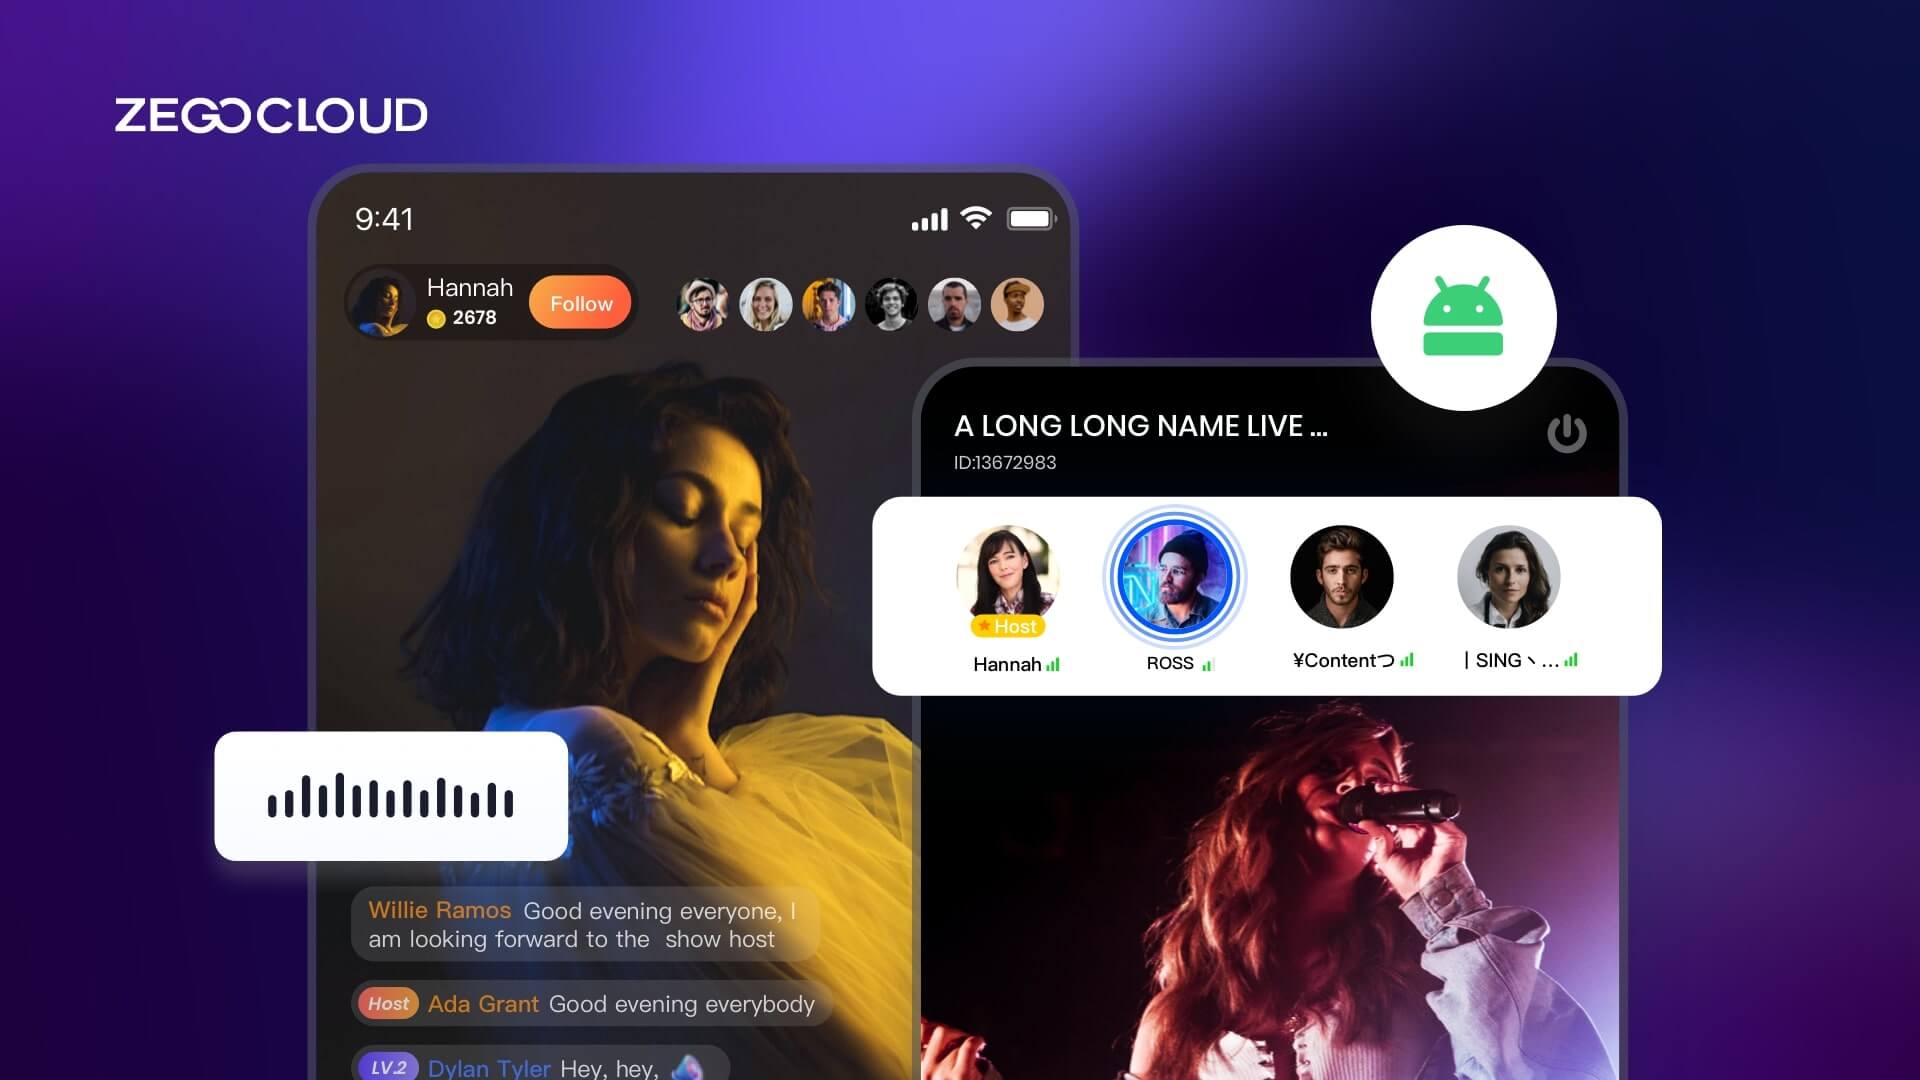
Building an Android live streaming app opens up exciting possibilities for creating interactive and engaging user experiences. Whether you’re looking to stream live events, host webinars, or launch your own video platform, this guide will walk you through the essential steps to get started. From setting up your development environment to integrating real-time video streaming using powerful tools like ZEGOCLOUD, you’ll learn how to create a high-performance live streaming app tailored to your needs.
Why ZEGOCLOUD SDK for Android Live Streaming APP
ZEGOCLOUD Live Streaming SDK is a powerful tool that provides complete development documentation and sample code to allow developers to integrate live streaming capabilities into their applications. It is an efficient live-streaming solution that can be used for various applications and platforms, including iOS, Android, Web, Flutter, and React Native.
It provides rich features including audio and video capture, encoding, streaming, playback, transcoding, cloud recording, real-time messaging, and co-streaming. Moreover, it supports different video qualities including high definition, standard definition, and smooth, and provides rich audio and video processing capabilities such as filters, beauty effects, and green screens.
What’s more important, ZEGOCLOUD offers pre-built UIKits and UI Components to let developers build live streaming apps in the shortest possible time. With low-code UIKits, developers can complete their live streaming app for Android with only a few lines of code. Now I will walk you step-by-step through building the best live streaming service using ZEGOCLOUD UIKits.
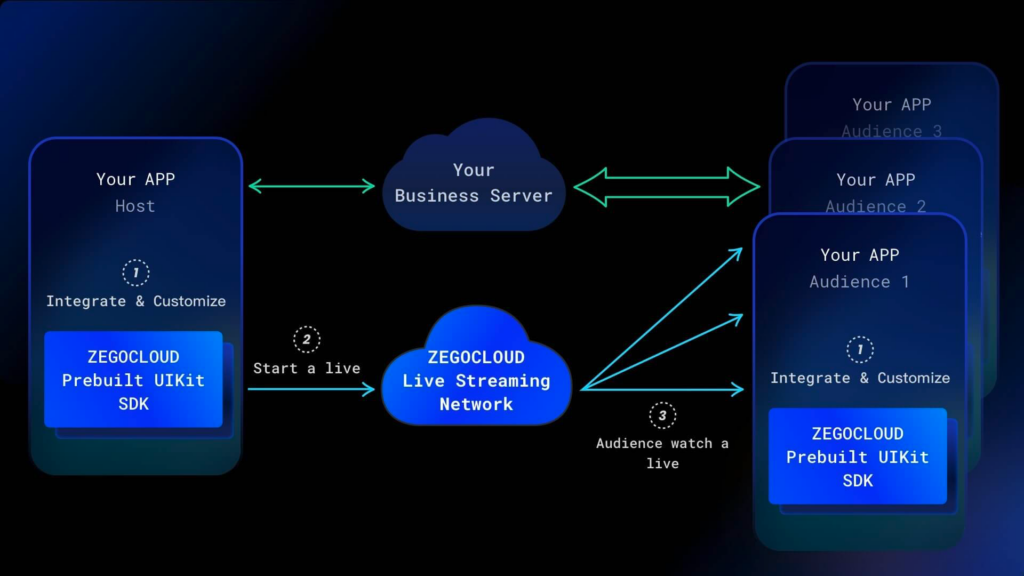
As shown in the figure, the android Live Streaming Kit is responsible for handling all the logic and UI of the stream services function. Include:
- UI and interaction of the live Streaming module
- Message sending and display
- Audio and video data transmission
- Camera and microphone management
- Live Viewer Statistics
You only need to implement business-related logic. For example:
- User login registration
- Live List Management
- Top up and send gifts, etc.
Easy Steps to Create Android Live Streaming APP
To create an Android live streaming app with ZEGOCLOUD UIKits, you can follow these general steps:
Preparation
- A ZEGOCLOUD developer account–Sign up
- Android Studio 2020.3.1 or later
- Devices with Android 5.0 or later
- Basic understanding of Android development
Implement live streaming
1. Create a project
Open your Android Studio ,click New Project- Empty Acticvity.
then change the Project Name, package name, project location, language, and min SDK if you need.
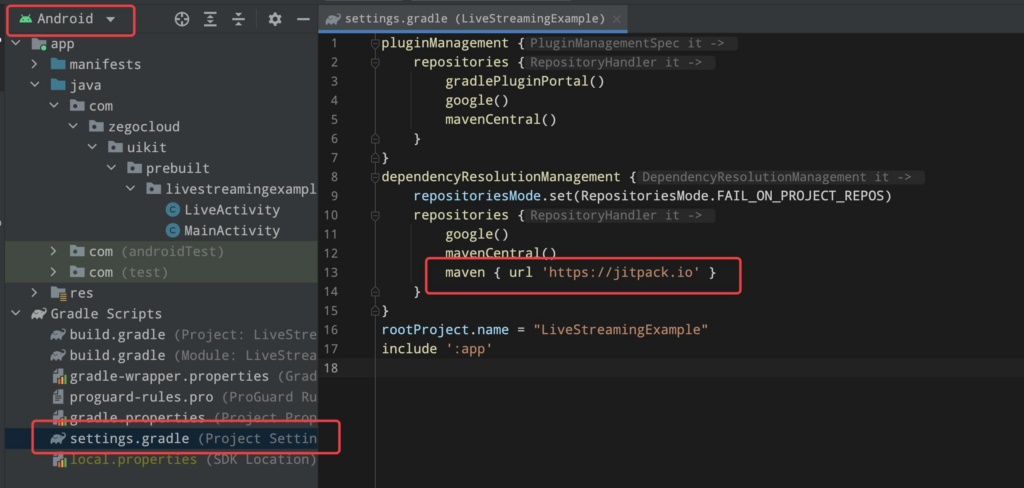
2. Add SDK to the project
You can use jitpack to add SDK to your project.
- If your Android Gradle Plugin is 7.1.0 or later: enter your project’s root directory, open the
settings.gradlefile to add the jitpack.
dependencyResolutionManagement {
    repositoriesMode.set(RepositoriesMode.FAIL_ON_PROJECT_REPOS)
        repositories {
            google()
            mavenCentral()
            maven { url 'https://www.jitpack.io' } // <- Add this line.
    }
}
- If your Android Gradle Plugin is earlier than 7.1.0: enter your project’s root directory, open the
build.gradlefile to add the jitpack.
allprojects {
repositories {
google()
mavenCentral()
maven { url "https://jitpack.io" } // <- Add this line.
}
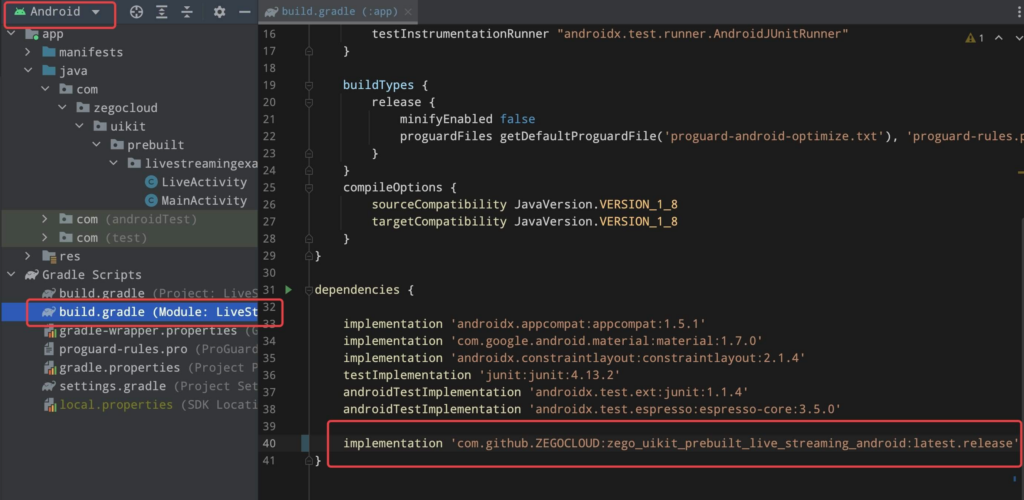
}Next you need to add SDK dependencies in ‘build.gradle’.
dependencies {
    ...
    implementation 'com.github.ZEGOCLOUD:zego_uikit_prebuilt_live_streaming_android:latest.release'   // add this line in your module-level build.gradle file's dependencies, usually named [app].
}
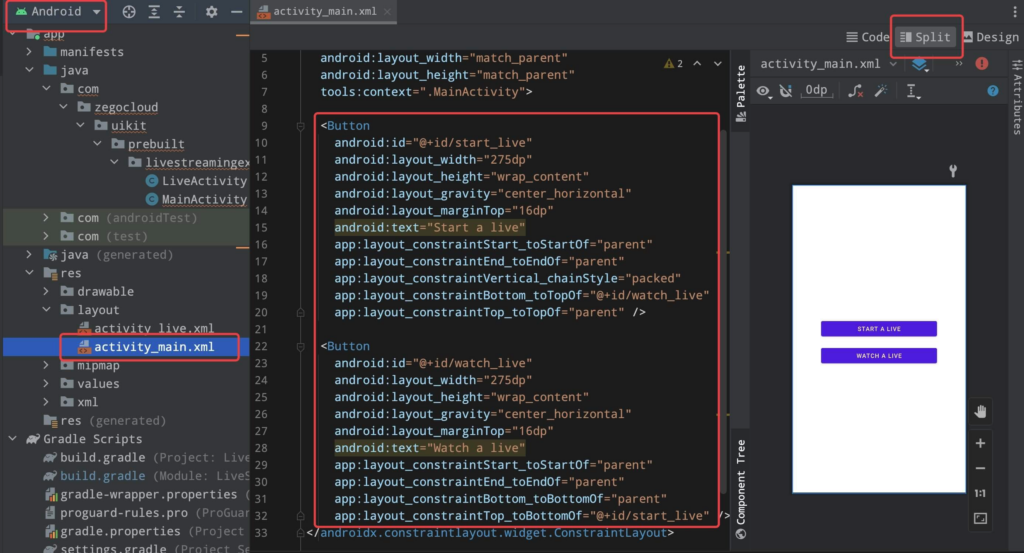
3. Add live button
Open the activity_main.xml file, add a start live button and a watch live button.
    <?xml version="1.0" encoding="utf-8"?>
    <androidx.constraintlayout.widget.ConstraintLayout xmlns:android="http://schemas.android.com/apk/res/android"
        xmlns:app="http://schemas.android.com/apk/res-auto"
        xmlns:tools="http://schemas.android.com/tools"
        android:layout_width="match_parent"
        android:layout_height="match_parent"
        tools:context=".MainActivity">

        <Button
            android:id="@+id/start_live"
            android:layout_width="275dp"
            android:layout_height="wrap_content"
            android:layout_gravity="center_horizontal"
            android:layout_marginTop="16dp"
            android:text="Start a live"
            app:layout_constraintStart_toStartOf="parent"
            app:layout_constraintEnd_toEndOf="parent"
            app:layout_constraintVertical_chainStyle="packed"
            app:layout_constraintBottom_toTopOf="@+id/watch_live"
            app:layout_constraintTop_toTopOf="parent" />

        <Button
            android:id="@+id/watch_live"
            android:layout_width="275dp"
            android:layout_height="wrap_content"
            android:layout_gravity="center_horizontal"
            android:layout_marginTop="16dp"
            android:text="Watch a live"
            app:layout_constraintStart_toStartOf="parent"
            app:layout_constraintEnd_toEndOf="parent"
            app:layout_constraintBottom_toBottomOf="parent"
            app:layout_constraintTop_toBottomOf="@+id/start_live" />
        </androidx.constraintlayout.widget.ConstraintLayout>
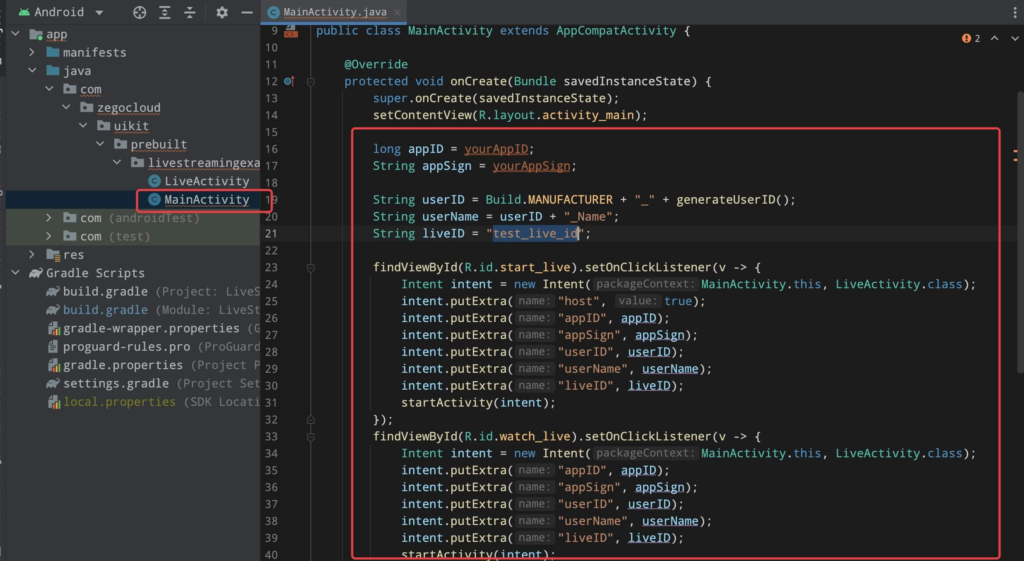
4. Add live page
Next, you need to create a new Empty Activity called LiveActivity. add click events for the buttons in step 2 to navigate to LiveActivity.
public class MainActivity extends AppCompatActivity {

    @Override
    protected void onCreate(Bundle savedInstanceState) {
        super.onCreate(savedInstanceState);
        setContentView(R.layout.activity_main);

        //Go to [ZEGOCLOUD Admin Console\|_blank](https://console.zegocloud.com/), get the `appID` and `appSign` of your project.
        long appID = yourAppID;
        String appSign = yourAppSign;
        // Specify the `userID` and `userName` for connecting the Live Streaming Kit service.`userID`, `userName`, and `liveID` can only contain numbers, letters, and underlines (_).
        String userID = ;
        String userName = ;
        // `liveID` represents the live streaming you want to start or watch (only supports single-host live streaming for now). Using the same `liveID` will enter the same live streaming.
        String liveID = ;

        findViewById(R.id.start_live).setOnClickListener(v -> {
            Intent intent = new Intent(MainActivity.this, LiveActivity.class);
            intent.putExtra("host", true);
            intent.putExtra("appID", appID);
            intent.putExtra("appSign", appSign);
            intent.putExtra("userID", userID);
            intent.putExtra("userName", userName);
            intent.putExtra("liveID", liveID);
            startActivity(intent);
        });

        findViewById(R.id.watch_live).setOnClickListener(v -> {
            Intent intent = new Intent(MainActivity.this, LiveActivity.class);
            intent.putExtra("appID", appID);
            intent.putExtra("appSign", appSign);
            intent.putExtra("userID", userID);
            intent.putExtra("userName", userName);
            intent.putExtra("liveID", liveID);
            startActivity(intent);
        });

    }
}
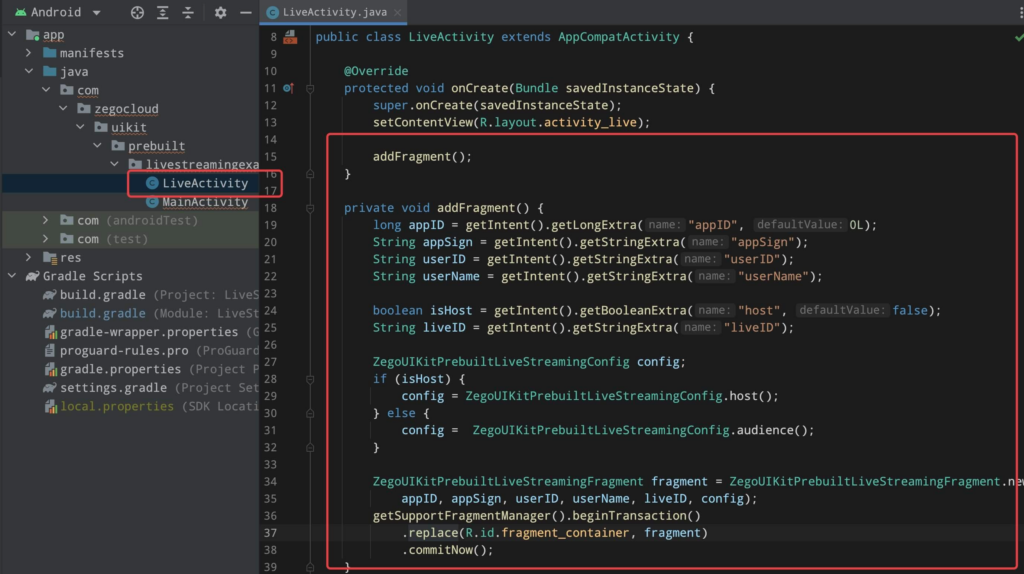
5. Add prebuilt UI to the project
Finally, you need to add ZegoUIKitPrebuiltLiveStreamingFragment provided by live streaming kit to LiveActivity.
public class LiveActivity extends AppCompatActivity {

    @Override
    protected void onCreate(Bundle savedInstanceState) {
        super.onCreate(savedInstanceState);
        setContentView(R.layout.activity_live);

        addFragment();
    }

    private void addFragment() {
        long appID = getIntent().getLongExtra("appID", 0L);
        String appSign = getIntent().getStringExtra("appSign");
        String userID = getIntent().getStringExtra("userID");
        String userName = getIntent().getStringExtra("userName");

        boolean isHost = getIntent().getBooleanExtra("host", false);
        String liveID = getIntent().getStringExtra("liveID");

        ZegoUIKitPrebuiltLiveStreamingConfig config;
        if (isHost) {
            config = ZegoUIKitPrebuiltLiveStreamingConfig.host();
        } else {
            config =  ZegoUIKitPrebuiltLiveStreamingConfig.audience();
        }

        ZegoUIKitPrebuiltLiveStreamingFragment fragment = ZegoUIKitPrebuiltLiveStreamingFragment.newInstance(
            appID, appSign, userID, userName, liveID, config);
        getSupportFragmentManager().beginTransaction()
            .replace(R.id.fragment_container, fragment)
            .commitNow();
    }
}
6. Custom Prebuilt UI
If you want to customize the UI, you can do it by modifying the properties of ZegoUIKitPrebuiltLiveStreamingConfig.
ZegoUIKitPrebuiltLiveStreamingConfig config = new ZegoUIKitPrebuiltLiveStreamingConfig();
config.turnOnCameraWhenJoining = false;
config.bottomMenuBarConfig.hostButtons = Arrays.asList(ZegoMenuBarButtonName.TOGGLE_CAMERA_BUTTON);
ZegoDialogInfo confirmDialogInfo = new ZegoDialogInfo();
confirmDialogInfo.title= "Leave confirm";
confirmDialogInfo.message= "Do you want to leave?";
confirmDialogInfo.cancelButtonName= "Cancel";
confirmDialogInfo.confirmButtonName= "Confirm";
config.confirmDialogInfo = confirmDialogInfo;
config.translationText.startLiveStreamingButton = "Start Live";
config.translationText.noHostOnline = "No host online";
ZegoUIKitPrebuiltLiveStreamingFragment fragment = ZegoUIKitPrebuiltLiveStreamingFragment.newInstance(appID, appSign, userID, userName, liveID, config);
Run a demo
Take action now, You can download the sample demo source code of this article, or consult us 24h technical support.
Conclusion
It’s clear that Android live streaming services applications are growing to be a significant element of culture. Additionally, there are many other app types available. One is still free to choose what they want to give potential consumers while building a live streaming services application that would compete with traditional TV, So joining the live streaming industry as soon as possible is a very correct choice.
Read more:
- 10 Best Live Streaming SDK Providers
- RTMP vs HLS vs WebRTC: Which is the Best Live Streaming Protocol?
FAQ
Q1: How long does it take to build an Android live streaming app?
The time it takes to build an Android live streaming app can vary depending on the complexity of the app and the developer’s experience. For a basic app with essential live streaming features, it typically takes around 4 to 8 weeks. If you require advanced features like user authentication, chat integration, or monetization options, the development time could extend to 12 weeks or more.
Q2: How much does it cost to develop an Android live streaming app?
The cost of developing an Android live streaming app can range from $10,000 to $50,000 or more, depending on factors like the app’s complexity, the development team’s location, and the features included. If you use a third-party SDK like ZEGOCLOUD, you may also need to factor in the cost of SDK usage, which is typically based on the number of active users, minutes streamed, or other usage metrics.
Q3: What are the common challenges in building an Android live streaming app?
Building an Android live streaming app comes with several challenges, including managing low-latency streaming, ensuring consistent video and audio quality across different network conditions, and handling device compatibility across various Android versions. Additionally, optimizing the app to handle high traffic during peak usage times and securing the live streams to prevent unauthorized access are also significant challenges. Ensuring scalability and providing a seamless user experience while maintaining performance under varying conditions can be particularly demanding.
Let’s Build APP Together
Start building with real-time video, voice & chat SDK for apps today!
