


These days, there are several different online meeting platforms that you can use to host your meetings, and the best part is that you can build them yourself! With a little bit of know-how, you can easily create an online meeting platform that is tailored specifically to your needs. In this article, we will show you how to build a Flutter video conferencing app by using ZEGOCLOUD SDK.
Why ZEGOCLOUD SDK for Flutter Video Conferencing Apps
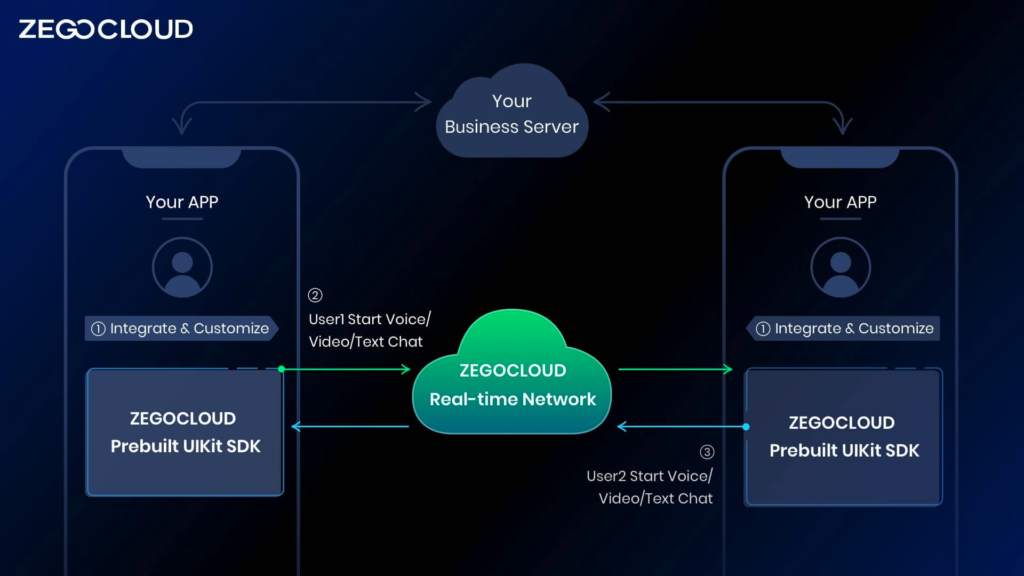
How do you make a video conferencing app with Flutter? If you’re looking for an easy and affordable way to get started with video conferencing platforms with Flutter, ZEGOCLOUD UIKits is a great option. This all-in-one kit includes everything you need to start online meetings. The kit is very easy to set up and use, and it’s a great way to get started with online meeting platforms if you’re not sure where to start.
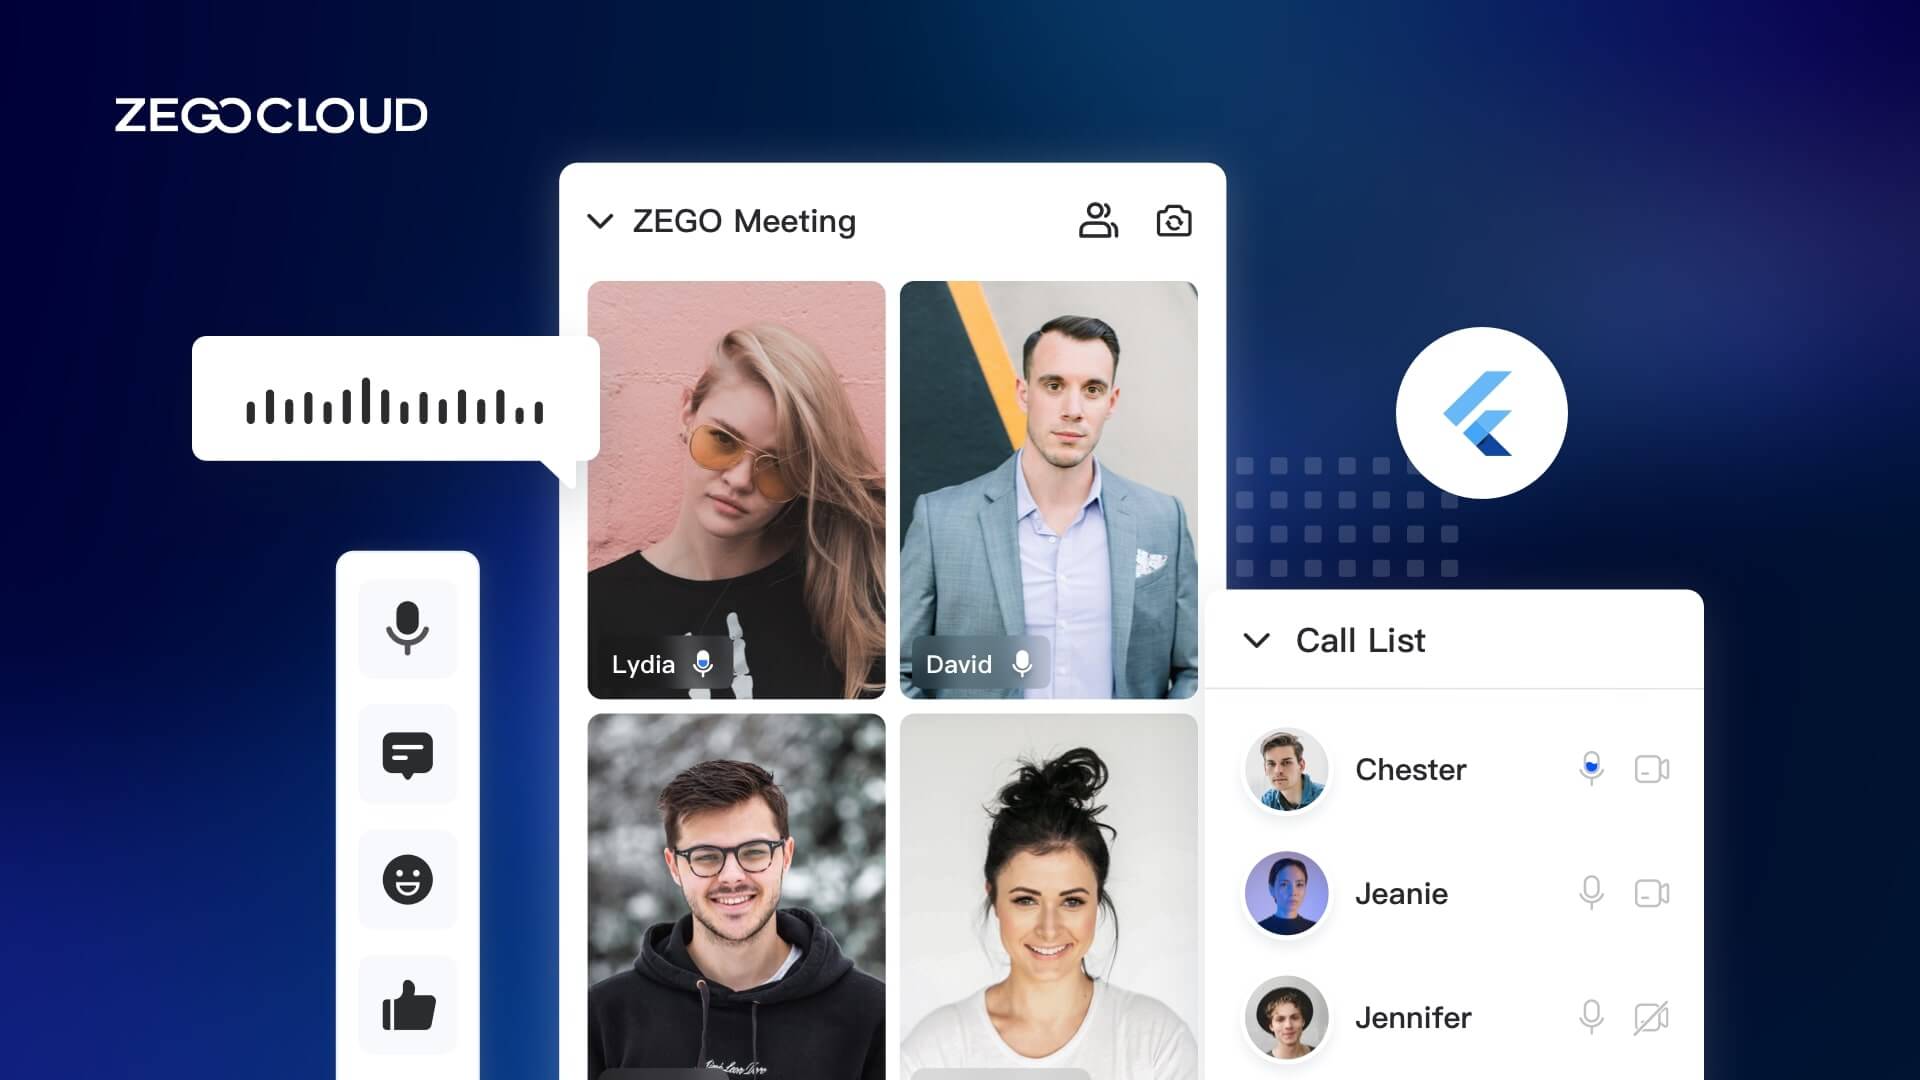
ZEGOCLOUD UIKIts includes a video conferencing kit for you to build online meeting platforms with flutter in low code. As shown in the figure, the functions provided by the video conference kit include:
- Multi-user audio/video meeting
- Adaptive video layouts
- Real-time sound waves display
- Customizable UI styles
- Device management
- Extendable top/bottom menu bar
- Customizable conference title
- Member List
- Conference join/leave notifications
Preparation
- A ZEGOCLOUD developer account–Sign up
- Flutter 1.12 or later.
- Basic understanding of Flutter development
UIKits SDK integration
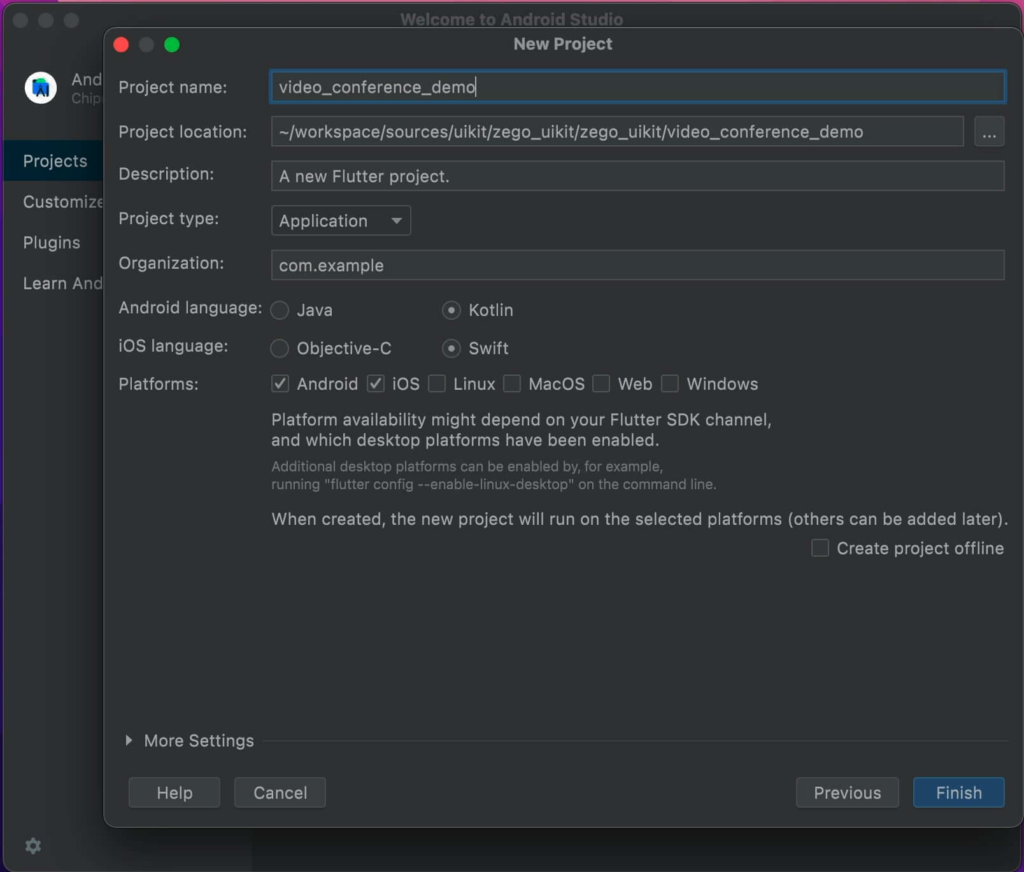
Create Project
First, you need to create a new project through Android Studio and create a new App project through File -> New -> New Flutter Project.
Import SDK
Next, you need to import video conference SDK, run the following code in your project root directory:
flutter pub add zego_uikit_prebuilt_video_conference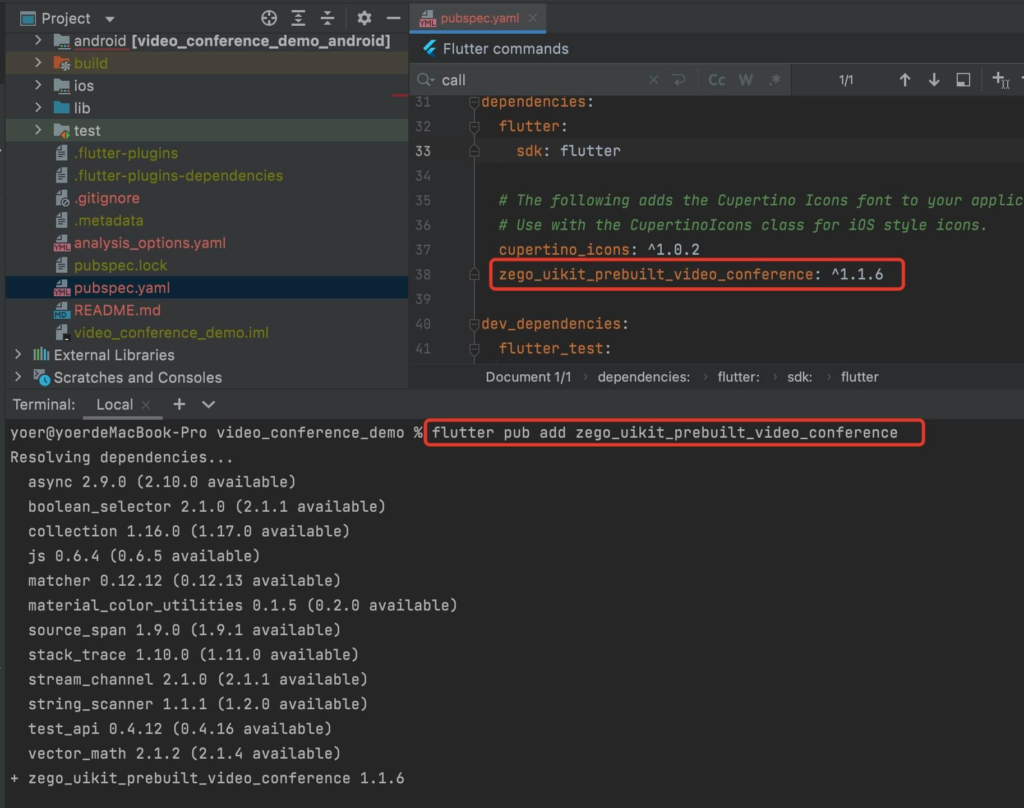
Implement Video Conference
Next, you need to use ZegoUIKitPrebuiltVideoConference to build an online meeting page.
import 'package:zego_uikit_prebuilt_video_conference/zego_uikit_prebuilt_video_conference.dart';

class VideoConferencePage extends StatelessWidget {
  final String conferenceID;

  const VideoConferencePage({required this.conferenceID, super.key});

  @override
  Widget build(BuildContext context) {
    return ZegoUIKitPrebuiltVideoConference(
        appID: yourAppID, // Fill in the appID that you get from ZEGOCLOUD Admin Console.
        appSign: yourAppSign, // Fill in the appSign that you get from ZEGOCLOUD Admin Console.
        conferenceID: conferenceID,
        userID: 'user_id',
        userName: "user_name",
        config: ZegoUIKitPrebuiltVideoConferenceConfig());
  }
}
Now, you can make an online conference by navigating to this VideoConferencePage.
Navigator.push(
    context,
    MaterialPageRoute(builder: (context) {
        return VideoConferencePage(
            conferenceID: "conference_id",
        );
    }),
);
Here is all the code for the demo
import 'dart:math';

import 'package:flutter/material.dart';
import 'package:zego_uikit_prebuilt_video_conference/zego_uikit_prebuilt_video_conference.dart';

final localUserID = Random().nextInt(1000).toString();

void main() {
  runApp(const MyApp());
}

class MyApp extends StatelessWidget {
  const MyApp({Key? key}) : super(key: key);

  @override
  Widget build(BuildContext context) {
    return const MaterialApp(home: HomePage());
  }
}

class HomePage extends StatefulWidget {
  const HomePage({Key? key}) : super(key: key);

  @override
  State<StatefulWidget> createState() => _HomePageState();
}

class _HomePageState extends State<HomePage> {
  /// Users who use the same conferenceID can in the same conference.
  var conferenceDTextCtrl = TextEditingController(text: "video_conference_id");

  @override
  Widget build(BuildContext context) {
    return Scaffold(
      body: Center(
        child: Padding(
          padding: const EdgeInsets.symmetric(horizontal: 10),
          child: Row(
            mainAxisAlignment: MainAxisAlignment.center,
            crossAxisAlignment: CrossAxisAlignment.center,
            children: [
              Expanded(
                child: TextFormField(
                  controller: conferenceDTextCtrl,
                  decoration: const InputDecoration(
                      labelText: "join a conference by id"),
                ),
              ),
              ElevatedButton(
                  onPressed: () {
                    Navigator.push(
                      context,
                      MaterialPageRoute(builder: (context) {
                        return VideoConferencePage(
                          conferenceID: conferenceDTextCtrl.text,
                        );
                      }),
                    );
                  },
                  child: const Text("join"))
            ],
          ),
        ),
      ),
    );
  }
}

class VideoConferencePage extends StatelessWidget {
  final String conferenceID;

  const VideoConferencePage({required this.conferenceID, super.key});

  @override
  Widget build(BuildContext context) {
    return ZegoUIKitPrebuiltVideoConference(
        appID: yourAppID,
        // Fill in the appID that you get from ZEGOCLOUD Admin Console.
        appSign: yourAppSign,
        // Fill in the appSign that you get from ZEGOCLOUD Admin Console.
        conferenceID: conferenceID,
        userID: 'user_id',
        userName: "user_name",
        config: ZegoUIKitPrebuiltVideoConferenceConfig());
  }
}
Configure your online meeting platforms
Android :
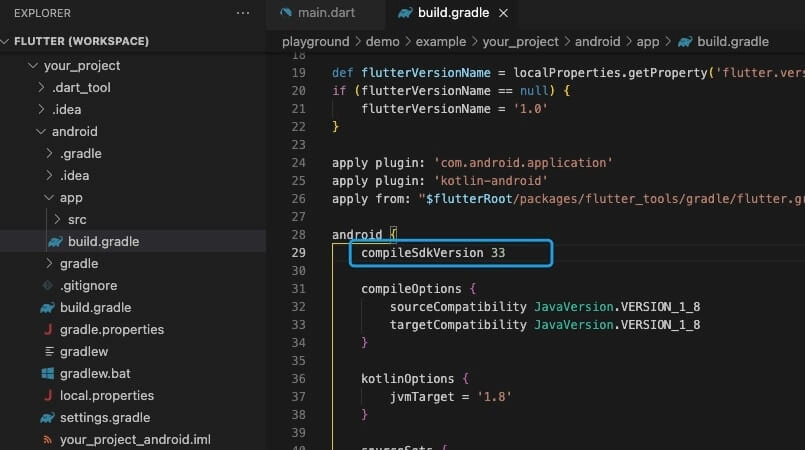
- Open the
your_project/android/app/build.gradlefile, and modify thecompileSdkVersionto 33.
- Next, you need to add device permissions. open the
your_project/app/src/main/AndroidManifest.xmlfile, and add the following code:
   <uses-permission android:name="android.permission.ACCESS_WIFI_STATE" />
   <uses-permission android:name="android.permission.RECORD_AUDIO" />
   <uses-permission android:name="android.permission.INTERNET" />
   <uses-permission android:name="android.permission.ACCESS_NETWORK_STATE" />
   <uses-permission android:name="android.permission.CAMERA" />
   <uses-permission android:name="android.permission.BLUETOOTH" />
   <uses-permission android:name="android.permission.MODIFY_AUDIO_SETTINGS" />
   <uses-permission android:name="android.permission.WRITE_EXTERNAL_STORAGE" />
   <uses-permission android:name="android.permission.READ_PHONE_STATE" />
   <uses-permission android:name="android.permission.WAKE_LOCK" />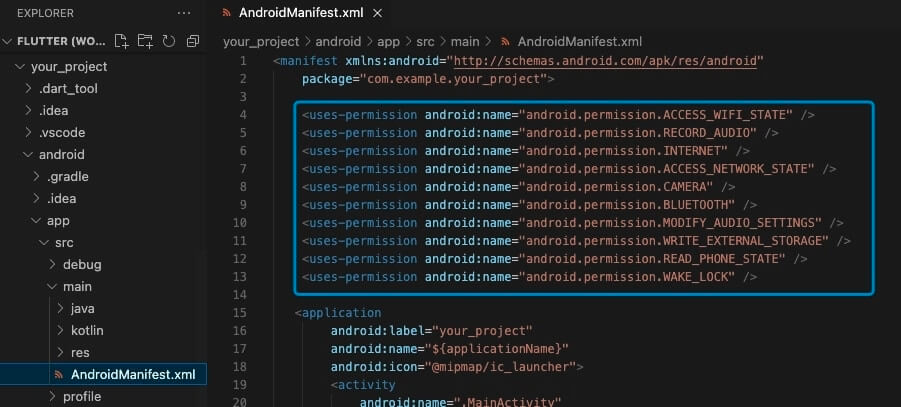
- To prevent obfuscation of the SDK public class names, do the following:
- In your project’s
your_project > android > appfolder, create aproguard-rules.profile with the following content as shown below:
-keep class **.zego.** { *; }- Add the following config code to the
releasepart of theyour_project/android/app/build.gradlefile.
proguardFiles getDefaultProguardFile('proguard-android.txt'), 'proguard-rules.pro'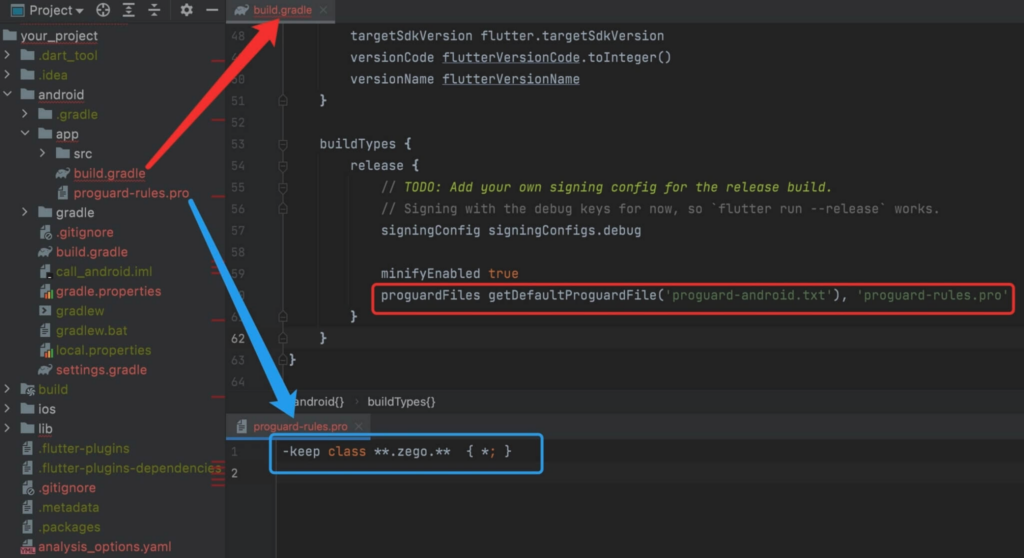
iOS :
- You need to add app permissions. open
your_project/ios/Runner/Info.plist, and add the following code:
<key>NSCameraUsageDescription</key>
<string>We require camera access to connect to a video conference</string>
<key>NSMicrophoneUsageDescription</key>
<string>We require microphone access to connect to a video conference</string>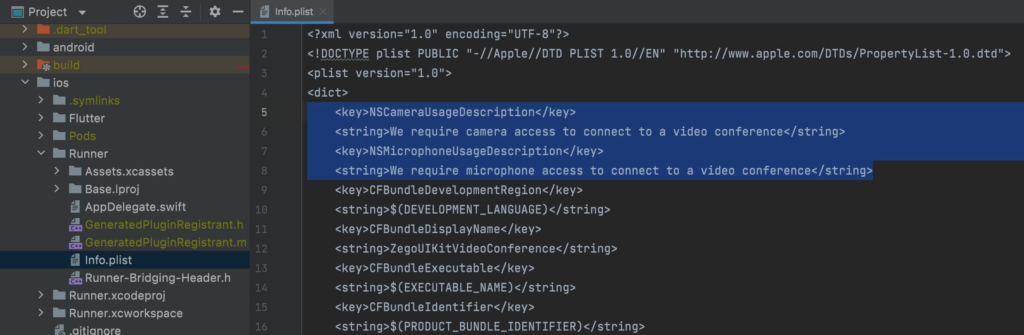
Run a Demo
After completing all the steps, you can start running your project and experience your own online meeting platforms. So hurry up and get started! You can download the sample demo source code of this article to start building online meeting platforms with Flutter.
Conclusion
Online meeting platforms are a great way to stay connected with colleagues, clients, and customers. They are easy to use and allow for real-time collaboration. However, many of the popular platforms are proprietary and can be expensive to use. To avoid these costs, you can build video conferencing apps with Flutter with ZEGOCLOUD SDK. If you are looking for a deeper requirement for your Flutter video conferencing app building, ZEGOCLOUD comes with a fully customized video call SDK as well. Sign up and try it now!
Read more:
- How to Build Video Conferencing App with React Native
- How to Build a Video Conferencing App for Android
- How to Build a Video Conferencing App for iOS
FAQ
Q1: How to implement video calling in Flutter?
To implement video calling in Flutter, you can use third-party libraries like ZEGOCLOUD, Agora, or Jitsi Meet. These libraries provide SDKs that integrate seamlessly with Flutter. Steps typically involve:
- Adding the video calling SDK to your
pubspec.yaml. - Initializing the SDK with your credentials.
- Building a user interface for the call.
- Managing real-time communication using the provided APIs.
Q2: How do you implement video streaming in Flutter?
To implement video streaming in Flutter, use platforms like ZEGOCLOUD or Wowza. The basic process includes:
- Adding a streaming SDK or plugin to your project.
- Configuring the SDK with your app credentials.
- Creating a video player widget for playback or integrating a camera for live streaming.
- Handling streaming events like start, stop, and error notifications.
Q3: Can Flutter do web apps?
Yes, Flutter supports building web apps. With the same codebase used for mobile applications, you can create web apps using Flutter’s web support. Simply run flutter create <project_name> and target the web platform. Flutter for web allows you to build responsive and performant applications using technologies like HTML, CSS, and JavaScript.
Q4: How to integrate ZEGOCLOUD with Flutter?
To integrate ZEGOCLOUD with Flutter, follow these steps:
- Test and debug to ensure smooth integration.
- Add the ZEGOCLOUD Flutter SDK to your
pubspec.yamlfile. - Import the required ZEGOCLOUD libraries into your Dart files.
- Initialize the ZEGOCLOUD SDK using your app ID and token.
Build your video call or live streaming UI and use ZEGOCLOUD APIs for functionalities like joining a room, starting a call, or live streaming.
Let’s Build APP Together
Start building with real-time video, voice & chat SDK for apps today!
