


In a virtual, online meeting called an online video conference, two or more people can communicate in real time over an audio and video chat. The culture of remote labor has spread due to the epidemic. Want to create your own video conferencing app for Android is simple? Here is a brief guide on how to quickly build an Android online conferencing application with ZEGOCLOUD UIKits.
Why ZEGOCLOUD SDK for Android Video Conferencing APP
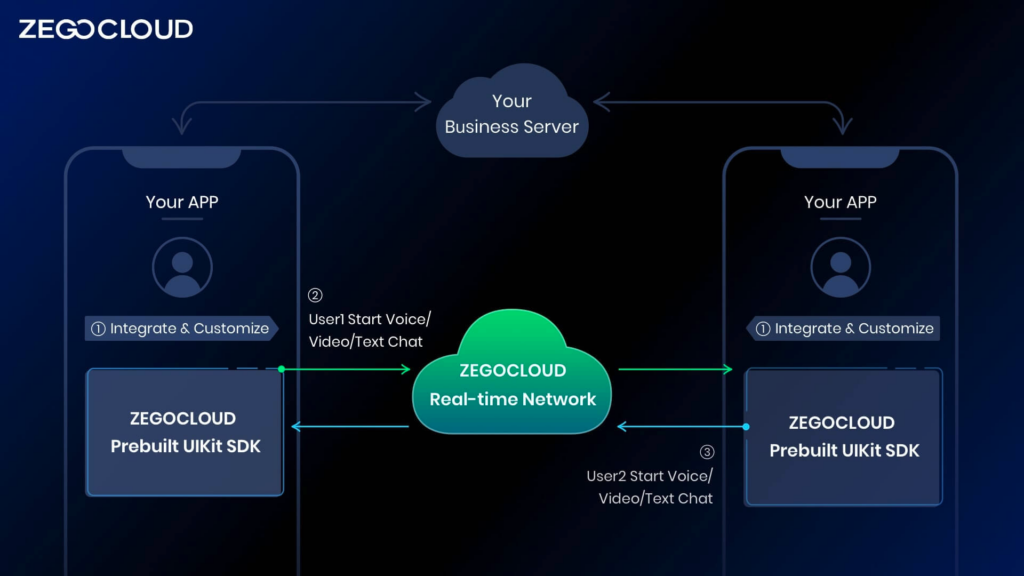
ZEGOCLOUD UIKits is for developers to build video conferencing apps for Android in low code. It is a prebuilt feature-rich component, which enables you to add video conferences to your Android app in minutes.
Additionally, since the business logic is integrated with the user interface, you can modify UI components to add or remove features.
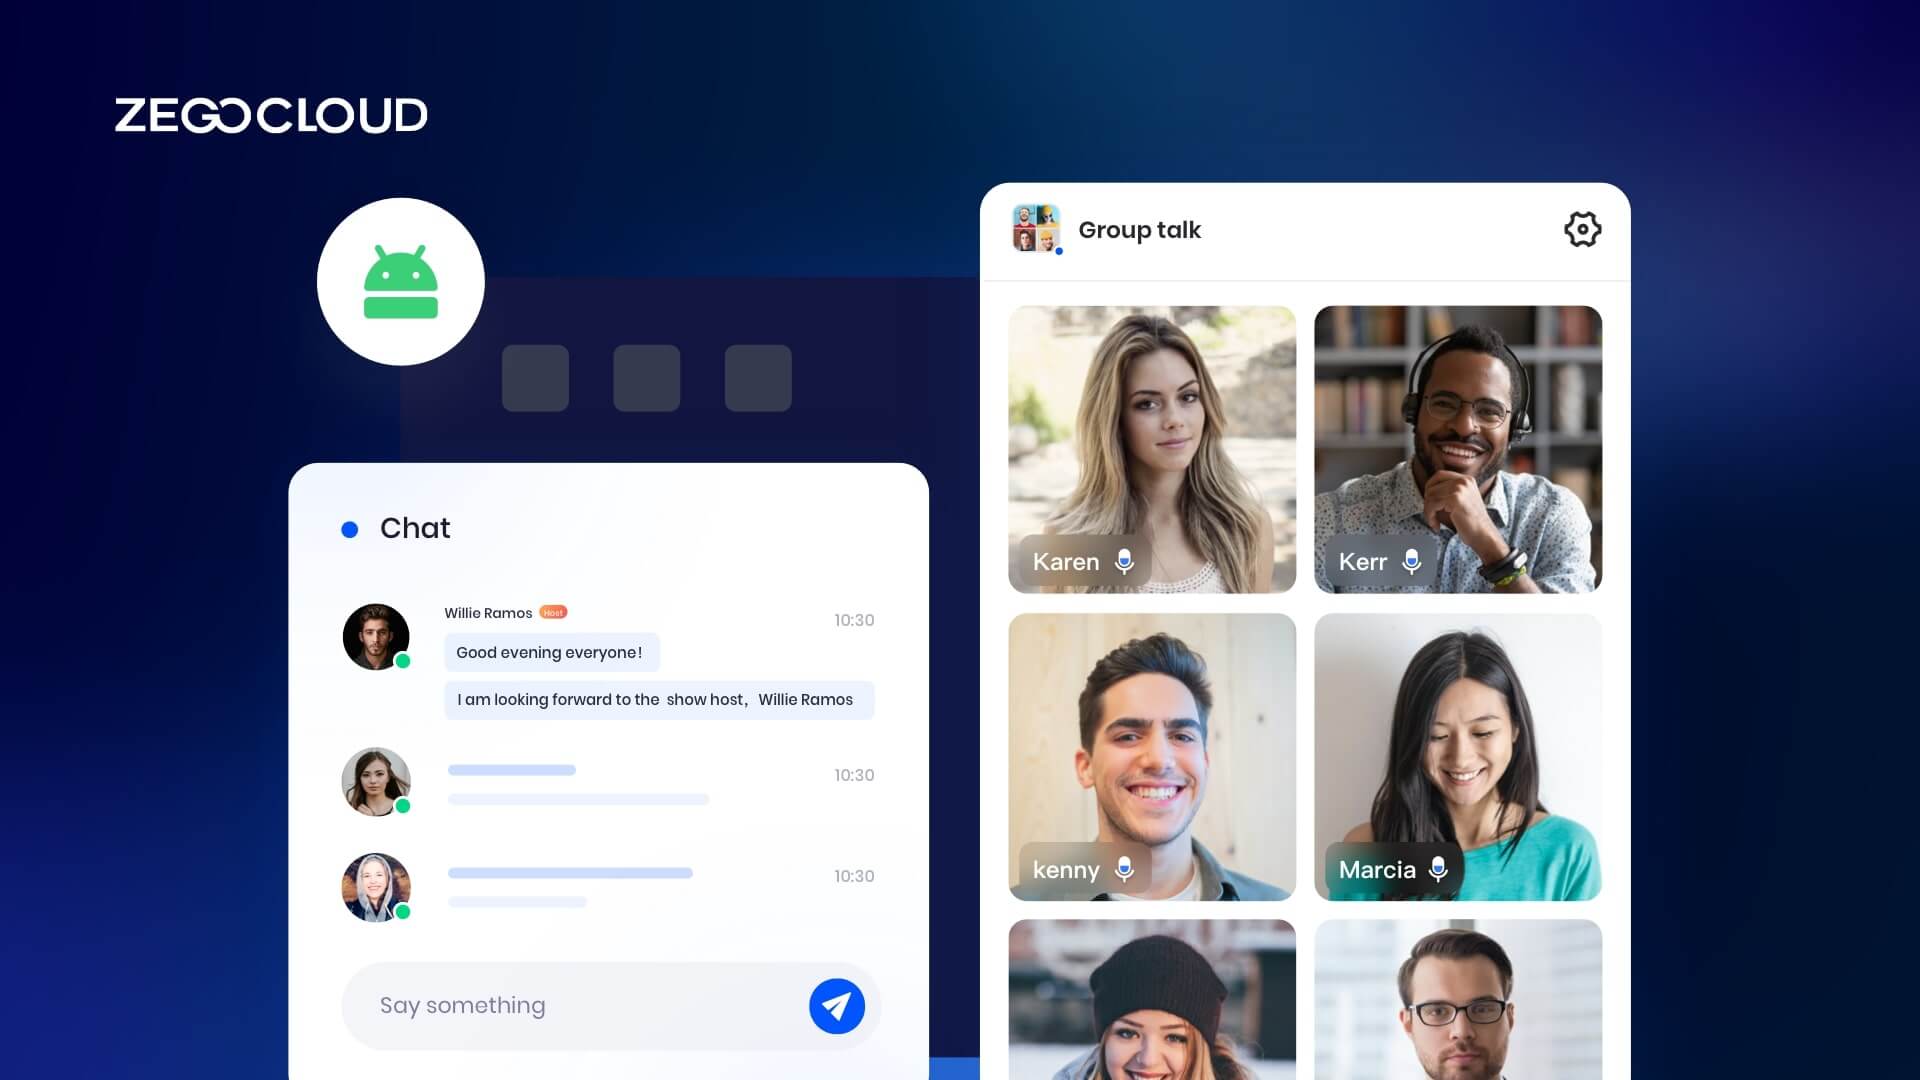
The logic and user interface of the video conferencing capability is completely handled by the Android Video Conference Kit, which is included in UIKits, as depicted in the picture. Include:
- Multi-user audio/video conferences
- Adaptive video layouts
- Real-time sound waves display
- Customizable UI styles
- Device management
- Extendable top/bottom menu bar
- Customizable conference title
- Member List
- Conference join/leave notifications
You only need to implement business-related logic. For example:
- User login registration
- Conference List Management
- User permission, etc.
Preparation
- A ZEGOCLOUD developer account–Sign up
- Android Studio 2020.3.1 or later
- Devices with Android 5.0 or later
- Basic understanding of Android development
How to Build Online Video Conferencing App on Android
1. Create a project
Open your Android Studio, click New Project- Empty Acticvity, then change the Project Name, package name, project location, language and min SDK if you need。
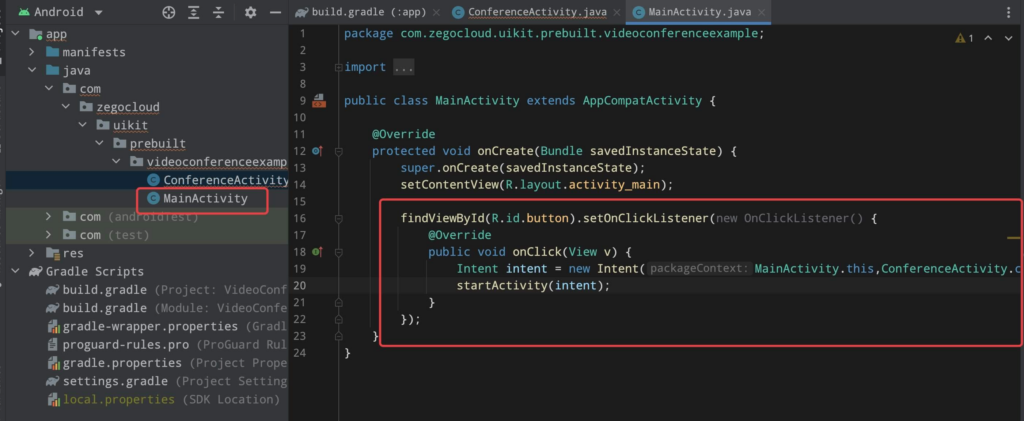
2. Create a new Empty Activity
create a new Empty Activity called ConferenceActivity, and add a join online conference button in MainActivity to navigate to it.
findViewById(R.id.button).setOnClickListener(new OnClickListener() {
    @Override
    public void onClick(View v) {
        Intent intent = new Intent(MainActivity.this,ConferenceActivity.class);
        startActivity(intent);
    }
});
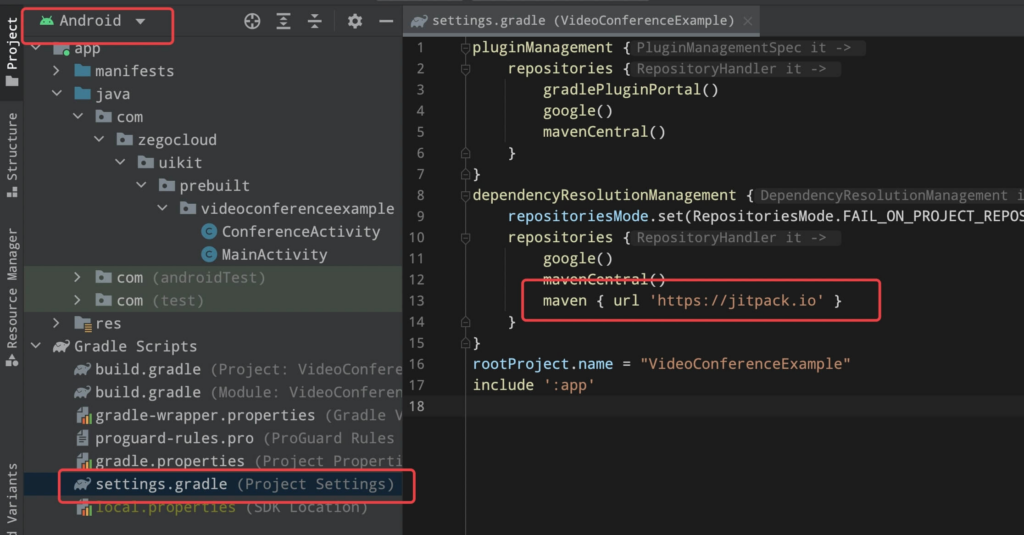
3. Add jitpack
If your Android Gradle Plugin is 7.1.0 or later: enter your project’s root directory, open the settings.gradle file to add the jitpack to dependencyResolutionManagement -> repositories like this:
dependencyResolutionManagement {
repositoriesMode.set(RepositoriesMode.FAIL_ON_PROJECT_REPOS)
repositories {
    google()
    mavenCentral()
    maven { url 'https://www.jitpack.io' } // <- Add this line.
}
}
If your Android Gradle Plugin is earlier than 7.1.0: enter your project’s root directory, open the build.gradle file to add the jitpack to allprojects -> repositories like this:
allprojects {
repositories {
google()
mavenCentral()
maven { url "https://jitpack.io" } // <- Add this line.
}
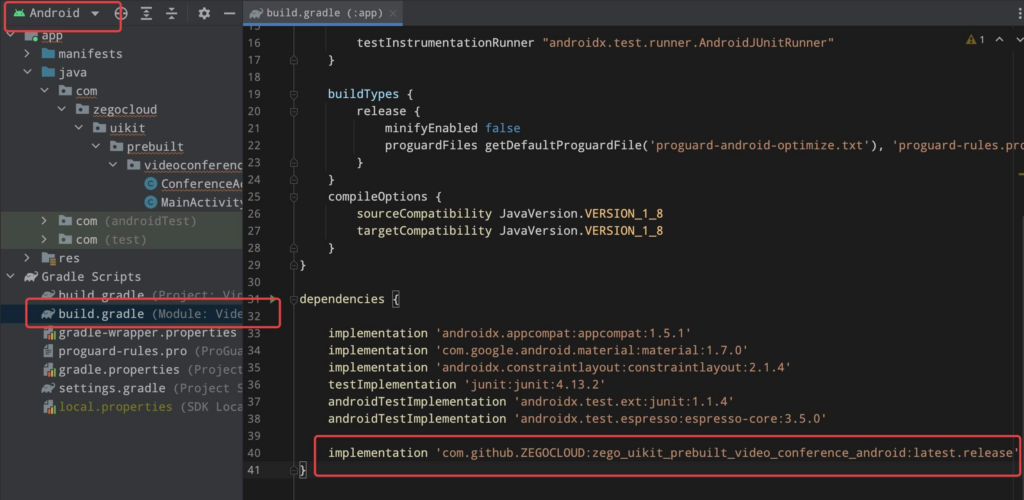
}4. Modify app-level
Modify your app-level on build.gradle file.
dependencies {
    ...
    implementation 'com.github.ZEGOCLOUD:zego_uikit_prebuilt_video_conference_android:latest.release'
}
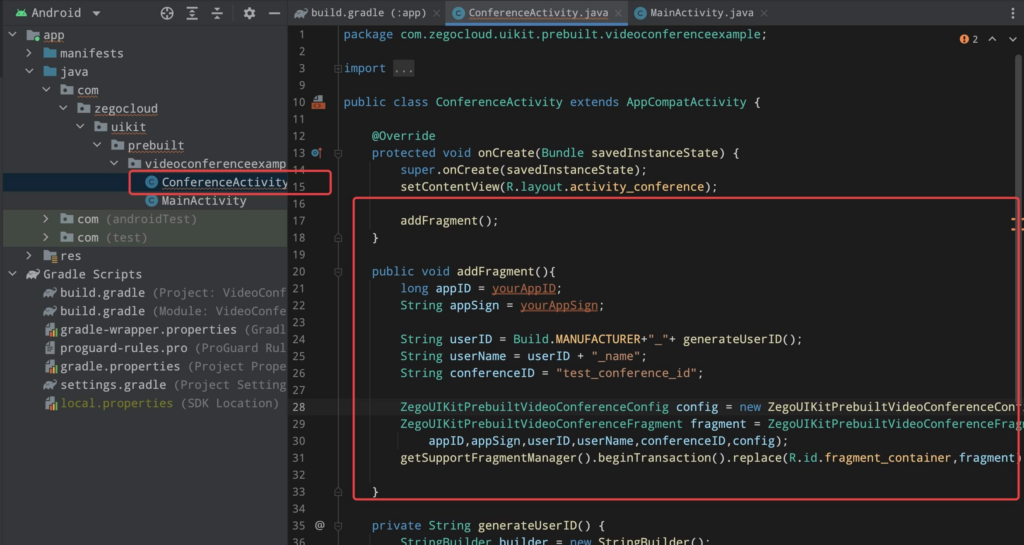
5. Add prebuilt UI to the project.
- Go to ZEGOCLOUD Admin Console, get the
appIDandappSignof your project. - Specify the
userIDanduserNamefor connecting the Video Conference Kit service. - Create a
conferenceIDthat represents the conference you want to start. - add a method in
ConferenceActivityand call it in theConferenceActivity‘sonCreatemethod.
public class ConferenceActivity extends AppCompatActivity {

    @Override
    protected void onCreate(Bundle savedInstanceState) {
        super.onCreate(savedInstanceState);
        setContentView(R.layout.activity_conference);

        addFragment();
    }

    public void addFragment(){
        long appID = yourAppID; // your appID, get from ZEGOCLOUD console
        String appSign = yourAppSign; //your appSign, get from ZEGOCLOUD console

        String userID =  ;  // your userID
        String userName =  ;  // your userName
        String conferenceID =  // conferenceID

        ZegoUIKitPrebuiltVideoConferenceConfig config = new ZegoUIKitPrebuiltVideoConferenceConfig();
        ZegoUIKitPrebuiltVideoConferenceFragment fragment = ZegoUIKitPrebuiltVideoConferenceFragment.newInstance(
            appID,appSign,userID,userName,conferenceID,config);
        getSupportFragmentManager().beginTransaction().replace(R.id.fragment_container,fragment).commitNow();
    }
}
6. Assign id for the root view
Modify the auto-created activity_conference.xml file, assign a id fragment_container for the root view:
        <?xml version="1.0" encoding="utf-8"?>
        <androidx.constraintlayout.widget.ConstraintLayout xmlns:android="http://schemas.android.com/apk/res/android"
        android:id="@+id/fragment_container"
        android:layout_width="match_parent"
        android:layout_height="match_parent">
        </androidx.constraintlayout.widget.ConstraintLayout>
Custom Prebuilt UI
You can custom prebuilt UI by modifying the ZegoUIKitPrebuiltVideoConferenceConfig :
ZegoUIKitPrebuiltVideoConferenceConfig config = new ZegoUIKitPrebuiltVideoConferenceConfig();
config.turnOnCameraWhenJoining = false;
config.audioVideoViewConfig.useVideoViewAspectFill = true;
config.bottomMenuBarConfig.buttons = Arrays.asList(
    ZegoMenuBarButtonName.TOGGLE_CAMERA_BUTTON,
    ZegoMenuBarButtonName.LEAVE_BUTTON,
    ZegoMenuBarButtonName.CHAT_BUTTON
);
config.topMenuBarConfig.isVisible = false;
config.inRoomNotificationViewConfig.notifyUserLeave = false;
config.memberListConfig.showCameraState = false;
You can download the source code from here.
Conclusion
Even though video conferencing is a competitive and rapidly changing market, there is still a lack of highly secured and customizable video conferencing platforms like Zoom. That’s why many businesses consider developing software tailored to their industry and customers. If you need a deeper requirement for your video conferencing app building, ZEGOCLOUD comes with a video call SDK that allows developers to customize video UI/UX. Sign up and try it now!
Read more:
- How to Build Video Conferencing Apps with Flutter
- How to Build a Video Conferencing App for iOS
- How to Build Video Conferencing App with React Native
FAQ
Q1: How to do a video conference call on Android?
You can make a video conference call on Android using apps like Google Meet, Zoom, WhatsApp, or any app that supports group video calls. Open the app, create a meeting or group, and tap the video call button.
Q2: Is Google video conferencing free?
Yes, Google Meet offers free video conferencing with basic features such as group calls, screen sharing, and meeting links.
Q3: Does Android have a built-in video call?
Some Android phones support built-in video calling through the Phone or Contacts app, but availability depends on the device model and carrier.
Q4: What is the best video calling app for Android?
Popular options include Google Meet, WhatsApp, Zoom, Messenger, and Telegram, depending on whether you prefer work meetings or casual chats.
Let’s Build APP Together
Start building with real-time video, voice & chat SDK for apps today!
