


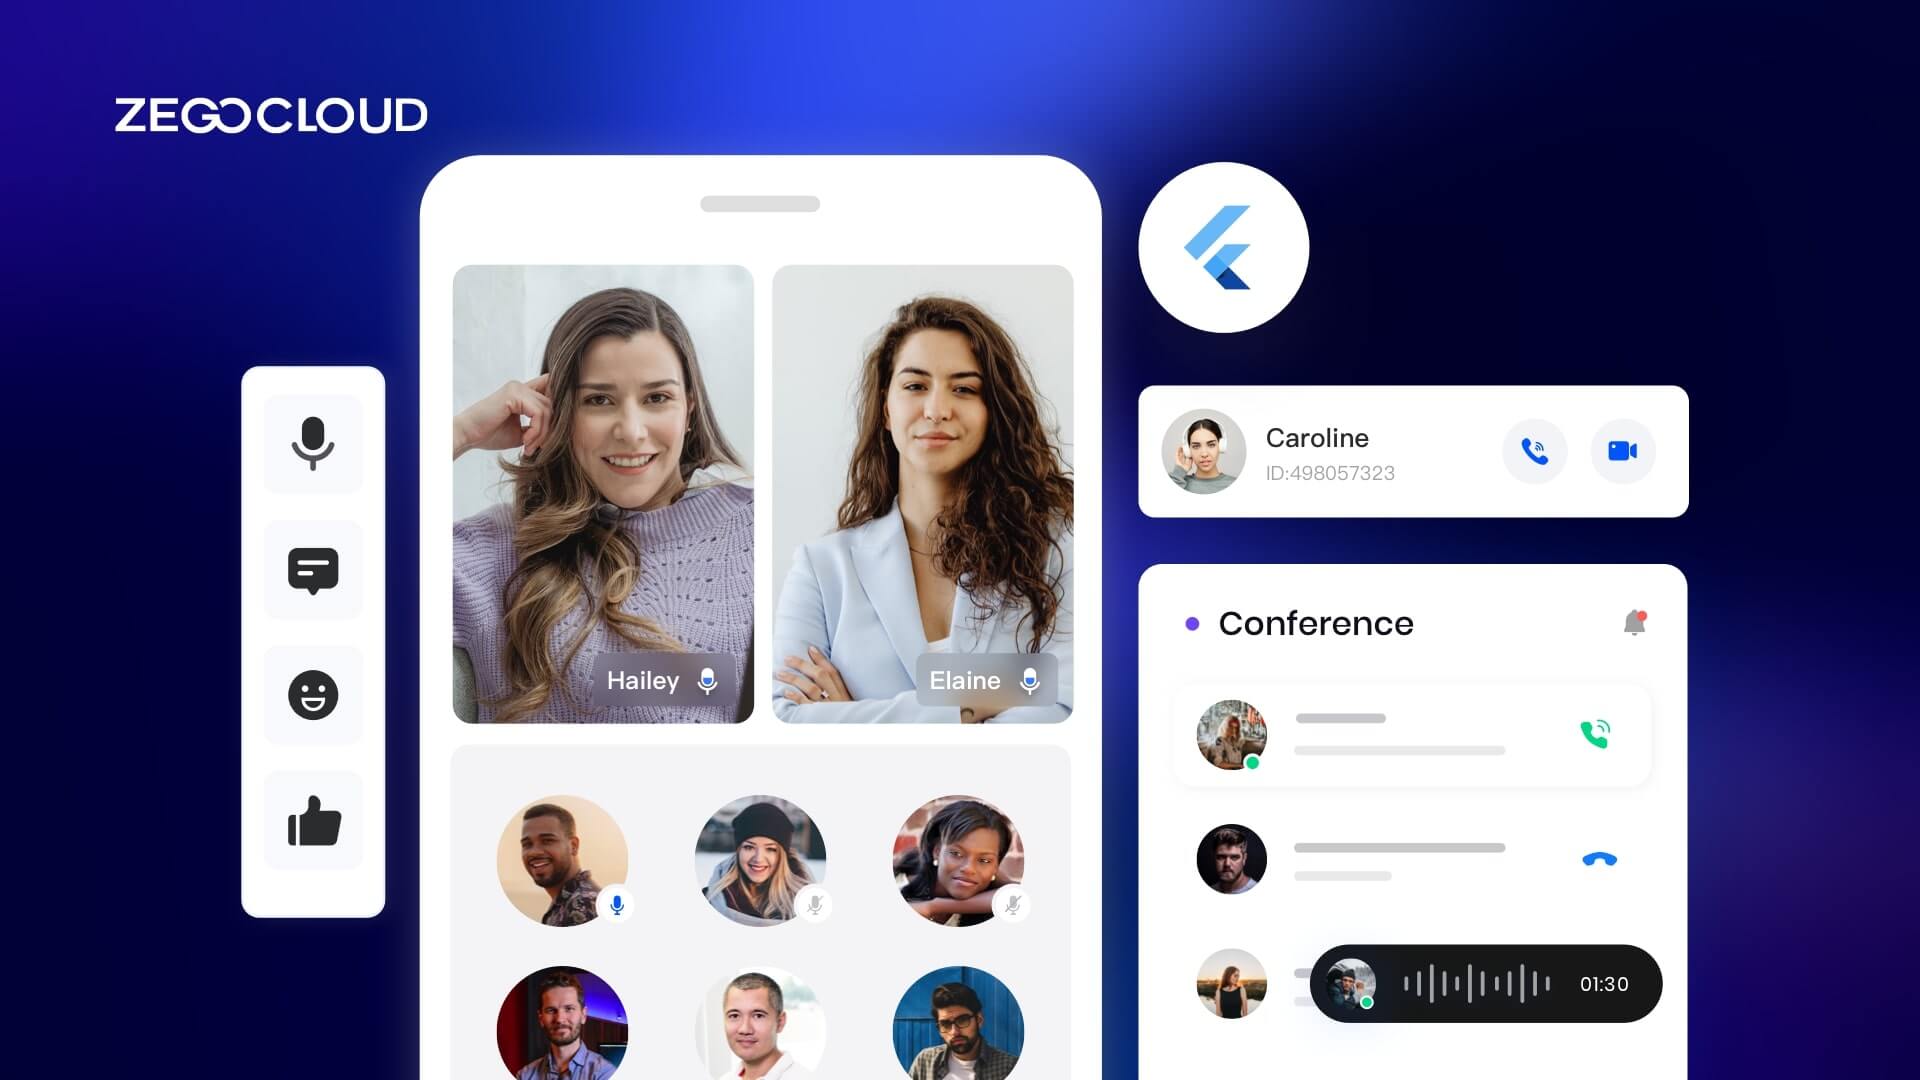
Flutter is a versatile tool that enables developers to create applications with a wide range of functionalities. It is capable of developing applications that can run on multiple platforms seamlessly. As video calls have become more and more popular since COVID-19, many developers are interested in making Flutter call apps. No worry, keep going on! This tutorial shows us how to create a Flutter video call application with the ZEGOCLOUD SDK.
What is a Video Call?
A video call is a live communication service that enables two or more people to interact in real-time through audio and video transmission. This technology combines the visual element with traditional voice communication, allowing participants to see each other using devices like smartphones, tablets, or computers equipped with cameras.
The use of video calls has become widespread, thanks to improved internet connectivity and the proliferation of camera-equipped devices, making it a popular choice for personal interactions, business meetings, and remote education. This technology bridges geographical gaps, enhancing communication with the added benefit of visual context and presence.
How Does Flutter Video Call Work?
Flutter video call functionality works by integrating real-time communication capabilities into a Flutter app, typically using a third-party SDK or service. Here’s how it generally works:
- Ending the Call: When the call ends, either by user action or due to network issues, the app uses the SDK to close the connection and release the resources used by the video and audio streams. This is essential for maintaining app performance and ensuring a clean user experience.
- Integration with an SDK: To add video calling to a Flutter app, you usually start by integrating a video call SDK, such as ZEGOCLOUD or Agora. These SDKs provide the necessary APIs and tools to handle video and audio streams, user authentication, and connection management.
- Setting Up the Video Call Interface: Once the SDK is integrated, you’ll need to build the video call interface within your Flutter app. This involves creating UI components for video feeds, controls for muting/unmuting, switching cameras, ending the call, and more. The SDK typically provides widgets or methods to display the video streams directly in your app’s UI.
- Handling User Permissions: For video calls, the app must request permission to access the camera and microphone. This is managed through the platform-specific code (iOS and Android) and the SDK. Proper handling of permissions ensures that the app can access the necessary hardware for video and audio during calls.
- Establishing the Call: When a user initiates a video call, the app uses the SDK to connect to the service’s servers, establish a peer-to-peer connection, and begin streaming video and audio data. The SDK handles the complexities of maintaining a stable connection, managing network conditions, and synchronizing the video streams between participants.
- Real-Time Video and Audio Transmission: During the call, the SDK manages the real-time transmission of video and audio data. It handles encoding, decoding, and adjusting the quality based on network conditions (e.g., reducing video resolution if the bandwidth is low). This ensures a smooth video call experience.
Benefits of Flutter Video Call
Integrating video calls into a Flutter app offers several benefits. First, Flutter allows you to develop for both iOS and Android using a single codebase, saving time and resources. This cross-platform approach makes development more efficient and reduces the need for maintaining separate codebases.
Flutter’s performance is another key advantage. The framework delivers smooth, responsive video calls with native-like performance, especially when paired with a robust SDK. This ensures high-quality audio and video, even in real-time communication scenarios.
The flexibility of Flutter’s UI customization is also a major benefit. Developers can create unique, responsive video call interfaces that align with their app’s design, enhancing user experience. Additionally, Flutter apps can easily scale to handle anything from one-on-one calls to large group sessions, making them suitable for a wide range of applications.
Finally, using Flutter for video calls is cost-effective. It reduces development costs and speeds up the time-to-market, which is particularly valuable for startups and businesses looking to optimize their resources. Plus, the active Flutter community provides strong support, ensuring reliability and continuous improvements.
Features of Flutter Video Call
Flutter video call functionality includes several key features that enhance the user experience and make development efficient:
- Cross-Platform Compatibility: Flutter allows developers to create video call apps that run seamlessly on both iOS and Android from a single codebase, ensuring a consistent experience across devices.
- High-Quality Video and Audio: With the right SDK, Flutter supports high-quality video and audio calls, providing clear, uninterrupted communication even in real-time scenarios.
- Customizable UI: Flutter’s flexible UI framework enables developers to design and implement custom video call interfaces that match the app’s branding and design language.
- Low Latency: Flutter apps, when integrated with a strong communication SDK, offer low-latency video calls, ensuring real-time interaction without noticeable delays.
- Scalability: The video call feature in Flutter apps can easily scale from handling one-on-one calls to supporting large group calls or webinars, making it suitable for various use cases.
- Security Features: Flutter video call solutions often include encryption and other security measures to protect user data and ensure safe communication.
- Easy Integration with Backend Services: Flutter’s compatibility with various backend services allows for seamless integration of features like user authentication, chat, and data storage within the video call app.
5 Examples of Flutter Video Call Applications
Here are five popular video calling applications with a brief overview of each. Each platform has carved its niche, delivering unique features and benefits that cater to personal, professional, and educational needs.
1. Google Meet
Google Meet is a widely-used video conferencing platform that allows users to host secure, high-quality video calls for both personal and professional purposes. Integrated with Google Workspace, Meet is accessible on mobile and web, and its Flutter integration can enhance the app with seamless video communication. With features like screen sharing, real-time captions, and low-latency performance, Google Meet ensures smooth, reliable video calls.
2. Zoom
Zoom has become a household name in the world of video calling, especially for business and educational meetings. With its large participant capacity, breakout rooms, and robust integrations, Zoom has proven to be essential for remote collaboration. Flutter developers can integrate Zoom’s SDK to offer features like HD video and audio, meeting scheduling, and real-time messaging in their own video call applications.
3. Microsoft Teams
Microsoft Teams is an all-in-one collaboration platform for teams, offering not only video calling but also chat, file sharing, and team management tools. It supports high-quality video calls and integrates smoothly with other Microsoft tools like OneDrive and Office 365. Flutter developers can build customized video call applications leveraging Microsoft Teams’ features to create seamless collaboration experiences in a cross-platform environment.
4. Skype
Skype, one of the oldest video call platforms, remains popular for personal communication, offering instant messaging, voice, and video calls. It’s highly accessible across multiple devices, and with Flutter, developers can integrate Skype’s features into their own applications for real-time video conversations. With cross-platform compatibility, it’s perfect for creating a smooth user experience on both mobile and desktop.
5. Cisco Webex
Cisco Webex is a robust, enterprise-level video conferencing platform designed for high-quality, secure communication. It’s ideal for large-scale virtual meetings, webinars, and team collaboration. Webex’s Flutter SDK allows developers to incorporate its rich video conferencing capabilities into custom apps, providing high-definition video, screen sharing, and virtual meeting management for seamless user engagement.
How to Build a Video Call App with Flutter with ZEGOCLOUD
ZEGOCLOUD UIKits is a collection of pre-designed user interface (UI) elements that can be used by developers to create visually appealing and intuitive applications with ease. It allows developers to build video communication applications with a seamless experience.
The UIKits come complete with a diverse range of design templates, including buttons, icons, frames, and other UI components, making it easier for developers to integrate video communication functionalities into their applications. These design templates can be used to create comprehensive UI designs for applications that are visually appealing and intuitive. It saves developers time and effort in designing UIs for their applications.
Through it, we can complete the development of video calls, live streaming, app chat, and video conferences, and other scenarios within 10 minutes.
UIKits support many frameworks such as Flutter, react native, iOS, Android, and Web, which are very friendly for different developers to build their applications. If you are wondering how to build a video call app with Flutter, UIKits is the most recommended pre-built SDK to help you complete your app development easily and quickly.
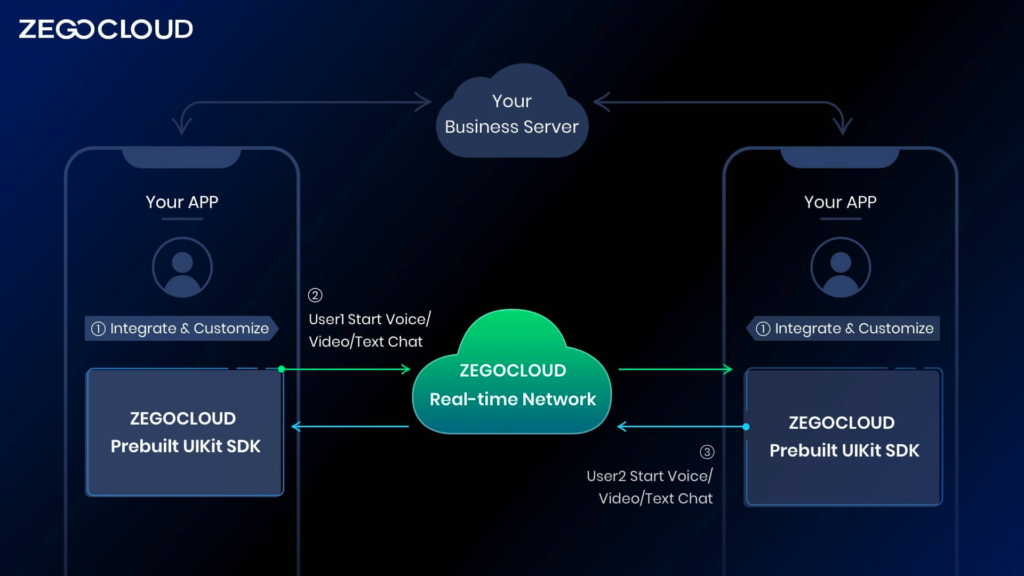
As shown in the figure, Flutter UIKit SDK is responsible for processing audio and video calls and the logic related to text chat. Include:
- UI and interaction of the calling module
- Call status management
- Audio and video data transmission
You only need to implement business-related logic. For example:
- User login registration
- Friends List Management
- Call billing recharge
How to Build a Video Calling App in Flutter
Preparation
- A ZEGOCLOUD developer account–Sign up
- Flutter 1.12 or later.
- Basic understanding of Flutter development
Steps to Implement Flutter Video Call
Create Project
Run the following code to create a new project.
flutter create --template app.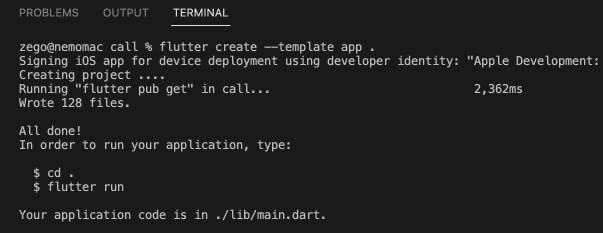
Add ZegoUIKitPrebuiltCall as a dependency
Run the following code in your project root directory:
flutter pub add zego_uikit_prebuilt_call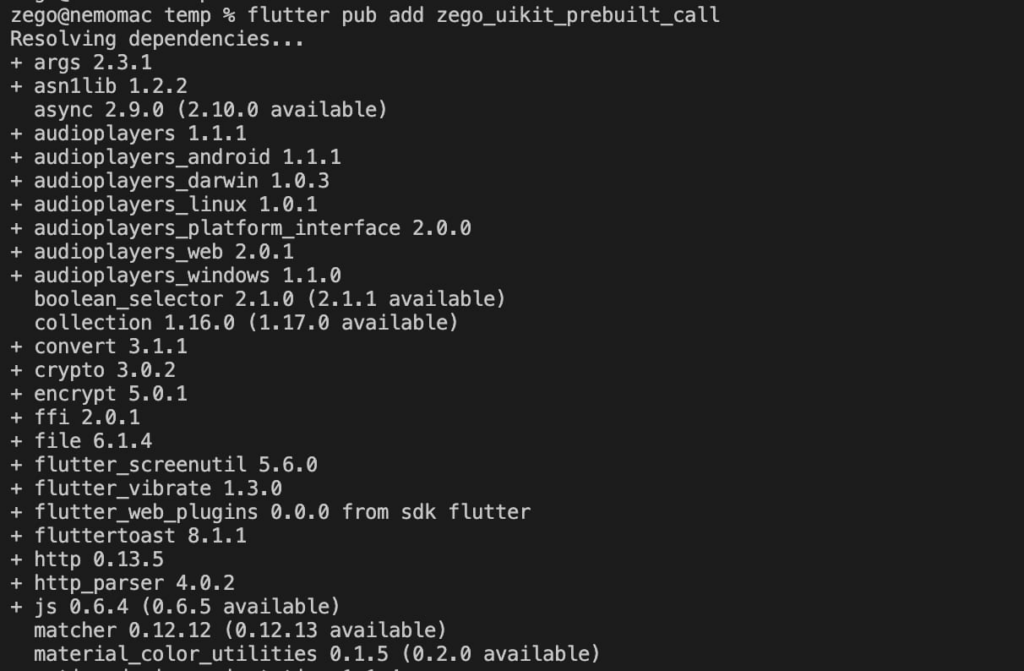
Add ZegoUIKitPrebuiltCall as a dependency
Run the following code in your project root directory:
flutter pub add zego_uikit_prebuilt_callImport the SDK
Now in your Dart code, import the prebuilt CallKit Flutter SDK.
import 'package:zego_uikit_prebuilt_call/zego_uikit_prebuilt_call.dart';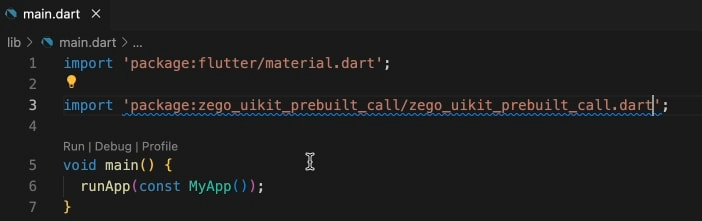
Start Video Call
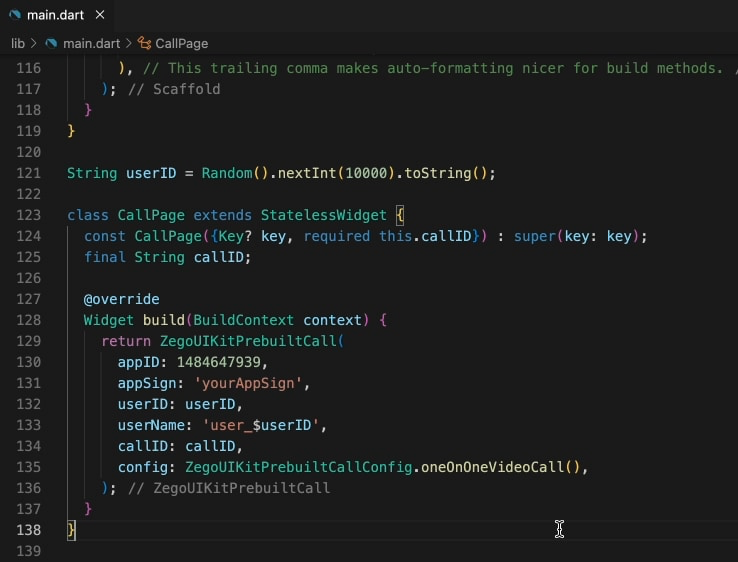
Use ZegoUIKitPrebuiltCall to build a Call page.
class CallPage extends StatelessWidget {
  const CallPage({Key? key, required this.callID}) : super(key: key);
  final String callID;
  @override
  Widget build(BuildContext context) {
    return ZegoUIKitPrebuiltCall(
      appID: yourAppID, // Fill in the appID that you get from ZEGOCLOUD Admin Console.
      appSign: yourAppSign, // Fill in the appSign that you get from ZEGOCLOUD Admin Console.
      userID: 'user_id',
      userName: 'user_name',
      callID: callID,
      // You can also use groupVideo/groupVoice/oneOnOneVoice to make more types of calls.
      config: ZegoUIKitPrebuiltCallConfig.oneOnOneVideoCall()
        ..onOnlySelfInRoom = () => Navigator.of(context).pop(),
    );
  }
}
Now, you can make a call by navigating to this. CallPage.
Add a call button
Add a Call button, and navigate to the CallPage.
import 'dart:math';
import 'package:flutter/material.dart';
import 'package:zego_uikit_prebuilt_call/zego_uikit_prebuilt_call.dart';
void main() {
  runApp(const MyApp());
}
class MyApp extends StatelessWidget {
  const MyApp({Key? key}) : super(key: key);
  @override
  Widget build(BuildContext context) {
    return MaterialApp(home: HomePage());
  }
}
class HomePage extends StatelessWidget {
  final callIDTextCtrl = TextEditingController(text: "testCallID");
  HomePage({Key? key}) : super(key: key);
  @override
  Widget build(BuildContext context) {
    return Scaffold(
      body: Center(
        child: Padding(
          padding: const EdgeInsets.symmetric(horizontal: 10),
          child: Row(
            mainAxisAlignment: MainAxisAlignment.center,
            crossAxisAlignment: CrossAxisAlignment.center,
            children: [
              Expanded(
                child: TextFormField(
                  controller: callIDTextCtrl,
                  decoration:
                      const InputDecoration(labelText: "start a call by id"),
                ),
              ),
              ElevatedButton(
                onPressed: () {
                  Navigator.push(
                    context,
                    MaterialPageRoute(builder: (context) {
                      return CallPage(callID: callIDTextCtrl.text);
                    }),
                  );
                },
                child: const Text("call"),
              )
            ],
          ),
        ),
      ),
    );
  }
}
Configure your project
- Android:
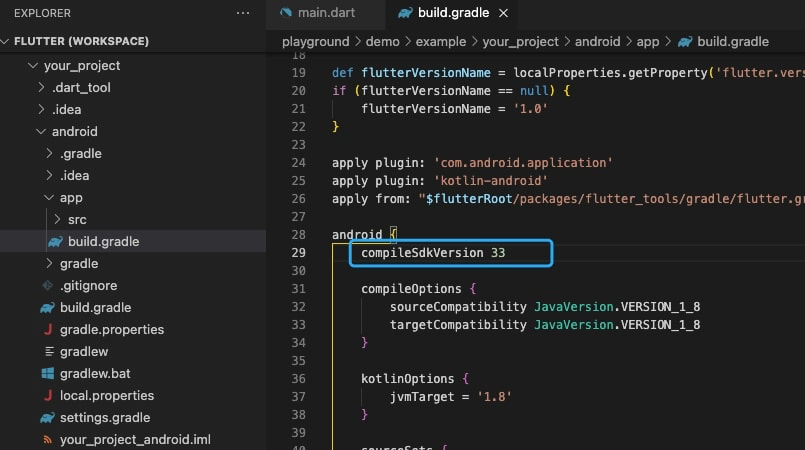
- If your project is created with Flutter 2. x.x, you will need to open the
your_project/android/app/build.gradlefile, and modify thecompileSdkVersionto 33.
- Add app permissions.
Open the fileyour_project/app/src/main/AndroidManifest.xml, and add the following code:
   <uses-permission android:name="android.permission.ACCESS_WIFI_STATE" />
   <uses-permission android:name="android.permission.RECORD_AUDIO" />
   <uses-permission android:name="android.permission.INTERNET" />
   <uses-permission android:name="android.permission.ACCESS_NETWORK_STATE" />
   <uses-permission android:name="android.permission.CAMERA" />
   <uses-permission android:name="android.permission.BLUETOOTH" />
   <uses-permission android:name="android.permission.MODIFY_AUDIO_SETTINGS" />
   <uses-permission android:name="android.permission.WRITE_EXTERNAL_STORAGE" />
   <uses-permission android:name="android.permission.READ_PHONE_STATE" />
   <uses-permission android:name="android.permission.WAKE_LOCK" />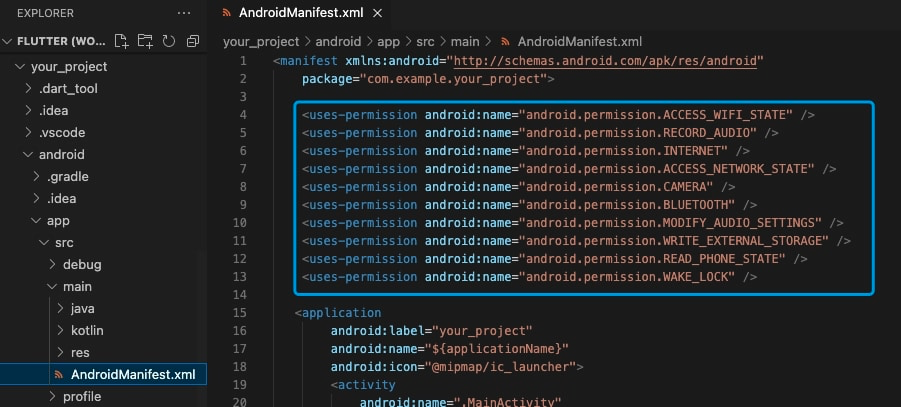
- Prevent code obfuscation.
To prevent obfuscation of the SDK public class names, do the following:
a. In your project’s your_project > android > app folder, create a proguard-rules.pro file with the following content as shown below:
-keep class **.zego.** { *; }b. Add the following config code to the release part of the your_project/android/app/build.gradle file.
proguardFiles getDefaultProguardFile('proguard-android.txt'), 'proguard-rules.pro'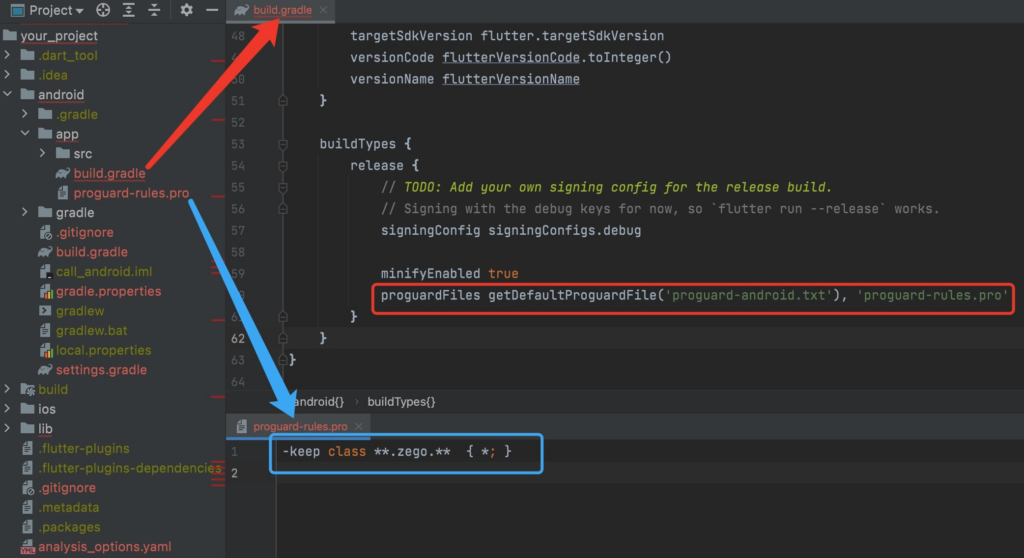
- iOS:
To add permissions, open your_project/ios/Runner/Info.plist, and add the following code to the dict part:
<key>NSCameraUsageDescription</key>
<string>We require camera access to connect to a call</string>
<key>NSMicrophoneUsageDescription</key>
<string>We require microphone access to connect to a call</string>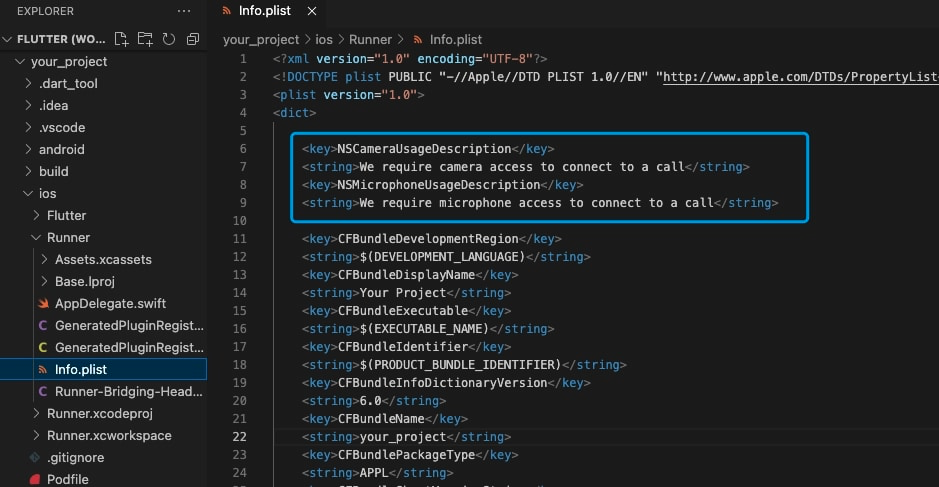
Run a Demo
Best Practices for Implementing Flutter Video Call
When implementing a video call feature in a Flutter app, following best practices ensures a smooth, reliable, and user-friendly experience:
- Choose the Right SDK: Select a robust and well-supported SDK, like ZEGOCLOUD or Agora, that provides comprehensive video and audio capabilities, including real-time communication, low latency, and cross-platform support.
- Optimize for Performance: Ensure the video call feature is optimized for performance by minimizing unnecessary processes, using efficient data management, and handling network fluctuations gracefully to maintain call quality.
- Handle Permissions Properly: Always request and manage camera and microphone permissions appropriately to ensure user privacy and app functionality. Make sure to provide clear explanations to users about why these permissions are needed.
- Implement Error Handling: Build robust error handling to manage network issues, device limitations, and user errors gracefully. This improves the app’s resilience and provides a better user experience.
- Ensure Security: Implement end-to-end encryption for all video and audio streams to protect user data and maintain privacy. Use secure protocols for data transmission and store any sensitive data securely.
- Test Across Devices: Test the video call functionality on a wide range of devices and network conditions to ensure compatibility and performance across different platforms and environments.
- Design an Intuitive UI: Create a user-friendly interface that makes it easy for users to start and end calls, switch cameras, mute audio, and access other essential features without confusion.
- Monitor and Optimize: After deployment, monitor the app’s performance using analytics and user feedback. Regularly update and optimize the video call feature to address any issues and improve the overall experience.
Conclusion
It’s way easier to make a video call now than it was five or ten years ago. Additionally, their recent popularity also makes a point. In today’s market, a simple and secure video call app will definitely find its audience.
You can download the sample demo source code of this article to learn how to. If you have deeper requirements, such as streaming mix, noise reduction, censorship, etc., you can use our Core SDK. ZEGOCLOUD has a fully customized video call SDK to meet what you want.
If you have any questions, you can always consult us at 24 hours for technical support.
Read more:
FAQ
Q1: What is the best SDK for Flutter video calls?
Top SDKs include Agora, ZEGOCLOUD, and Twilio. Each offers reliable video/audio quality, with Agora being popular for low-latency needs, ZEGOCLOUD for scalability, and Twilio for customization.
Q2: Why is my Flutter video call not working?
Common reasons include missing camera/microphone permissions, incorrect SDK setup, or network issues. Check if your App ID and token are correct and ensure WebRTC services are accessible.
Q3: How to integrate WebRTC with Flutter?
Use the flutter_webrtc plugin. Add it to pubspec.yaml, configure permissions, and set up signaling for peer-to-peer connections.
Q4: How can I add group video calls in Flutter?
Choose an SDK that supports multi-party video conferencing (e.g., ZEGOCLOUD, Agora). Each participant joins a shared session and their video streams are displayed dynamically.
Q5: How do I enable screen sharing in a Flutter video call?
Some SDKs, like ZEGOCLOUD and Agora, provide built-in screen sharing. You need to request screen recording permissions and stream the captured screen as a video source.
Let’s Build APP Together
Start building with real-time video, voice & chat SDK for apps today!
