


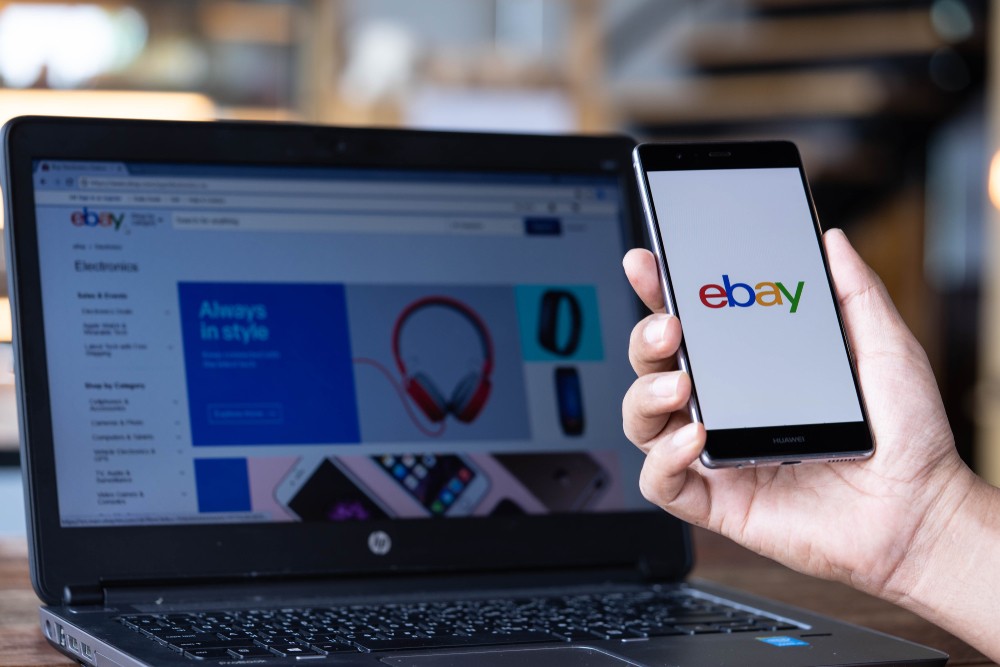
eBay is one of the most popular online marketplaces in the world. If you’re looking to build your own eBay clone app, there are a few things you need to know. In this article, we’ll walk you through the steps involved in building a successful eBay clone app with ZEGOCLOUD SDK, from choosing the right platform to implementing the essential features.
What is eBay Clone?
An eBay clone refers to a software or platform that replicates the core features and functionalities of eBay, a well-known online auction and shopping website where people and businesses buy and sell a wide variety of goods and services worldwide. eBay clones are designed to offer similar online marketplace capabilities, allowing users to list items for sale, bid on items, buy products outright, and engage in various types of transactions.
eBay clone scripts or platforms are often used by entrepreneurs and businesses looking to create their own online marketplace without starting from scratch. These clones can provide a foundation with basic marketplace features, including:
- User registration and account management
- Product listings with descriptions, photos, and pricing
- Bidding system for auctions
- Buy Now options for direct purchases
- Feedback and rating systems for buyers and sellers
- Secure payment processing integrations
While an eBay clone aims to replicate the successful aspects of eBay’s business model, marketplace owners need to customize and adapt the platform to their specific target market or niche to differentiate themselves and offer unique value to their users.
Many companies offer ready-made eBay clone scripts that can be customized and deployed to launch a new online marketplace. These scripts are designed to reduce development time and costs, providing a quick way to enter the market. However, the success of such a marketplace depends on various factors, including user experience, security, scalability, and effective management.
How to Make App like eBay with ZEGOCLOUD SDK
ZEGOCLOUD offers a comprehensive chat SDK that provides a variety of features for building chat apps, including real-time text chat, voice chat, video chat, file transfer, and group chat. It is a powerful tool that can be used to build a wide range of chat apps, from simple messaging apps to complex social media platforms. What’s more, it comes with pre-built UIKits that allow developers to build an eBay app clone in 10 minutes.
Your eBay clone app will use ZEGOCLOUD UIKits to provide real-time chat functionality between buyers and sellers. This will allow buyers to ask questions about products, sellers to provide support, and buyers and sellers to negotiate prices. The chat functionality will also be used to facilitate the buying and selling process, such as sending payment confirmations and tracking shipping information.
In addition, to chat functionality, your eBay clone app will also include the following features:
- Product search and discovery
- Product listings
- Shopping cart
- Payment processing
- Shipping
- Ratings and reviews
These features will allow users to buy and sell products securely and conveniently. We’ll focus on integrating ZEGOCLOUD UIKits in the following sections.
Why Choose ZEGOCLOUD SDK for eBay Clone?
Effective communication lies at the heart of any successful online marketplace platform. When building your eBay clone app, choosing the right chat solution is crucial. ZEGOCLOUD UIKits emerges as the perfect choice, offering a wide range of features and benefits to enhance communication between buyers and sellers. Here are a few reasons to choose ZEGOCLOUD SDK for your eBay clone:
1. Real-time Communication
ZEGOCLOUD ChatKit enables real-time, instant communication between buyers and sellers within your eBay clone app. This fosters seamless interaction, allowing users to ask questions, negotiate prices, and make informed purchase decisions efficiently.
2. Cross-platform Compatibility
With ZEGOCLOUD In-app chat SDK, your eBay clone app will seamlessly function across multiple platforms. Whether users prefer the web, mobile, or desktop applications, UIKits ensures a consistent and accessible communication experience, enhancing user engagement and satisfaction.
3. Rich Media Support
ZEGOCLOUD UIKits empowers sellers to showcase their products effectively. The platform supports the sharing of images, videos, and other media files within the chat interface, enabling sellers to provide detailed product information and captivating visuals, leading to higher buyer engagement and conversion rates.
How Do I Clone My eBay App?
By now, your curiosity about creating an eBay clone should have been satisfied. But now, a more exciting question arises: How can you transform that inspiration into reality? Fear not, for the answer lies within ZEGOCLOUD UIKits. With its impressive capabilities, you can effortlessly emulate eBay’s functionalities and take communication within your app to new heights.
Let’s dive in and unlock the boundless potential of ZEGOCLOUD ChatKit as you embark on this thrilling adventure of creating your own eBay clone app.
Preparation
Before you get started, please make sure you have the following prerequisites:
- A ZEGOCLOUD developer account – Sign up
- Get your AppID and ServerSecret by creating a project and activating the In-app Chat service in the ZEGOCLOUD Admin Console.
- A PC with a minimum of 4GB of RAM and a 1GHz processor.
- A stable internet connection.
- Have NodeJS installed
- A development environment of your choice.
If you’re comfortable with the prerequisites, follow the steps in the next section to get started with the integration of ZEGOCLOUD’s ChatKit into your app.
Setting up the Development Environment
To build an eBay clone with React and Firebase, and integrate ZEGOCLOUD’s In-app Chat SDK for the chat functionality, we need to set up our development environment. This section will guide you through the necessary steps to get your environment ready for the project.
Create a New React Project
Open your terminal or command prompt and navigate to the directory where you want to create your eBay clone project. Create your React eBay Clone with Vite by running the following command:
npm create vite@latestFollow the prompts that follow to complete the project setup
Set up Firebase
To use Firebase for your eBay clone, you need to create a Firebase project and obtain the necessary configuration details. Follow these steps:
- Go to the Firebase website and sign in with your Google account.
- Click on the “Go to Console” button to access the Firebase Console.
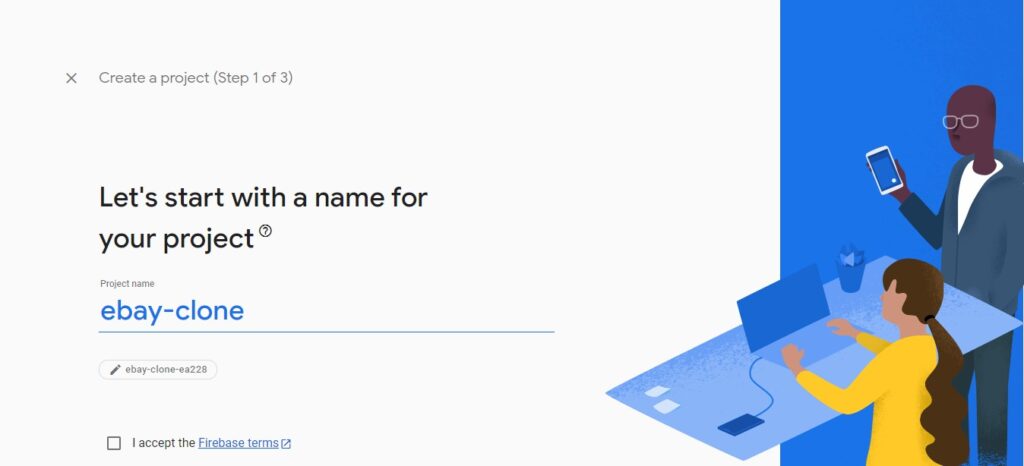
- Start your journey to the cloud by clicking the “Add Project” button. Give your project a name and select the region that’s best for you.
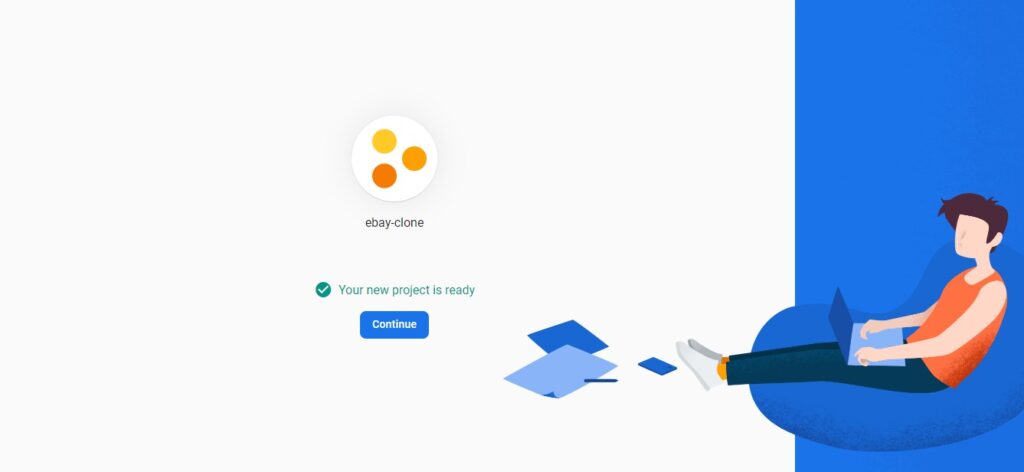
4. Once the project is created, click on the “Continue” button to proceed to the project dashboard.
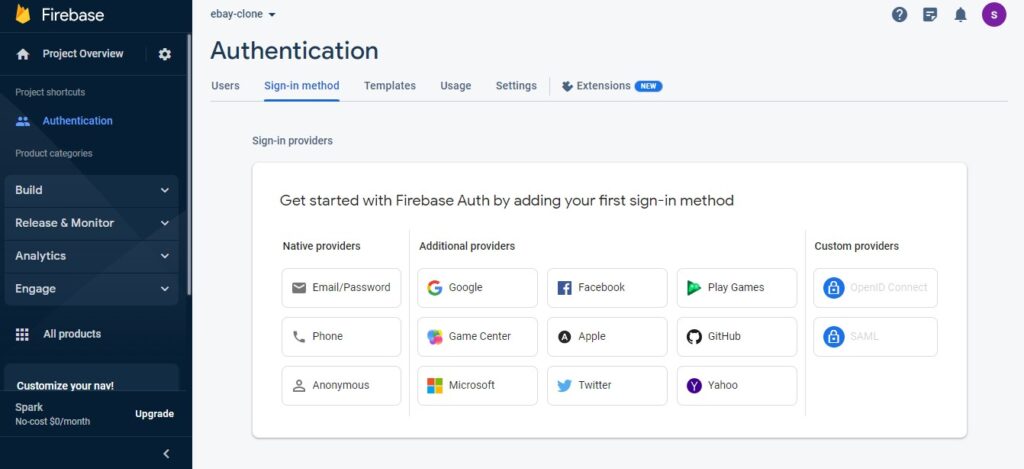
5. In the project dashboard, click on the “Authentication” tab from the left sidebar and enable the desired authentication methods. Choose Email/Password.
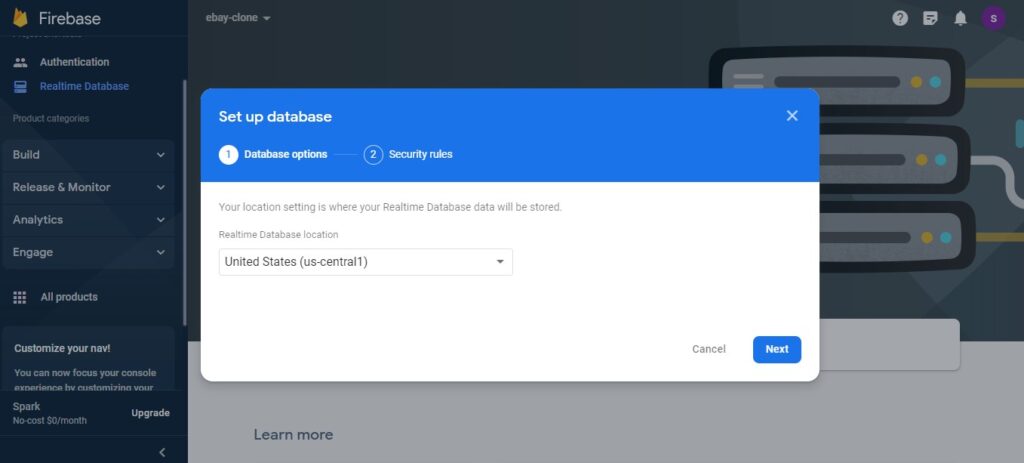
6. Click on the “Firestore Database” tab from the left sidebar and click on the “Create Database” button. Choose the “Start in test mode” option and select a region for your database.
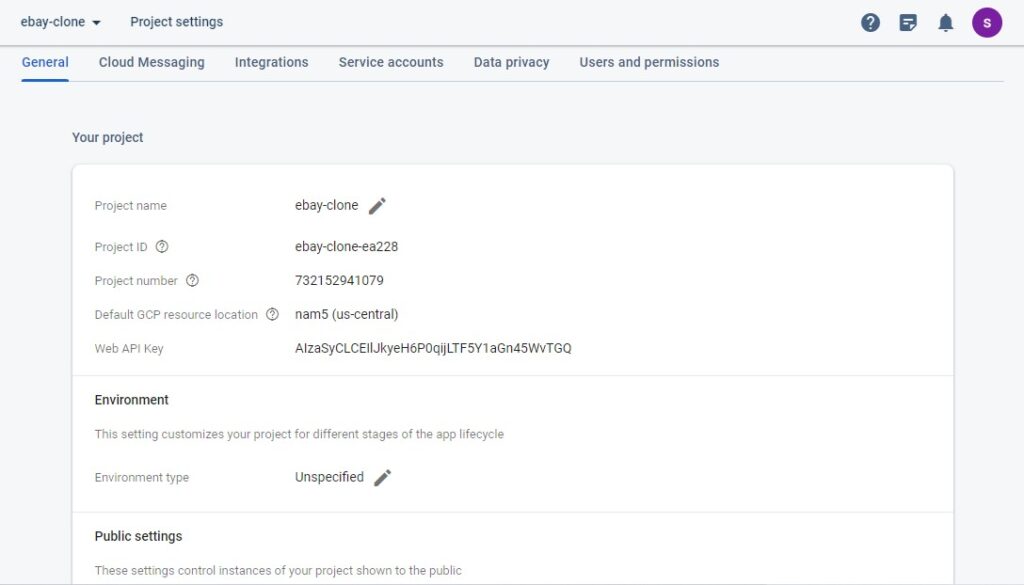
7. Now, click on the “Settings” icon next to “Project Overview” in the left sidebar and select “Project settings”.
8. In the “General” tab, scroll down to the “Your apps” section and click on the “</>” icon to add a new web app.
9. Provide a nickname for your app and click on the “Register app” button. Copy the Firebase configuration code that appears in the modal.
Integrate Firebase in your React project
In your eBay clone project directory, open the src folder and create a new file called firebase.js you can as well use any other name. Paste the Firebase configuration code you obtained in the previous step into this file.
const firebaseConfig = {
  apiKey: 'YOUR_API_KEY',
  authDomain: 'YOUR_AUTH_DOMAIN',
  projectId: 'YOUR_PROJECT_ID',
  // ... other configuration properties
};

firebase.initializeApp(firebaseConfig);
Additionally, you need to install the Firebase SDKs.
npm install firebaseThis will install the Firebase JavaScript SDK and make it available for usage in your project.
Install Bootstrap
To style the project, Bootstrap was utilized. Install it easily using the provided commands:
npm i bootstrapnpm i react-bootstrapInstall ZEGOCLOUD’s In-app Chat Kit
To enable chat functionality in your eBay clone, you can integrate ZEGOCLOUD’s In-app Chat Kit. Follow these steps:
Here are the steps on how to integrate ZEGOCLOUD’s In-app Chat Kit into your project:
Add SDK dependencies (using NPM)
Execute the npm i @zegocloud/zimkit-react command to effortlessly install the required dependencies.
Setting up Images
All of the images used in this project can be found in the src/assets folder. You can download projects and use them in your own project.
Building the User Interface
The user interface of eBay captivates users and remains a central component of their experience. In this section, we’ll focus on implementing key sections of this renowned e-commerce platform. We’ll keep our implementation concise and focus on essential pages like login, signup, homepage, and chat. Let’s begin this exciting journey!
Signup component
Create a component folder in the src folder. To build a signup component, create a file named SignupPage.jsx. Paste the following codes inside:
import React, { useState } from "react";
import firebase from "firebase/compat/app";
import "firebase/compat/auth";
import { Link } from "react-router-dom";
import ebayLogo from "../assets/ebay-logo.png";
import "../App.css";

function SignupPage() {
  const [email, setEmail] = useState("");
  const [password, setPassword] = useState("");

  const handleSignup = async (e) => {
    e.preventDefault();

    try {
      await firebase.auth().createUserWithEmailAndPassword(email, password);
    } catch (error) {
      console.error(error);
      alert(getErrorPrompt(error.code));
    }
  };

  // Function to get the prompt message based on error code
  const getErrorPrompt = (errorCode) => {
    switch (errorCode) {
      case "auth/email-already-in-use":
        return "Email already in use. Please choose a different email address.";
      case "auth/invalid-email":
        return "Invalid email address. Please enter a valid email.";
      case "auth/weak-password":
        return "The password is too weak. Please choose a stronger password.";
      // Add more cases for other error codes if needed
      default:
        return "An error occurred during sign-up. Please try again later.";
    }
  };

  return (
    <div className="container d-flex justify-content-center align-items-center vh-100">
      <div className="col-md-6">
        <h1 className="text-center">
          <img src={ebayLogo} alt="Ebay Logo" className="ebay-logo" /> Sign Up
        </h1>
        <br />

        <form onSubmit={handleSignup}>
          <div className="form-group">
            <input
              type="email"
              className="form-control"
              placeholder="Email"
              value={email}
              onChange={(e) => setEmail(e.target.value)}
              required
            />
          </div>

          <br />
          <div className="form-group">
            <input
              type="password"
              className="form-control"
              placeholder="Password"
              value={password}
              onChange={(e) => setPassword(e.target.value)}
              required
            />
          </div>
          <br />
          <div className="text-center">
            <button type="submit" className="btn btn-primary">
              Sign Up
            </button>
          </div>
        </form>

        <br />
        <br />
        <p className="text-center">
          Already have an account? <Link to="/login">Login</Link>
        </p>
      </div>
    </div>
  );
}

export default SignupPage;
These codes import necessary dependencies, create a signup page component with form validation, handle signup functionality with Firebase authentication, and display error prompts if needed.
Login page
In the components folder, create another file LoginPage.jsx. To create a login page with form validation, handles login with Firebase, and displays errors copy and paste the codes below into the file:
import React, { useState } from 'react';
import firebase from 'firebase/compat/app';
import 'firebase/compat/auth';
import { Link } from 'react-router-dom';
import ebayLogo from "../assets/ebay-logo.png";
import "../App.css";

function LoginPage() {
  const [email, setEmail] = useState('');
  const [password, setPassword] = useState('');

  const handleLogin = async (e) => {
    e.preventDefault();

    try {
      await firebase.auth().signInWithEmailAndPassword(email, password);
    } catch (error) {
      console.error(error);
      alert(getErrorPrompt(error.code));
    }
  };

  // Function to get the prompt message based on error code
  const getErrorPrompt = (errorCode) => {
    switch (errorCode) {
      case 'auth/user-not-found':
        return "User not found. Please check your email and password.";
      case 'auth/wrong-password':
        return "Invalid password. Please try again.";
      // Add more cases for other error codes if needed
      default:
        return "An error occurred during sign-in. Please try again later.";
    }
  };

  return (
    <div className="container d-flex justify-content-center align-items-center vh-100">
      <div className="col-md-6 text-center">
        <h1><img src={ebayLogo} alt="Ebay Logo" className="ebay-logo" /> Login</h1>
        <form onSubmit={handleLogin}>
          <div className="mb-3">
            <input
              type="email"
              className="form-control input-lg"
              placeholder="Email"
              value={email}
              onChange={(e) => setEmail(e.target.value)}
            />
          </div>
          <div className="mb-3">
            <input
              type="password"
              className="form-control input-lg"
              placeholder="Password"
              value={password}
              onChange={(e) => setPassword(e.target.value)}
            />
          </div>
          <button type="submit" className="btn btn-primary btn-lg">Login</button>
        </form>
        <p className="mt-3">
          Not registered? <Link to="/signup">Sign up</Link>
        </p>
      </div>
    </div>
  );
}

export default LoginPage;
Before moving to the next step, let’s make a quick update to your App.jsx file located in the src folder. Replace the existing code with the following snippet below to ensure smooth authentication and routing.
import React, { useState, useEffect } from 'react';
import { BrowserRouter as Router, Route, Navigate, Routes } from 'react-router-dom';
import firebase from 'firebase/compat/app';
import 'firebase/compat/auth';
import HomePage from './components/hompage/HomePage.jsx';
import LoginPage from './components/LoginPage.jsx';
import SignupPage from './components/SignupPage.jsx';
import ChatUtils from './components/hompage/ChatUtils.jsx';

// Replace the following configuration with your Firebase project configuration
const firebaseConfig = {
  apiKey: import.meta.env.VITE_FIREBASE_API_KEY,
  authDomain: import.meta.env.VITE_FIREBASE_AUTH_DOMAIN,
  projectId: import.meta.env.VITE_FIREBASE_PROJECT_ID,
  appId: import.meta.env.VITE_FIREBASE_APP_ID
};

// Initialize Firebase
firebase.initializeApp(firebaseConfig);

function App() {
  const [user, setUser] = useState(null);
  const [loading, setLoading] = useState(true);

  useEffect(() => {
    // Listen for user authentication state changes
    const unsubscribe = firebase.auth().onAuthStateChanged((user) => {
      setUser(user);
      setLoading(false);
    });

    // Clean up the listener
    return () => unsubscribe();
  }, []);

  if (loading) {
    return <div>Loading...</div>;
  }

  return (
    <Router>
      <Routes>
        <Route
          path="/"
          element={user ? <HomePage /> : <Navigate to="/login" />}
        />
        <Route
          path="/login"
          element={!user ? <LoginPage /> : <Navigate to="/" />}
        />
        <Route
          path="/signup"
          element={!user ? <SignupPage /> : <Navigate to="/" />}
        />
        <Route
          path="/chat"
          element={user ? <ChatUtils /> : <Navigate to="/" />}
        />

      </Routes>
    </Router>
  );
}

export default App;
One more thing, open your App.css and insert this code:
.ebay-logo{

  height: 150px;

  width:200px;

  margin-top: -15px;
}
Homepage component
The homepage serves as the core of our application and requires successful login or signup to access. Create a “homepage” folder under components and place the following code snippet into a React component named HomePage.
import React, { useState, useEffect } from "react";
import firebase from "firebase/compat/app";
import "firebase/compat/auth";
import { Navigate } from "react-router-dom";

import HeaderBar from "./HeaderBar.jsx";
import SearchBar from "./SearchBar.jsx";
import CategoryBar from "./CategoryBar.jsx";
import SampleProduct from "./SampleProduct.jsx";
import ExploreProducts from "./ExploreProducts.jsx";
import Footer from "./Footer.jsx";
import DailyDeals from "./DailyDeals.jsx";

function HomePage() {
  const [loading, setLoading] = useState(true);
  const [user, setUser] = useState(null);

  useEffect(() => {
    const unsubscribe = firebase.auth().onAuthStateChanged((user) => {
      setUser(user);
      setLoading(false);
    });

    return () => unsubscribe();
  }, []);

  if (loading) {
    return <div>Loading...</div>;
  }

  if (!user) {
    return <Navigate to="/login" />;
  }

  return (
    <div>
      <HeaderBar />
      <SearchBar />
      <CategoryBar />
      <SampleProduct />
      <br />
      <br />
      <ExploreProducts />

      <br />
      <br />

      <DailyDeals />

      <br />
      <br />
      <br />
      <br />
      <br />
      <br />

      <Footer />


    </div>
  );
}

export default HomePage;
The homepage component generates an array of visually captivating components, forming an appealing homepage. Here’s the function responsible for generating these components:
- HeaderBar: The
HeaderBaris the top section of the eBay clone homepage that typically contains the logo, navigation menu, and user account options. - SearchBar:
SearchBarcomponent allows users to enter keywords or product names to search for specific items they want to buy on the eBay clone platform. - CategoryBar: The
CategoryBarprovides a list of product categories or filters, allowing users to browse and navigate through different types of products available on the eBay clone website. - SampleProduct:
SampleProductrefers to a representative or featured product showcased on the homepage, giving users a glimpse of the types of items available for purchase on the eBay clone platform. - ExploreProducts: The
ExploreProductssection presents a curated selection or recommendations of various products from different categories, encouraging users to discover new items of interest on the eBay clone website. - DailyDeals:
DailyDealscomponent highlights special offers or discounted products that are available for a limited time, enticing users to take advantage of attractive deals on the eBay clone platform. - Footer: The
Footeris the bottom section of the eBay clone homepage that typically contains important links, such as terms of service, privacy policy, contact information, and additional navigational options to help users find relevant information or access other parts of the website.
Create the above components under the homepage folder. Copy and paste the codes below to build up homepage components.
HeaderBar.jsx
import React, { useEffect, useState } from 'react';
import firebase from 'firebase/compat/app';
import 'firebase/compat/auth';
import { Link } from "react-router-dom";
import handleLogout from './HandleLogout';
import '../../App.css'; // Provide the correct relative path to App.css


const HeaderBar = () => {
  const [currentUser, setCurrentUser] = useState(null);

  useEffect(() => {
    const unsubscribe = firebase.auth().onAuthStateChanged((user) => {
      setCurrentUser(user);
    });

    // Clean up the subscription when the component unmounts
    return () => unsubscribe();
  }, []);

  if (currentUser) {
    var email = currentUser.email;

    var username = email.split('@')[0];
  }

  return (
    <header className="navbar navbar-expand-lg navbar-light bg-light">
      <div className="container">
        <span className="navbar-brand">Hi, {username} 🚀</span>
        <div className="navbar-nav ml-auto">
          <button className="btn btn-link nav-item"><Link to="/chat">Chat</Link></button>
          <button className="btn btn-link nav-item">Sell</button>
          <button className="btn btn-link nav-item">Wishlist</button>
          <button className="btn btn-link nav-item">Cart</button>
          <button className="btn btn-link nav-item" onClick={handleLogout}>
            Sign out
          </button>
        </div>
      </div>
    </header>
  );
};

export default HeaderBar;
SearchBar.jsx
import React from 'react';
import { Navbar, Container, Form, FormControl, Button } from 'react-bootstrap';
import ebayLogo from '../../assets/ebay-logo.png';

const SearchBar = () => {
  return (
    <Navbar bg="light">
      <Container>
        <Navbar.Brand>
          <img src={ebayLogo} alt="Ebay Logo" height={60}/>
        </Navbar.Brand>
        <Form className="d-flex justify-content-between align-items-center flex-grow-1">
          <div className="d-flex flex-grow-1">
            <FormControl type="text" placeholder="Search for anything" className="mr-2 flex-grow-1" />
            <Button variant="primary">Search</Button>
          </div>
        </Form>
      </Container>
    </Navbar>
  );
};

export default SearchBar;
CategoryBar.jsx
import React from "react";
import { NavLink } from "react-router-dom";

const categories = [
  "🤍Saved",
  "Electronics",
  "Clothing",
  "Home & Kitchen",
  "Books",
  "Beauty",
  "Toys & Games",
  "Sports & Outdoors",
  "Health & Wellness",
  "Automotive",
  "Jewelry",
];

const CategoryBar = () => {
  return (
    <nav className="navbar navbar-expand-lg navbar-light bg-light">
      <button
        className="navbar-toggler"
        type="button"
        data-toggle="collapse"
        data-target="#navbarNav"
        aria-controls="navbarNav"
        aria-expanded="false"
        aria-label="Toggle navigation"
      >
        <span className="navbar-toggler-icon"></span>
      </button>
      <div
        className="collapse navbar-collapse justify-content-center"
        id="navbarNav"
      >
        <ul className="navbar-nav smaller-font">
          <li className="nav-item">
            <NavLink className="nav-link" to="/" exact activeclassname="active">
              Home
            </NavLink>
          </li>
          {categories.map((category, index) => (
            <li className="nav-item" key={index}>
              <NavLink
                className="nav-link"
                to={`/category${index + 1}`}
                activeclassname="active"
              >
                {category}
              </NavLink>
            </li>
          ))}
        </ul>
      </div>
    </nav>
  );
};

export default CategoryBar;
SampleProduct.jsx
import React from 'react';
import Carousel from 'react-bootstrap/Carousel';
import image1 from "../../assets/item1.jpg";
import image2 from "../../assets/item2.avif";
import iphone from "../../assets/iphone.png";
import carTools from "../../assets/carTools.jpg";


const SampleProduct = () => {
  return (
    <div>
      <Carousel>
        <Carousel.Item>
          <img
            className="d-block w-100"
            src={image1}
            alt="First slide"
          />
          <Carousel.Caption>
            <h3>Ar/VR</h3>
            <p>Get your high quality AR/VR deals now! check available deals</p>
          </Carousel.Caption>
        </Carousel.Item>
        <Carousel.Item>
          <img
            className="d-block w-100"
            src={image2}
            alt="Second slide"
          />
          <Carousel.Caption>
            <h3>Drones</h3>
            <p>Get your high quality Drone deals now! check available deals</p>
          </Carousel.Caption>
        </Carousel.Item>
        <Carousel.Item>
          <img
            className="d-block w-100"
            src={iphone}
            alt="Third slide"
          />
          <Carousel.Caption>
            <h3>iPhone</h3>
            <p>Get your cheap and high quality iPhone deals now! check available deals</p>
          </Carousel.Caption>
        </Carousel.Item>
        <Carousel.Item>
          <img
            className="d-block w-100"
            src={carTools}
            alt="Fourth slide"
          />
          <Carousel.Caption>
            <h3>Car Tools</h3>
            <p>Get your cheap and high quality CarTools deals now! check available deals</p>
          </Carousel.Caption>
        </Carousel.Item>
      </Carousel>
    </div>
  );
};

export default SampleProduct;
ExploreProducts.jsx
import React from "react";
import { Link } from "react-router-dom";
import product1 from "../../assets/product1.webp";
import product2 from "../../assets/product2.webp";
import product3 from "../../assets/product3.jpg";
import product4 from "../../assets/product4.webp";
import product5 from "../../assets/product5.jfif";
import product6 from "../../assets/product6.jpg";
import forwardarrow from "../../assets/forward-arrow.png"

import './ExploreProducts.css'; // Import your CSS file for styling

const ExploreProducts = () => {
  return (
    <div className="explore-container">
      <h3>Explore popular products</h3>
      <div className="product-list">
        <div className="product-circle">
          <img src={product1} alt="Product 1" />
        </div>
        <div className="product-circle">
          <img src={product2} alt="Product 2" />
        </div>
        <div className="product-circle">
          <img src={product3} alt="Product 3" />
        </div>
        <div className="product-circle">
          <img src={product4} alt="Product 4" />
        </div>
        <div className="product-circle">
          <img src={product5} alt="Product 5" />
        </div>
        <div className="product-circle">
          <img src={product6} alt="Product 6" />
        </div>
        <div className="product-circle last-circle">
          <div className="see-more">See more<img src = {forwardarrow} className="forward-icon"/></div>
        </div>
      </div>
    </div>
  );
};

export default ExploreProducts;
ExploreProducts.css (styling)
.explore-container {
  display: flex;
  flex-direction: column;
  align-items: center;
}

.explore-container .product-list {
  display: flex;
  justify-content: center;
  flex-wrap: wrap;
}

.explore-container .product-circle {
  width: 120px;
  height: 120px;
  border-radius: 50%;
  margin: 10px;
  overflow: hidden;
  display: flex;
  justify-content: center;
  align-items: center;
}

.explore-container .product-circle img {
  max-width: 100%;
  max-height: 100%;
  object-fit: cover;
}

.explore-container .last-circle {
  background: linear-gradient(to bottom, blue, purple);
}

.explore-container .see-more {

  font-size: large;
  display: flex;
  align-items: center;
  justify-content: center;
  color: white;
  font-weight: bold;
  height: 100%;
  width: 100%;
}

.forward-icon {
  width: 30px;
  height: 40px;
}
DailyDeals.jsx
import React, { useState, useEffect } from 'react';
import firebase from 'firebase/compat/app';
import 'firebase/compat/auth';
import { Card, Button } from 'react-bootstrap';
import Drone from '../../assets/dronep.jpg';
import S23 from '../../assets/s23-ultrap.jfif';
import Watch from '../../assets/smartwatchp.jpg';
import Hoodie from '../../assets/hoodiesp.webp';

const DailyDeals = () => {
  const [currentUser, setCurrentUser] = useState(null);

  useEffect(() => {
    const unsubscribe = firebase.auth().onAuthStateChanged((user) => {
      setCurrentUser(user);
    });

    // Clean up the subscription when the component unmounts
    return () => unsubscribe();
  }, []);

  let username = '';
  if (currentUser) {
    const email = currentUser.email;
    username = email.split('@')[0];
  }

  // Sample data for the products
  const products = [
    {
      id: 1,
      name: '3D HD Drones',
      price: '$9.99',
      description: 'Lorem ipsum dolor sit amet, consectetur adipiscing elit.',
      image: Drone,
    },
    {
      id: 2,
      name: 'S23 Ultra',
      price: '$19.99',
      description: 'Lorem ipsum dolor sit amet, consectetur adipiscing elit.',
      image: S23,
    },
    {
      id: 3,
      name: 'Indie Hoodie',
      price: '$29.99',
      description: 'Lorem ipsum dolor sit amet, consectetur adipiscing elit.',
      image: Hoodie,
    },
    {
      id: 4,
      name: 'Apple Smartwatch',
      price: '$39.99',
      description: 'Lorem ipsum dolor sit amet, consectetur adipiscing elit.',
      image: Watch,
    },
  ];

  return (
    <div>
      <h3 className="text-center">Daily Deals</h3>
      <br/>
      <br/>
      <div className="row">
        {products.map((product) => (
          <div key={product.id} className="col-md-3">
            <Card>
              <Card.Img variant="top" src={product.image} alt={product.name} />
              <Card.Body>
                <Card.Title>{product.name}</Card.Title>
                <Card.Text>
                  <strong>Price:</strong> {product.price}
                  <br />
                  <strong>Description:</strong> {product.description}
                  <br />
                  <strong>Created by:</strong> {username}
                  <br />
                </Card.Text>
                <Button variant="primary">Contact Seller</Button>
              </Card.Body>
            </Card>
          </div>
        ))}
      </div>
    </div>
  );
};

export default DailyDeals;
Footer.jsx
import React from 'react';
import { Container, Row, Col } from 'react-bootstrap';
const Footer = () => {
return (
<footer className="bg-ghostwhite text-dark mt-5 d-flex align-items-center">
<Container>
<Row>
<Col md={3} sm={6}>
<h5>Company</h5>
<ul className="list-unstyled">
<li>About</li>
<li>Careers</li>
<li>Press</li>
<li>Affiliates</li>
</ul>
</Col>
<Col md={3} sm={6}>
<h5>Buy</h5>
<ul className="list-unstyled">
<li>Deals</li>
<li>Coupons</li>
<li>Gift Cards</li>
<li>Help</li>
</ul>
</Col>
<Col md={3} sm={6}>
<h5>Sell</h5>
<ul className="list-unstyled">
<li>Start Selling</li>
<li>Learn to Sell</li>
<li>Businesses</li>
<li>Help</li>
</ul>
</Col>
<Col md={3} sm={6}>
<h5>Stay Connected</h5>
<ul className="list-unstyled">
<li>Facebook</li>
<li>Twitter</li>
<li>Instagram</li>
<li>YouTube</li>
</ul>
</Col>
</Row>
<hr />
<Row>
<Col md={6}>
<small>© {new Date().getFullYear()} eBay Inc. All Rights Reserved.</small>
</Col>
<Col md={6}>
<ul className="list-inline float-md-end">
<li className="list-inline-item"><a href="#">Privacy Policy</a></li>
<li className="list-inline-item"><a href="#">Terms & Conditions</a></li>
<li className="list-inline-item"><a href="#">Site Map</a></li>
</ul>
</Col>
</Row>
</Container>
</footer>
);
};
export default Footer;Integrate In-app Chat Kit into the project
Establish a connection and sign in.
To seamlessly incorporate In-app Chat Kit components into your file, follow these steps:
- Create an instance of In-app Chat Kit within the file that requires In-app Chat UI components.
- Initialize the In-app Chat Kit SDK by invoking the
initmethod. - Achieve successful login by utilizing the
connectUsermethod, providing your user information and Token. Authentication must pass for a successful login. Customize rules to generate a meaningfuluser ID, associating it with your business account system. - Showcase the In-app Chat Kit components by importing the
Commonmodule into the file that requires their usage.
Create a new file with homepage components call ChatUtils.jsx. Add the codes below to it.
import React from 'react';

// Integrate the SDK
import { ZIMKitManager, Common } from '@zegocloud/zimkit-react';
import '@zegocloud/zimkit-react/index.css';

// The following uses the App instance as an example.
export default class App extends React.Component {
    constructor() {
        super();
        this.state = {
            appConfig: {
                appID: 0,        // The AppID you get from the ZEGOCLOUD admin console.
                serverSecret: '' // The serverSecret you get from ZEGOCLOUD Admin Console.
            },
            // The userID and userName is a strings of 1 to 32 characters.
            // Only digits, letters, and the following special characters are supported: '~', '!', '@', '#', '$', '%', '^', '&', '*', '(', ')', '_', '+', '=', '-', '`', ';', ''', ',', '.', '<', '>', '/', '\'
            userInfo: {
                // Your ID as a user.
                userID: '',
                // Your name as a user.
                userName: '',
                // The image you set as a user avatar must be network images. e.g., https://storage.zego.im/IMKit/avatar/avatar-0.png
                userAvatarUrl: ''
            },
        }
    }
    async componentDidMount() {
        const zimKit = new ZIMKitManager();
        const token = zimKit.generateKitTokenForTest(this.state.appConfig.appID, this.state.appConfig.serverSecret, this.state.userInfo.userID);
        await zimKit.init(this.state.appConfig.appID);
        await zimKit.connectUser(this.state.userInfo, token);
    }
    render() {
        return (
            <Common></Common>
        );
    }
}
By following these steps, you’ll effortlessly integrate In-app Chat Kit components into your application, enhancing your communication capabilities.
Start a one-on-one chat
Before initiating a chat, ensure that the peer user has previously logged into the In-app Chat UIKit. Retrieve the userID using your unique business logic, and then execute the provided code snippet.
createChat(userID: string) {
    ZIMKitChatListVM.getInstance().initWithConversationID(userID, ZIMKitConversationType.ZIMKitConversationTypePeer);
}
Start a group chat
Obtain the userIDList and groupName using your personalized business logic. The userIDList contains the desired user IDs to invite to the group chat. Once retrieved, fill in the appropriate parameters and execute the provided code snippet to proceed with the process.
createGroupChat(groupName: string, userIDList: string[]) {
    ZIMKitManager.getInstance()
        .createGroup(groupName, userIDList)
        .then((data) => {
            const { groupInfo, errorUserList } = data;
            const { baseInfo } = groupInfo;
            if (errorUserList.length) {
                // Create a prompt window to notify the user that the user ID they entered does not exist. The prompt window should be implemented based on your business logic.


            } else {
                // After the group chat is created successfully, this navigates to the chat page directly.

                const groupID = baseInfo.groupID
                ZIMKitChatListVM.getInstance().initWithConversationID(groupID,  ZIMKitConversationType.ZIMKitConversationTypeGroup);
            }
        }).catch((error) => {
            // Create a prompt window to notify the user of the error when creating a group chat. The prompt window should be implemented based on the returned error information.

        });;
}
Join a group chat
Get the group ID using your own business logic. The groupID uniquely identifies the group chat you want to join. Once you have the group ID, fill it in the provided parameter and run the code snippet.
joinGroupChat(groupID: string) {
ZIMKitManager.getInstance()
.joinGroup(groupID)
.then((data) => {
const groupID = data.groupInfo.baseInfo.groupID;
ZIMKitChatListVM.getInstance().initWithConversationID(groupID, ZIMKitConversationType.ZIMKitConversationTypeGroup);
});
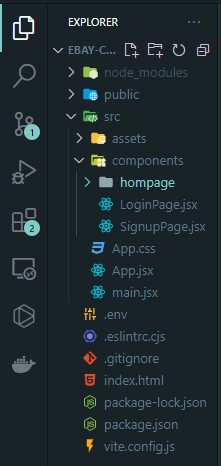
}Your project structure should look like the one below if you follow the instructions correctly.
Run a Demo
You can download the eBay Clone app source code here.
Conclusion
Building your own eBay clone app is an exhilarating venture that requires careful planning and the right resources. By leveraging the power of modern technologies and platforms like ZEGOCLOUD ChatKit, you can create a robust and user-friendly online marketplace. With a comprehensive feature set and seamless communication capabilities, your eBay clone app has the potential to revolutionize the e-commerce industry and drive your entrepreneurial success. Sign up to get started with ZEGOCLOUD’s In-app Chat Kit.
Read more:
Let’s Build APP Together
Start building with real-time video, voice & chat SDK for apps today!
