


Adding voice calls to your iOS app helps keep users engaged and prevents them from switching to other platforms. With modern real-time communication tools, developers can easily integrate this feature without needing advanced audio knowledge. This guide covers practical steps for building an iOS voice call app, including setting up audio, managing calls, and creating a clear and user-friendly interface.
How to Build a Voice Call App with iOS
Creating a voice calling app for iOS becomes much simpler when you use ZEGOCLOUD’s ready-made iOS voice SDK. Popular apps like WhatsApp and Discord rely on real-time voice technology to connect millions of users. With ZEGOCLOUD, you get the same powerful audio technology that handles all the complex networking and audio processing.
In this section, we will build a complete voice calling app that connects users through clear audio calls. The app will handle multiple users, manage call states properly, and provide a clean interface for making and receiving calls.
Prerequisites
Before starting, make sure you have these requirements ready:
- A ZEGOCLOUD account (sign up at console.zegocloud.com)
- Your AppID and AppSign from ZEGOCLOUD Admin Console.
- Xcode 13.0 or later installed on your Mac.
- An iOS device running iOS 9.0 or later for testing.
- Basic knowledge of Swift and iOS development.
If you have these ready, let’s start building your voice calling app!
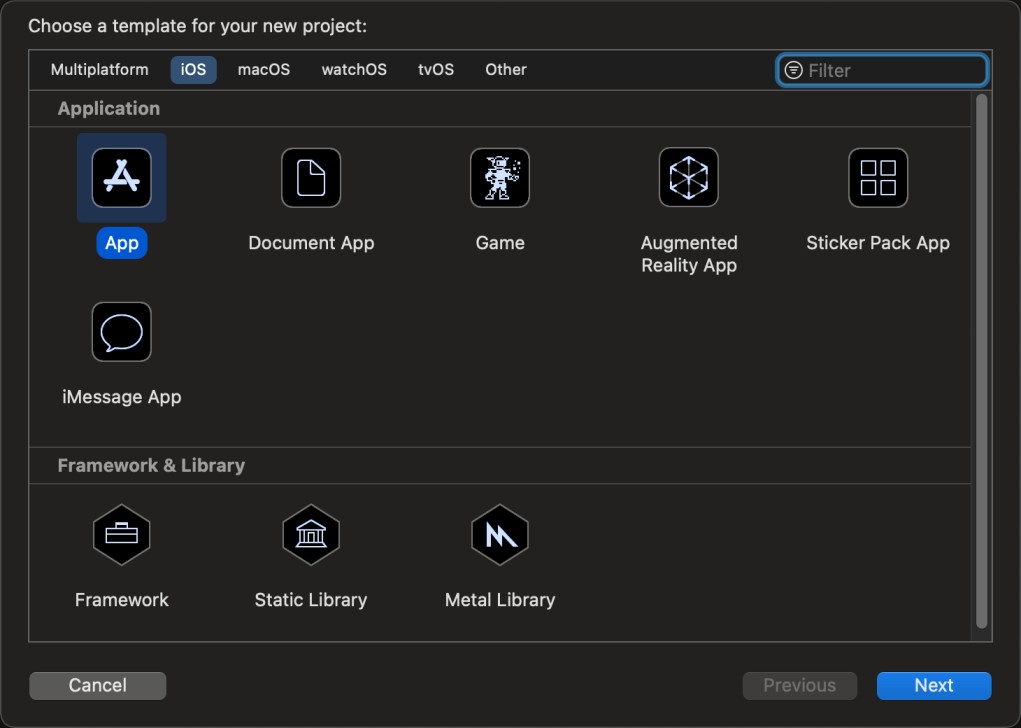
1. Create Your iOS Project
First, create a new iOS project in Xcode for your voice calling app:
Open Xcode and select “File > New > Project” from the menu. In the dialog box, choose the iOS tab and select “App” from the Application section.
Fill in your project details with a meaningful name and your organization identifier. This creates your App Bundle Identifier that iOS uses to identify your app.
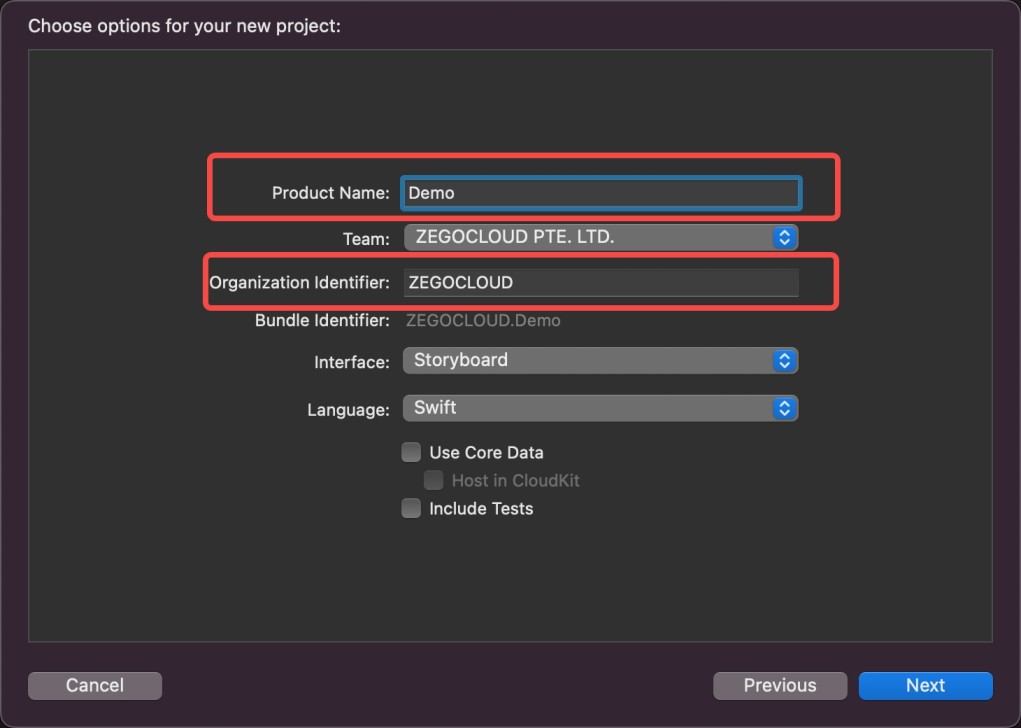
Choose a directory to save your project and click “Create” to set up the basic project structure.
2. Install ZEGOCLOUD SDK
Add the ZEGOCLOUD Express SDK to your project using Swift Package Manager:
- Open your project in Xcode and select “File > Add Packages…” from the menu bar. In the search box, enter this URL: https://github.com/zegolibrary/express-video-ios
- Choose the SDK version you want to integrate (use “Up to Next Major Version” for the latest stable release). Click “Add Package” to download and integrate the SDK into your project.
Xcode will automatically handle the installation and make the SDK available for use in your code.
3. Add Device Permissions
Voice call apps need permission to use the device microphone. You can add these permissions to your app:
In Xcode, select your project target and click on the “Info” tab. Under “Custom iOS Target Properties,” click the “+” button to add new permissions.
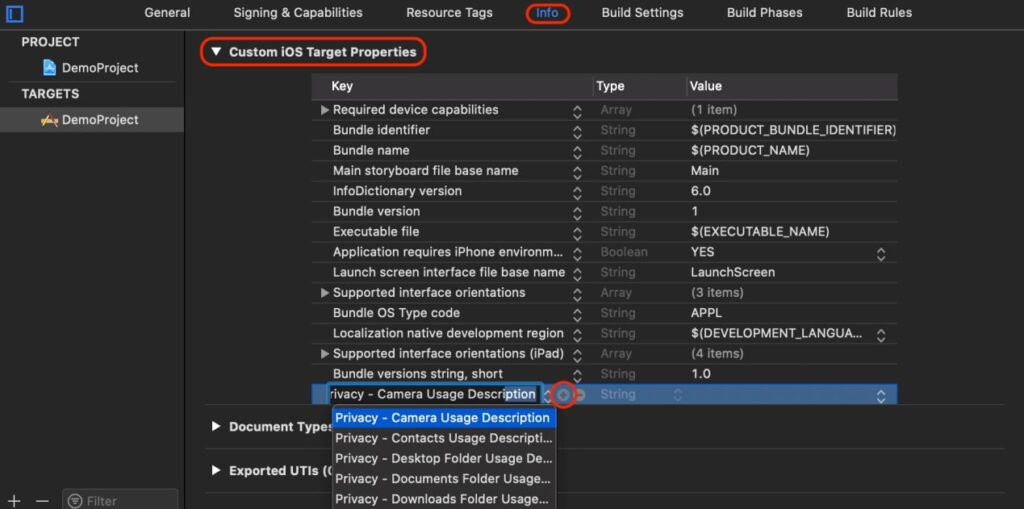
Add these two privacy descriptions: Privacy - Microphone Usage Description: “This app needs microphone access to make voice calls” Privacy - Camera Usage Description: “This app needs camera access for video features” (optional for voice-only)

These descriptions tell users why your app needs these permissions when they first open it.
4. Set Up Your App Configuration
Create a configuration file to store your ZEGOCLOUD credentials securely. Add a new Swift file called Config.swift:
struct AppConfig {
    // Get these values from ZEGOCLOUD Console
    static let appID: UInt32 = your_app_id
    static let appSign: String = "your_app_sign"

    // Generate user tokens for authentication
    static func generateUserID() -> String {
        return "user_\(Int.random(in: 1000...9999))"
    }
}
Replace your_app_id and your_app_sign with the actual values from your ZEGOCLOUD console. These credentials authenticate your app with ZEGOCLOUD’s servers.
5. Create the Voice Engine
Set up the core voice calling engine that handles all audio processing. Add this code to your main view controller:
import UIKit
import ZegoExpressEngine

class VoiceCallViewController: UIViewController {
    private var currentRoomID: String = ""
    private var currentUserID: String = ""
    private var isInCall: Bool = false
    private var isMicrophoneMuted: Bool = false

    override func viewDidLoad() {
        super.viewDidLoad()
        setupVoiceEngine()
        setupUI()
    }

    private func setupVoiceEngine() {
        let profile = ZegoEngineProfile()
        profile.appID = AppConfig.appID
        profile.appSign = AppConfig.appSign
        profile.scenario = .standardVoiceCall

        // Create engine with voice call settings
        ZegoExpressEngine.createEngine(with: profile, eventHandler: self)
    }

    private func destroyEngine() {
        ZegoExpressEngine.destroy(nil)
    }
}
This creates the voice engine with settings optimized for voice calls rather than video or broadcasting.
6. Handle Voice Call Events
Implement event handlers to manage call states and audio streams. Extend your view controller with the event handler protocol:
extension VoiceCallViewController: ZegoEventHandler {

    // Handle new audio streams from other users
    func onRoomStreamUpdate(_ updateType: ZegoUpdateType,
                           streamList: [ZegoStream],
                           extendedData: [AnyHashable : Any]?,
                           roomID: String) {

        if updateType == .add {
            // Someone started talking - play their audio
            for stream in streamList {
                ZegoExpressEngine.shared().startPlayingStream(stream.streamID)
            }
        } else {
            // Someone stopped talking - stop their audio
            for stream in streamList {
                ZegoExpressEngine.shared().stopPlayingStream(stream.streamID)
            }
        }
    }

    // Handle room connection changes
    func onRoomStateUpdate(_ state: ZegoRoomState,
                          errorCode: Int32,
                          extendedData: [AnyHashable : Any]?,
                          roomID: String) {

        if state == .connected {
            print("Connected to call successfully")
            updateCallUI(connected: true)
        } else if state == .disconnected {
            print("Call ended or connection lost")
            updateCallUI(connected: false)
        }
    }

    // Handle other users joining or leaving
    func onRoomUserUpdate(_ updateType: ZegoUpdateType,
                         userList: [ZegoUser],
                         roomID: String) {

        for user in userList {
            if updateType == .add {
                print("User \(user.userName) joined the call")
            } else {
                print("User \(user.userName) left the call")
            }
        }
    }
}
These event handlers automatically manage audio streams and update your app when call states change.
7. Implement Call Functions
Add the core functions for starting, joining, and ending voice calls:
extension VoiceCallViewController {

    // Start or join a voice call
    func startCall(roomID: String, userID: String) {
        self.currentRoomID = roomID
        self.currentUserID = userID

        let user = ZegoUser(userID: userID)
        let config = ZegoRoomConfig()
        config.isUserStatusNotify = true

        // Join the call room
        ZegoExpressEngine.shared().loginRoom(roomID, user: user, config: config) { [weak self] errorCode, extendedData in
            if errorCode == 0 {
                // Successfully joined - start transmitting voice
                self?.startPublishingAudio()
                self?.isInCall = true
            } else {
                print("Failed to join call: \(errorCode)")
                self?.showError("Could not connect to call")
            }
        }
    }

    // Start transmitting your voice to others
    private func startPublishingAudio() {
        let streamID = "voice_\(currentUserID)"

        // Disable camera for voice-only calls
        ZegoExpressEngine.shared().enableCamera(false)

        // Start sending your voice
        ZegoExpressEngine.shared().startPublishingStream(streamID)
    }

    // End the current call
    func endCall() {
        // Stop sending your voice
        ZegoExpressEngine.shared().stopPublishingStream()

        // Leave the call room
        ZegoExpressEngine.shared().logoutRoom(currentRoomID)

        isInCall = false
        updateCallUI(connected: false)
    }

    // Toggle microphone on/off
    func toggleMicrophone() -> Bool {
        isMicrophoneMuted.toggle()
        ZegoExpressEngine.shared().muteMicrophone(isMicrophoneMuted)
        return isMicrophoneMuted
    }
}
These functions handle the main call actions users need: joining calls, speaking, and controlling their microphone.
8. Create the User Interface
Build a simple interface with buttons for call actions. Add this UI setup code:
extension VoiceCallViewController {

    private func setupUI() {
        view.backgroundColor = .systemBackground

        // Create call control buttons
        let stackView = UIStackView()
        stackView.axis = .vertical
        stackView.spacing = 20
        stackView.translatesAutoresizingMaskIntoConstraints = false

        let joinButton = createButton(title: "Join Call", action: #selector(joinCallTapped))
        let muteButton = createButton(title: "Mute", action: #selector(muteTapped))
        let endButton = createButton(title: "End Call", action: #selector(endCallTapped))

        stackView.addArrangedSubview(joinButton)
        stackView.addArrangedSubview(muteButton)
        stackView.addArrangedSubview(endButton)

        view.addSubview(stackView)

        // Center the buttons
        NSLayoutConstraint.activate([
            stackView.centerXAnchor.constraint(equalTo: view.centerXAnchor),
            stackView.centerYAnchor.constraint(equalTo: view.centerYAnchor),
            stackView.widthAnchor.constraint(equalToConstant: 200)
        ])
    }

    private func createButton(title: String, action: Selector) -> UIButton {
        let button = UIButton(type: .system)
        button.setTitle(title, for: .normal)
        button.backgroundColor = .systemBlue
        button.setTitleColor(.white, for: .normal)
        button.layer.cornerRadius = 8
        button.addTarget(self, action: action, for: .touchUpInside)
        button.translatesAutoresizingMaskIntoConstraints = false
        button.heightAnchor.constraint(equalToConstant: 50).isActive = true
        return button
    }

    // Button action handlers
    @objc private func joinCallTapped() {
        let roomID = "demo_room_123"
        let userID = AppConfig.generateUserID()
        startCall(roomID: roomID, userID: userID)
    }

    @objc private func muteTapped(_ sender: UIButton) {
        let isMuted = toggleMicrophone()
        sender.setTitle(isMuted ? "Unmute" : "Mute", for: .normal)
    }

    @objc private func endCallTapped() {
        endCall()
    }

    private func updateCallUI(connected: Bool) {
        // Update button states and UI based on call status
        DispatchQueue.main.async {
            // Update your UI elements here
        }
    }

    private func showError(_ message: String) {
        DispatchQueue.main.async {
            let alert = UIAlertController(title: "Error", message: message, preferredStyle: .alert)
            alert.addAction(UIAlertAction(title: "OK", style: .default))
            self.present(alert, animated: true)
        }
    }
}
With the code above, we created a clean interface with the essential call controls users need.
9. Handle App Lifecycle
Make sure the voice engine starts and stops properly with your app:
extension VoiceCallViewController {

    override func viewWillDisappear(_ animated: Bool) {
        super.viewWillDisappear(animated)

        // Clean up when leaving the screen
        if isInCall {
            endCall()
        }
        destroyEngine()
    }

    override func viewDidAppear(_ animated: Bool) {
        super.viewDidAppear(animated)

        // Restart engine if needed when returning to screen
        setupVoiceEngine()
    }
}
This ensures your app properly manages system resources and doesn’t leave calls running in the background.
Run a Demo
To test your implementation, you need at least two devices or one device and the web testing platform. Install your app on two different iOS devices. Have each device join the same room with different user IDs.
Conclusion
You now have a fully functional voice calling app that handles real-time audio communication between users! Using ZEGOCLOUD’s powerful SDK, you built professional-grade voice calling features without needing deep audio engineering knowledge. Your users can now make clear voice calls, control their microphone, and connect with others seamlessly.
This foundation opens up many possibilities for enhancing your app. Consider adding features like call history, contact lists, group voice calls, or integration with your existing user system. With the core voice technology working, you can focus on building unique features that make your app stand out in the market.
FAQ
Q1: How can I implement voice calls in an iOS app without interruptions?
Use CallKit for native call UI and PushKit for VoIP push notifications. These ensure the app can wake up and display a proper interface even if it’s in the background. Managing audio sessions correctly is also key to preventing call disruptions.
Q2: What frameworks are required to build voice calling on iOS?
You’ll need AVFoundation for handling audio, CallKit for the native calling interface, and PushKit for VoIP push notifications. For actual call functionality, integrating a real-time SDK like WebRTC or ZEGOCLOUD is recommended.
Q3: What common mistakes do beginners make when building iOS voice calls?
Common issues include missing microphone permission requests, incorrect audio session setup, and improper use of CallKit or VoIP pushes. These can lead to no sound, failed calls, or app rejections if not handled correctly.
Let’s Build APP Together
Start building with real-time video, voice & chat SDK for apps today!
