


Integrating screen sharing into a React Native video call app enables users to share their device screen with others in real-time. This feature is widely used for presentations, remote work, online classes, and game streaming. In this guide, we will build a React Native video call app and explain how to integrate screen sharing into React Native video calls using ZEGOCLOUD. Let’s get started.
How to Add Screen Share to React Native Video Call with ZEGOCLOUD
ZEGOCLOUD handles video capture, real-time transmission, and playback. It supports multiple video sources, including camera and screen capture.
Prerequisites
Before starting development, ensure you have:
- A ZEGOCLOUD account with Video Call services enabled → Sign up here
- React Native 0.60.0 or later
- Node.js and npm installed
- Valid AppID and AppSign from the ZEGOCLOUD console
- iOS device or simulator running iOS 12.0 or later (iPhone X or later recommended for screen sharing)
- Android device or simulator running Android 5.0 or later for screen sharing
- Basic understanding of React Native
Step 1. Project Setup
1.1 Install the SDK
Add the ZEGOCLOUD Video Call SDK to your React Native project:
npm install zego-express-engine-reactnative --saveFor iOS, install the native dependencies:
cd ios && pod installOnce installed, you can import the SDK in your project:
import ZegoExpressEngine from 'zego-express-engine-reactnative';1.2 Configure Permissions
Android
Open android/app/src/main/AndroidManifest.xml and add the required permissions:
<!-- Permissions required by the SDK -->
<uses-permission android:name="android.permission.ACCESS_WIFI_STATE" />
<uses-permission android:name="android.permission.RECORD_AUDIO" />
<uses-permission android:name="android.permission.INTERNET" />
<uses-permission android:name="android.permission.ACCESS_NETWORK_STATE" />
<uses-permission android:name="android.permission.CAMERA" />
<uses-permission android:name="android.permission.BLUETOOTH" />
<uses-permission android:name="android.permission.MODIFY_AUDIO_SETTINGS" />
<uses-permission android:name="android.permission.WRITE_EXTERNAL_STORAGE" />

<!-- Permissions required by the App -->
<uses-permission android:name="android.permission.READ_PHONE_STATE" />
<uses-permission android:name="android.permission.WAKE_LOCK" />

<!-- Required for screen sharing if target Android SDK version is 34.0.0 or later -->
<uses-permission android:name="android.permission.FOREGROUND_SERVICE"/>
<uses-permission android:name="android.permission.FOREGROUND_SERVICE_MEDIA_PROJECTION"/>

<uses-feature
    android:glEsVersion="0x00020000"
    android:required="true" />

<uses-feature android:name="android.hardware.camera" />
<uses-feature android:name="android.hardware.camera.autofocus" />
Android 6.0+ requires dynamic permission requests. Add this to your app:
import { PermissionsAndroid } from 'react-native';

const granted = PermissionsAndroid.check(PermissionsAndroid.PERMISSIONS.CAMERA,
                                        PermissionsAndroid.RECORD_AUDIO);
granted.then((data) => {
  if (!data) {
    const permissions = [PermissionsAndroid.PERMISSIONS.RECORD_AUDIO, PermissionsAndroid.PERMISSIONS.CAMERA];
    PermissionsAndroid.requestMultiple(permissions);
  }
}).catch((err) => {
  console.log(err.toString());
});
iOS
In Xcode, select your target project and go to Info > Custom iOS Target Properties.
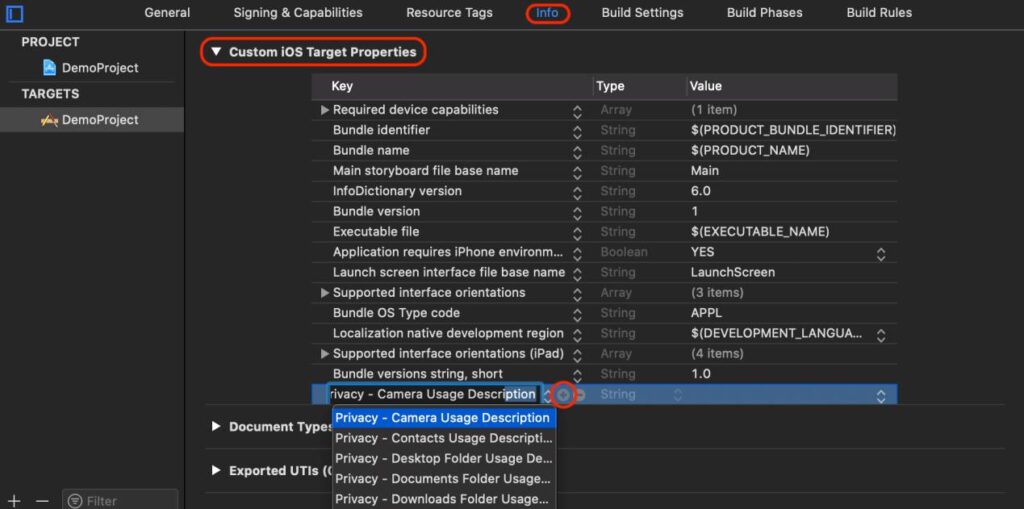
Add these privacy descriptions:
Privacy - Camera Usage DescriptionPrivacy - Microphone Usage Description

Step 2. Implement Basic Video Call
Before adding screen sharing, you need a working video call setup. Screen sharing publishes on a separate channel while the main video call runs on the primary channel.
2.1 Create the Engine
Initialize the ZEGOCLOUD engine with your credentials:
import ZegoExpressEngine from 'zego-express-engine-reactnative';

const profile = {
  appID : YOUR_APP_ID,
  appSign: 'YOUR_APP_SIGN',
  scenario : 0
};

ZegoExpressEngine.createEngineWithProfile(profile);
2.2 Set Up Event Listeners
Register callbacks to handle room and stream events:
ZegoExpressEngine.instance().on('roomStateUpdate', (roomID, state, errorCode, extendedData) => {
  // Handle room connection state changes
});

ZegoExpressEngine.instance().on('roomUserUpdate', (roomID, updateType, userList) => {
  // Handle users joining or leaving
});

ZegoExpressEngine.instance().on('roomStreamUpdate', (roomID, updateType, streamList) => {
  // Handle streams being published or stopped
});
2.3 Login to Room
Join a room to start the video call:
let roomConfig = new ZegoRoomConfig();
roomConfig.isUserStatusNotify = true;

ZegoExpressEngine.instance().loginRoom('room1', {'userID': 'id1', 'userName': 'user1'}, roomConfig);
2.4 Publish and Play Streams
Start publishing your camera stream and play streams from other users:
import { findNodeHandle } from 'react-native';

// Publish your camera stream
ZegoExpressEngine.instance().startPublishingStream("streamID");

// Play another user's stream
let remoteViewRef = findNodeHandle(this.refs.zego_play_view);

ZegoExpressEngine.instance().startPlayingStream("streamID", {
    'reactTag': remoteViewRef,
    'viewMode': 0,
    'backgroundColor': 0
});
Step 3. Add Screen Sharing
With the video call working, you can now add screen sharing. Screen sharing uses a separate publish channel (Aux) so users can share their screen while keeping their camera stream active.
3.1 Set Video Source to Screen Capture
Switch the video source from camera to screen capture on the Aux channel:
ZegoExpressEngine.instance().setVideoSource(ZegoVideoSourceType.ScreenCapture, ZegoPublishChannel.Aux);3.2 Set Audio Source (iOS Only)
If you want to capture system audio during screen sharing on iOS:
ZegoExpressEngine.instance().setAudioSource(ZegoAudioSourceType.ScreenCapture, ZegoPublishChannel.Aux);3.3 Start Screen Capture
For In-App Screen Sharing (iOS Only)
If you only need to share content within your app:
ZegoExpressEngine.instance().startScreenCaptureInApp();For Cross-App Screen Sharing
To share the entire device screen, including other apps:
ZegoExpressEngine.instance().startScreenCapture();On Android, a system dialog will appear asking the user for permission to record the screen. The user must grant this permission for screen sharing to work.
On iOS, cross-app screen sharing requires a Broadcast Upload Extension (see next section).
3.4 iOS Broadcast Upload Extension Setup
Cross-app screen sharing on iOS is recorded by the system through an Extension process, so you need to create and configure one.
The memory usage of the Broadcast Upload Extension is limited to 50 MB, so do not allocate additional memory to the Screen Sharing Extension.
Create the Extension:
- In Xcode, go to File > New > Target
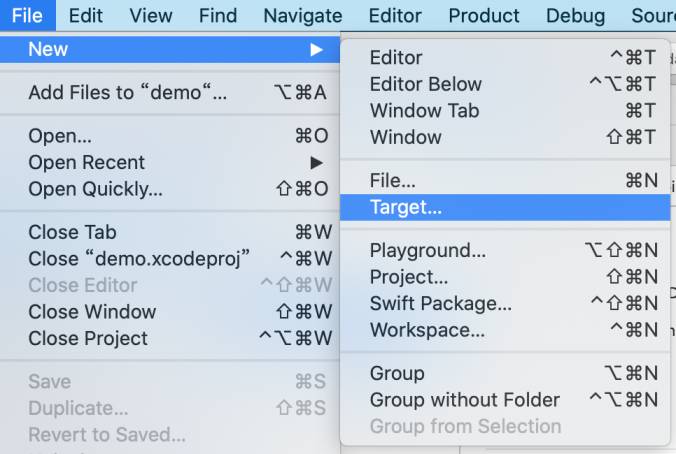
- Select Broadcast Upload Extension on the iOS page and click Next.
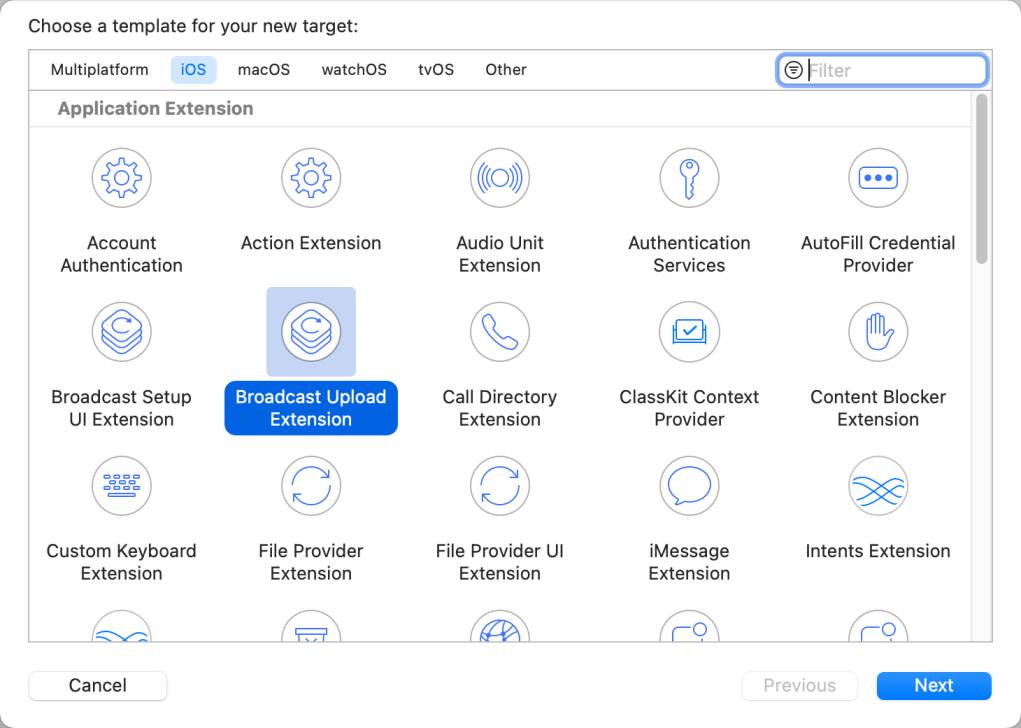
- Fill in the Product Name (e.g., “ScreenShare”), select Team and Language, then click Finish.
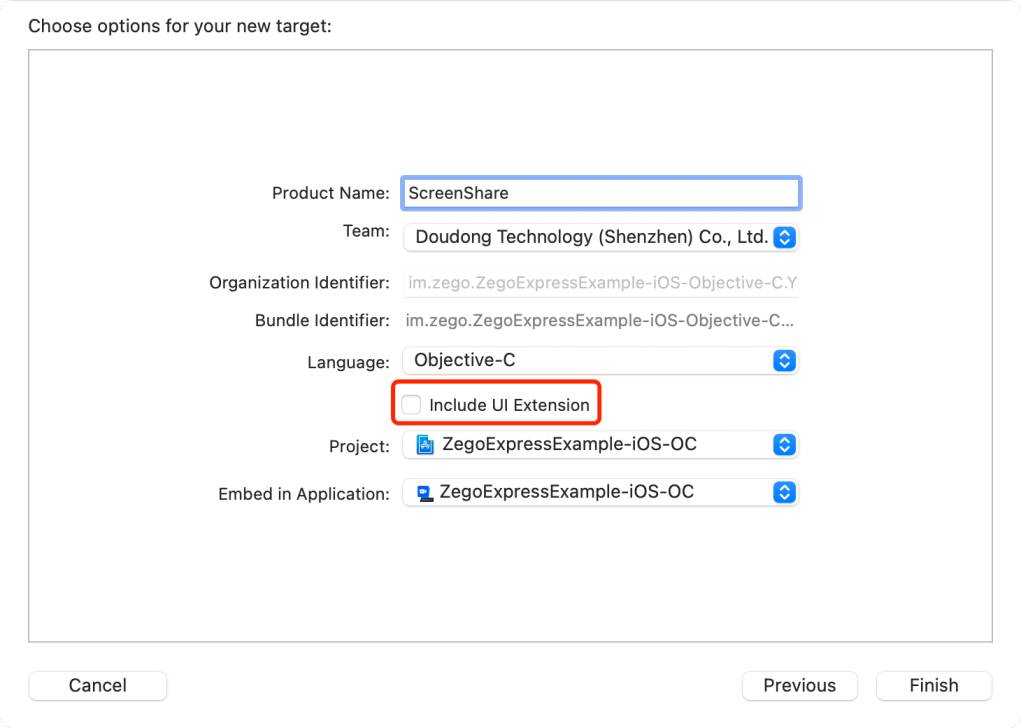
There is no need to check “Include UI Extension”.
Configure the Extension:
- Make sure
RPBroadcastProcessModeis set toRPBroadcastProcessModeSampleBufferin the extension’s Info.plist - Select the Extension target in Xcode, go to General > Frameworks and Libraries, click “+”, and add
ZegoExpressEngine.xcframework
Implement the Extension:
In your extension’s SampleHandler.m, import the SDK header, then set up the data transmission channel when the broadcast starts:
#import <ZegoExpressEngine/ZegoExpressEngine.h>

- (void)broadcastStartedWithSetupInfo:(NSDictionary<NSString *,NSObject *> *)setupInfo {
    [ZegoReplayKitExt.sharedInstance setupWithDelegate:self];
}
Send screen data to the SDK in the processSampleBuffer callback:
- (void)processSampleBuffer:(CMSampleBufferRef)sampleBuffer withType:(RPSampleBufferType)sampleBufferType {
    [ZegoReplayKitExt.sharedInstance sendSampleBuffer:sampleBuffer withType:sampleBufferType];
}
Stop screen sharing and disconnect the data transmission channel when the broadcast ends:
- (void)broadcastFinished {
    [ZegoReplayKitExt.sharedInstance finished];
}
3.5 Publish the Screen Share Stream
After the screen capture is started, publish the stream to the cloud server. The channel for publishing must be consistent with the channel used when setting the capture source:
ZegoExpressEngine.instance().startPublishingStream(streamID, ZegoPublishChannel.Aux);3.6 Play Screen Share Streams
Other users can play the screen share stream using the startPlayingStream method:
// The streamID is the one used by the user who initiated the screen sharing
ZegoExpressEngine.instance().startPlayingStream(streamID, {
    'reactTag': findNodeHandle(this.refs.zego_play_view),
    'viewMode': 0,
    'backgroundColor': 0
});
Step 4. Clean Up
When leaving the call, stop all streams and destroy the engine:
// Stop publishing streams.
ZegoExpressEngine.instance().stopPublishingStream();

// Stop playing streams.
ZegoExpressEngine.instance().stopPlayingStream("streamID");

// Log out of a room.
ZegoExpressEngine.instance().logoutRoom('room1');

ZegoExpressEngine.destroyEngine();
Conclusion
You now have a React Native video call app with screen sharing, demonstrating how to integrate screen sharing into a React Native video call using a main channel and an Aux channel. The video call runs on the main channel, while screen sharing uses the Aux channel, allowing users to share their screen without stopping the camera. With ZEGOCLOUD handling video capture, encoding, and transmission, you can focus on building and refining your app’s features.
FAQ
Q1: How can I share my screen during a video call?
To share your screen during a video call, you need to capture the device screen and publish it as a separate video stream. In React Native apps, this is commonly done by using an auxiliary channel so screen sharing runs alongside the camera feed without interrupting it.
Q2: How to implement video call in React Native?
You can implement a video call in React Native by integrating a real-time communication SDK that handles audio and video capture, encoding, and transmission. The basic steps include initializing the SDK, joining a room, publishing local audio and video streams, and rendering remote streams in the UI.
Q3: Which video calling app allows screen sharing?
Many modern video calling apps support screen sharing, including tools designed for meetings, online classes, and remote collaboration. From a development perspective, apps built with RTC SDKs can enable screen sharing by publishing screen streams in addition to camera streams.
Q4: How to display a video in React Native?
In React Native, video is typically displayed by binding a video stream to a native view provided by the RTC SDK. This view renders the local or remote video feed directly within your app’s layout, allowing real-time playback during calls.
Let’s Build APP Together
Start building with real-time video, voice & chat SDK for apps today!
