


Online chat has become an essential feature in modern applications, fostering real-time communication and enhancing user engagement. However, developing a robust chat system from scratch is no small feat—it involves handling complex challenges like UI design, real-time data synchronization, message storage, and cross-platform compatibility. While building independently may seem appealing for full customization, it often requires significant time and resources. By contrast, leveraging a pre-built UIKit streamlines the process, offering ready-made components and proven functionality to accelerate development while maintaining flexibility. To address these challenges, ZEGOCLOUD has introduced a powerful solution: the In-app Chat Kit.
In-app Chat Kit is a UI component library based on the In-app Chat SDK. It provides general UI components, such as the chat list, one-on-one chat, and group chat. You can use IMKit to quickly build custom in-app chat application based on your actual business needs, eliminating the need for complex UI development processes.
This doc will guide you to integrate the In-app Chat Kit for Flutter and start a chat quickly.
Before you begin
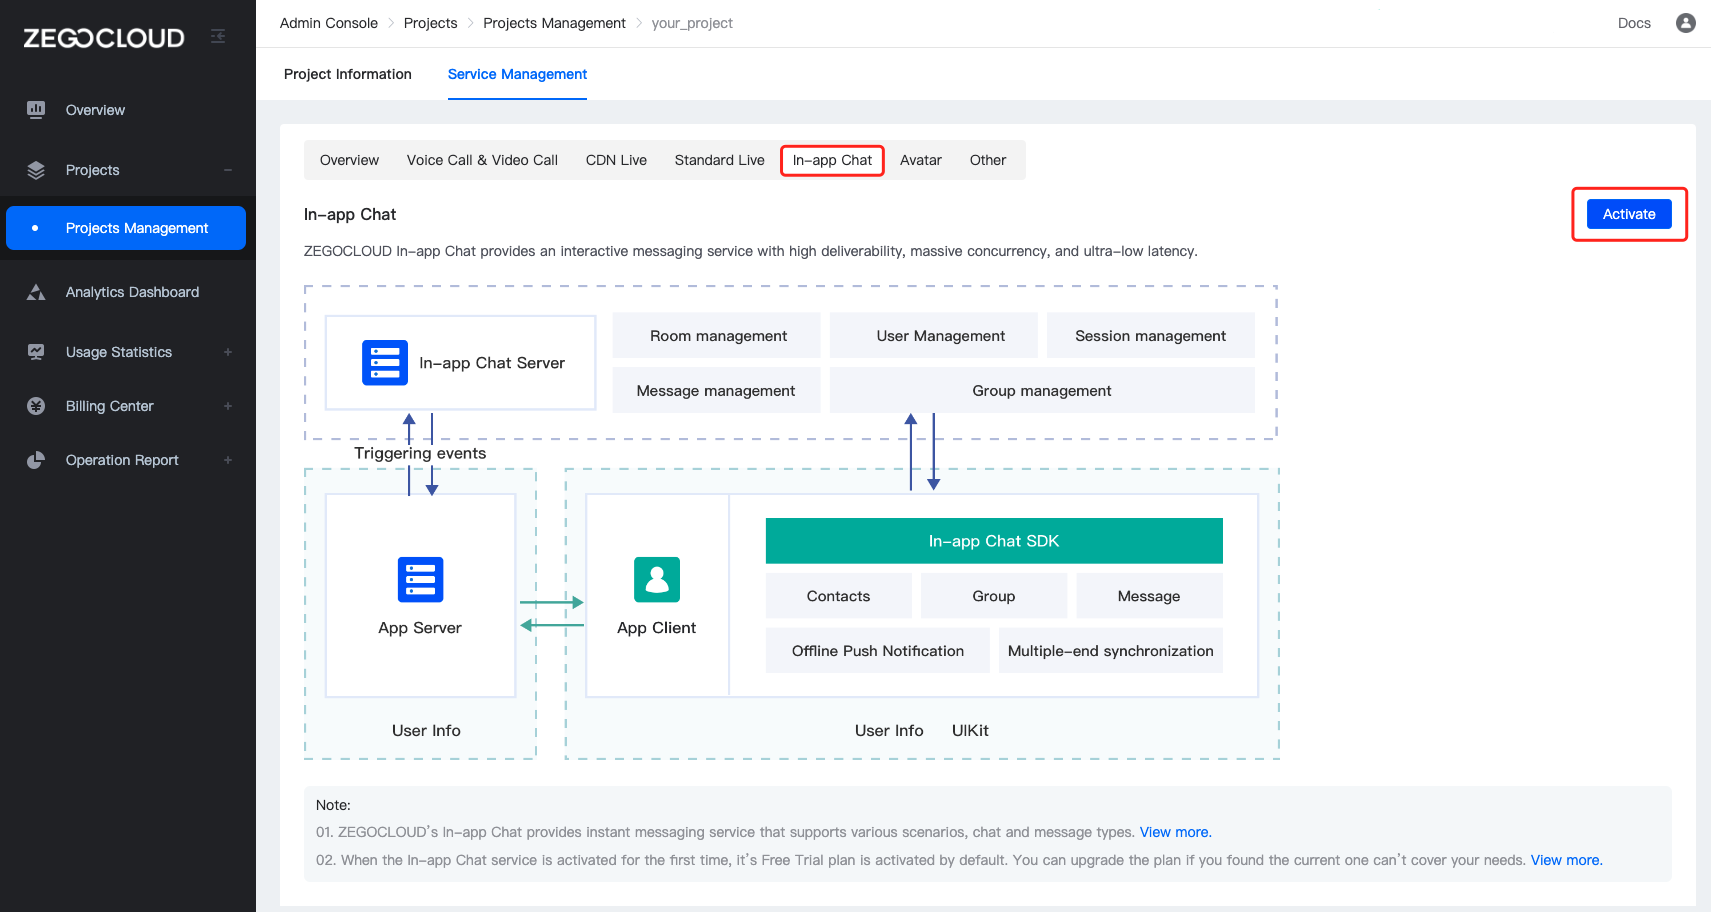
Log in the ZEGOCLOUD Admin Console and do the following:
1. Create a project, and get the AppID and AppSign of your project.
2. Activate the In-app Chat service.
Integrate the SDK
Add SDK dependencies
flutter pub add zego_zimkitIntegrate In-app Chat Kit into the project
Step 1. Call the init method to initialize the In-app Chat Kit SDK.
void main() {
  ZIMKit().init(
    appID: YourSecret.appID, // your appid
    appSign: YourSecret.appSign, // your appSign
  );
  runApp(YourApp());
}
Step 2. Log in by calling the connectUser method with your user information.
The login only succeeded when the authentication passed.
Warning: You can customize rules to generate the user ID and user name. We recommend that you set a meaningful user ID. You can associate the user ID with your business account system.
ZIMKit().connectUser(id: id, name: name).then(_){
    Navigator.of(context).push(
        MaterialPageRoute(
            builder: (context) => const ZIMKitDemoHomePage(),
        ),
    );
}

class ZIMKitDemoHomePage extends StatelessWidget {
  const ZIMKitDemoHomePage({Key? key}) : super(key: key);

  @override
  Widget build(BuildContext context) {
    return WillPopScope(
      onWillPop: () async => false,
      child: Scaffold(
        appBar: AppBar(
          title: const Text('Conversations'),
          actions: const [HomePagePopupMenuButton()],
        ),
        body: ZIMKitConversationListView(
          onPressed: (context, conversation, defaultAction) {
            Navigator.push(context, MaterialPageRoute(
              builder: (context) {
                return ZIMKitMessageListPage(
                  conversationID: conversation.id,
                  conversationType: conversation.type,
                );
              },
            ));
          },
        ),
      ),
    );
  }
}
Configure your project
Android
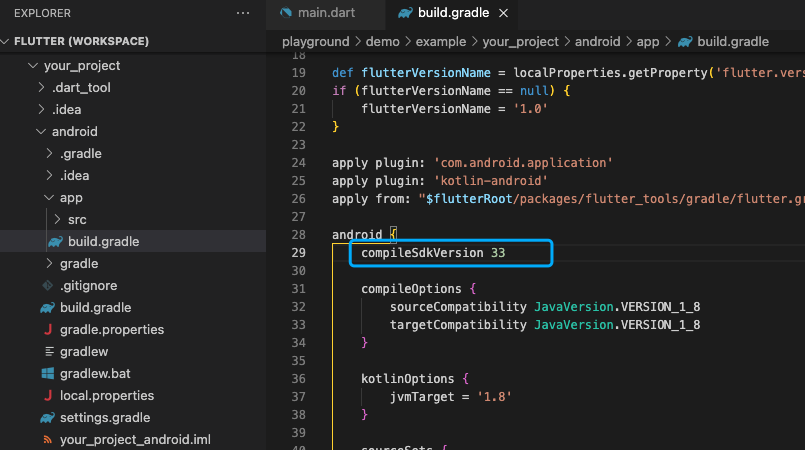
Step 1. Modify the compileSdkVersion
Open the your_project/android/app/build.gradle file, and modify the compileSdkVersion to 33.
Step 2. Modify the minSdkVersion
And in the same file, edit the minSdkVersion.
minSdkVersion 21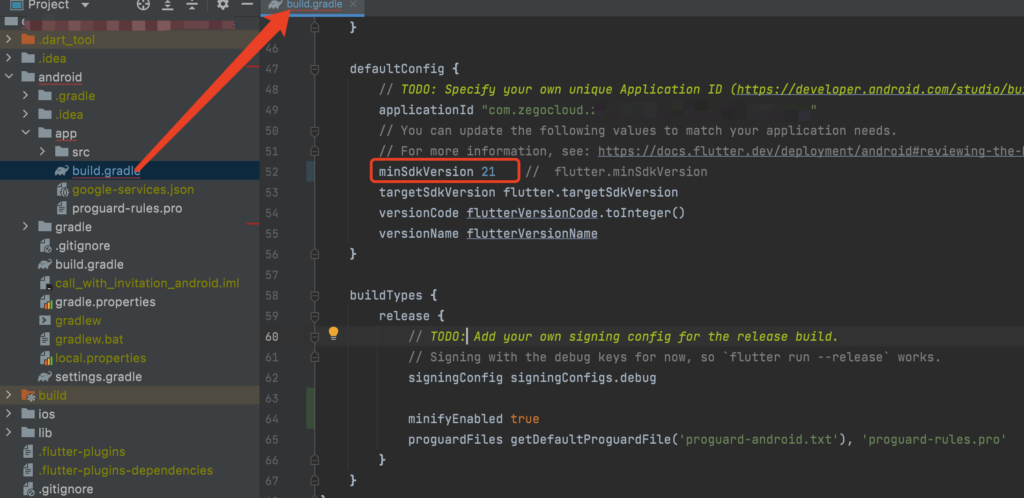
Step 3. Add app permissions
Open the file your_project/app/src/main/AndroidManifest.xml, and add the following code:
  <uses-permission android:name="android.permission.ACCESS_WIFI_STATE" />
  <uses-permission android:name="android.permission.RECORD_AUDIO" />
  <uses-permission android:name="android.permission.INTERNET" />
  <uses-permission android:name="android.permission.ACCESS_NETWORK_STATE" />
  <uses-permission android:name="android.permission.CAMERA" />
  <uses-permission android:name="android.permission.BLUETOOTH" />
  <uses-permission android:name="android.permission.MODIFY_AUDIO_SETTINGS" />
  <uses-permission android:name="android.permission.WAKE_LOCK" />
  <uses-permission android:name="android.permission.FOREGROUND_SERVICE" />
  <uses-permission android:name="android.permission.USE_FULL_SCREEN_INTENT" />
  <uses-permission android:name="android.permission.REQUEST_IGNORE_BATTERY_OPTIMIZATIONS" />
  <uses-permission android:name="android.permission.VIBRATE"/>

  <uses-permission android:name="android.permission.WRITE_EXTERNAL_STORAGE"/>
  <uses-permission android:name="android.permission.READ_EXTERNAL_STORAGE"/>
  <uses-permission android:name="android.permission.READ_MEDIA_VIDEOS"/>
  <uses-permission android:name="android.permission.READ_MEDIA_AUDIO"/>
  <uses-permission android:name="android.permission.READ_MEDIA_IMAGES"/>
Step 4. Prevent code obfuscation.
1. In your project’s your_project > android > app folder, create a proguard-rules.pro file with the following content as shown below:
-keep class **.zego.** { *; }2. Add the following config code to the release part of the your_project/android/app/build.gradle file:
proguardFiles getDefaultProguardFile('proguard-android.txt'), 'proguard-rules.pro'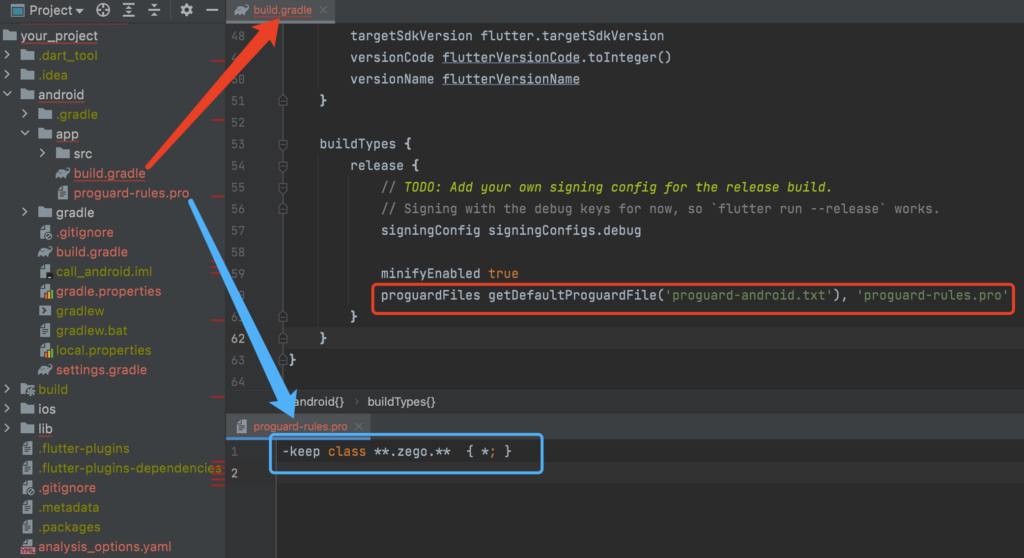
iOS
Step 1. Add permissions
To add permissions, open your_project/ios/Runner/Info.plist, and add the following code to the dict part:
<key>NSCameraUsageDescription</key>
<string>We require camera access to connect to a call</string>
<key>NSMicrophoneUsageDescription</key>
<string>We require microphone access to connect to a call</string>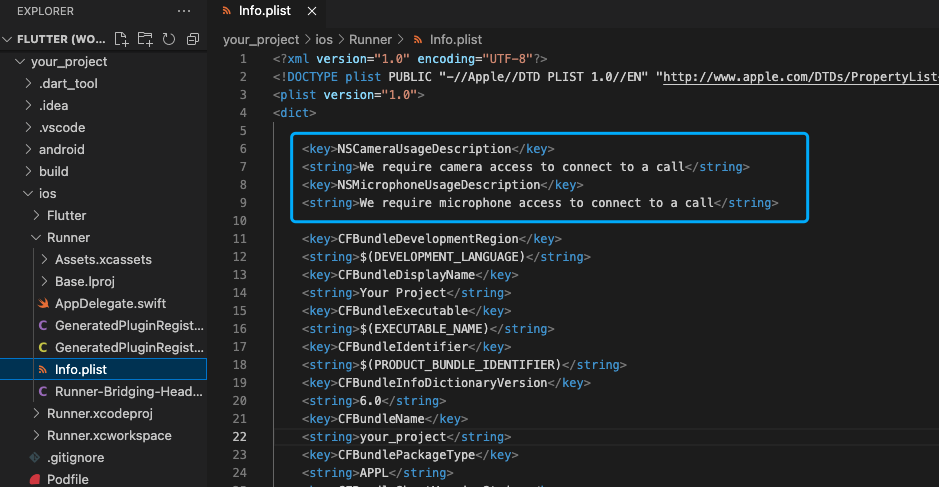
2. To use the notifications and build your app correctly, navigate to the Build Settings tab, and set the following build options for your target app.
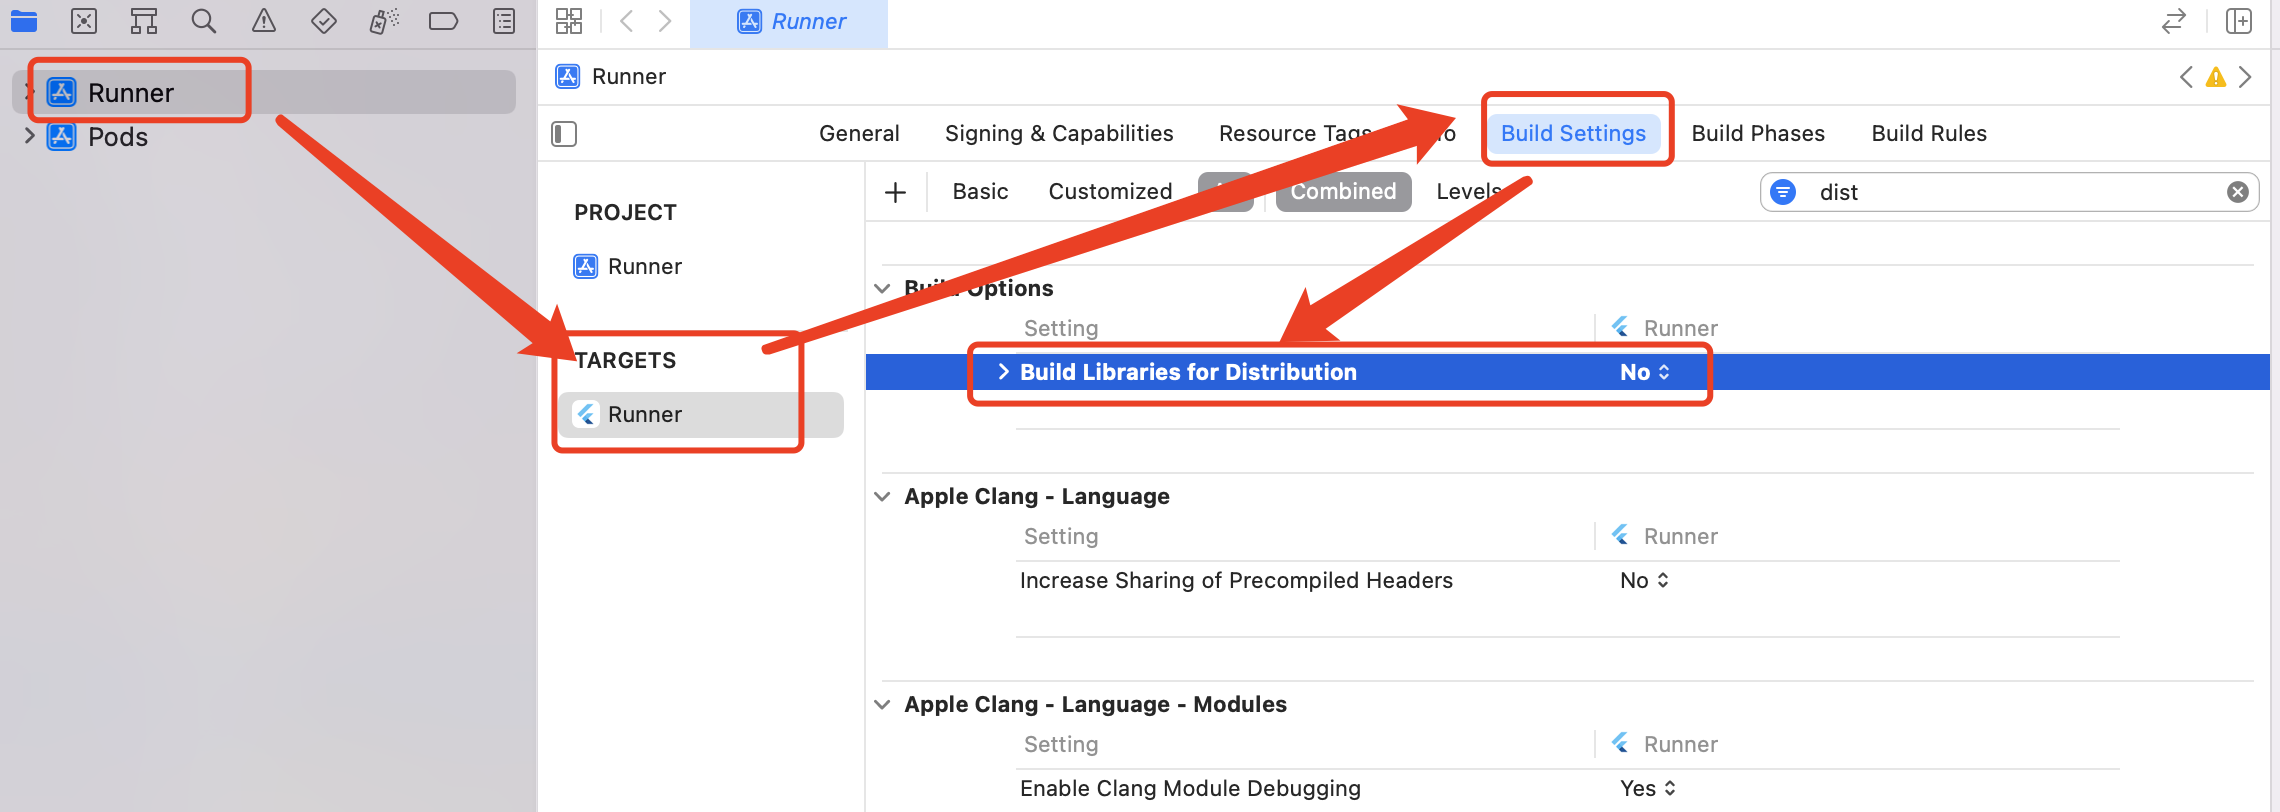
Refer to and set the following build options:
- In the Runner Target:
- Build Libraries for Distribution ->
NO - Only safe API extensions ->
NO - iOS Deployment Target ->
11 or greater
- Build Libraries for Distribution ->
- In other Targets:
- Build Libraries for Distribution ->
NO - Only safe API extensions ->
YES
- Build Libraries for Distribution ->
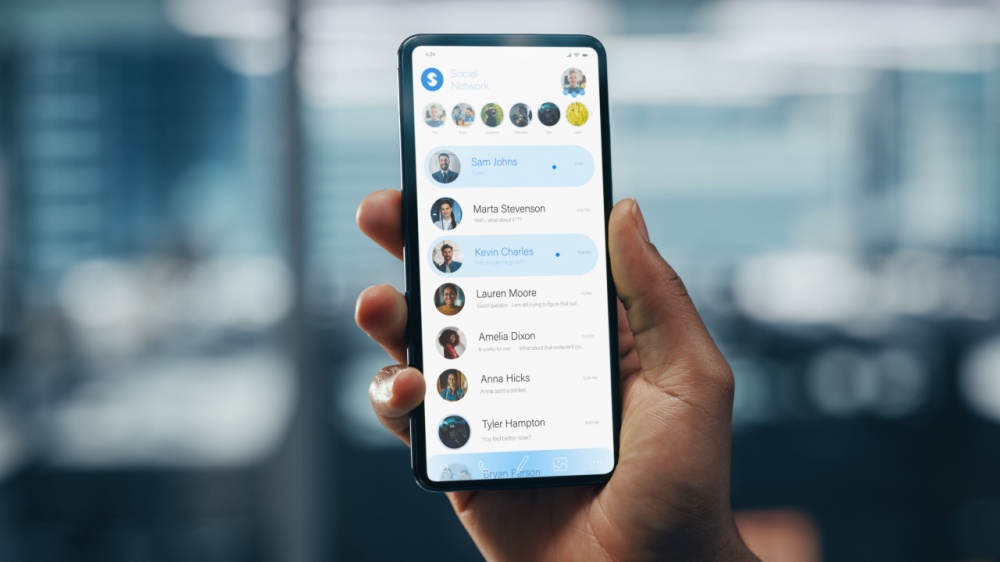
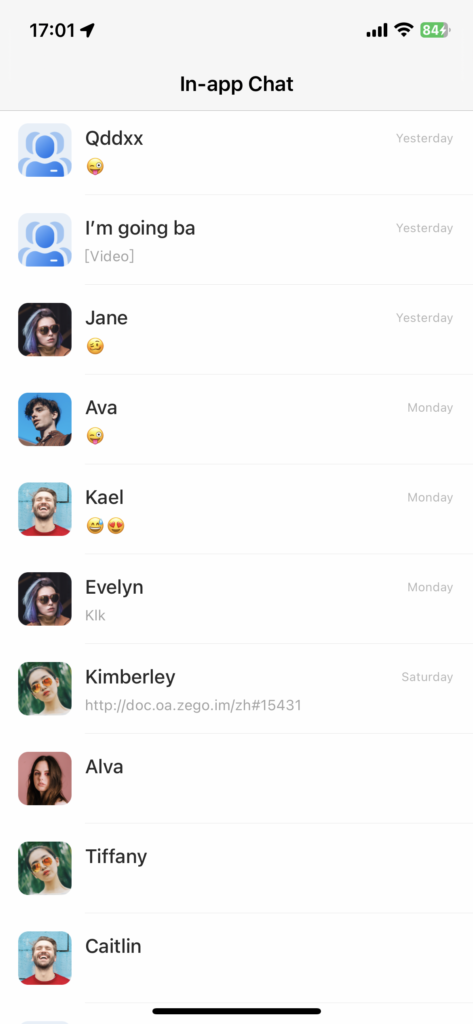
How will your App look like?
Ideally, by this point, your app will look like this:
Start a chat
In-app Chat Kit supports the following and this section shows you how to implement those respectively:
Start a one-on-one chat
Warning: Whether starting a one-on-one chat or a group chat, the peer user you want to chat with/the users you want to invite to a chat group must have logged in to the In-app Chat UIKit at least once. Otherwise, an error will occur.
1. Get the userID that is generated using your own business logic. (the userID here refers to the peer user you want to chat with.)
2. Fill in the userID parameter and run the following code:
// 1. connect user
ZIMKit().connectUser(id: id, name: name).then(_){
    Navigator.of(context).push(
        MaterialPageRoute(
            builder: (context) => const ZIMKitDemoHomePage(),
        ),
    );
}

// 2. navigate to the MessageListPage
Navigator.push(context, MaterialPageRoute(builder: (context) {
    return ZIMKitMessageListPage(
        conversationID: userID,
        conversationType: ZIMConversationType.peer,
    );
}));
Start a group chat
1. Get the groupID, groupName and inviteUserIDs that is generated using your own business logic. (the inviteUserIDs here refers to the ID list of the users that you want to invite to the group chat.)
2. Fill in the parameters and run the following code:
// 1. connect user
ZIMKit().connectUser(id: id, name: name).then(_){
    Navigator.of(context).push(
        MaterialPageRoute(
            builder: (context) => const ZIMKitDemoHomePage(),
        ),
    );
}

// 2. navigate to the MessageListPage
Navigator.push(context, MaterialPageRoute(builder: (context) {
    return ZIMKitMessageListPage(
        conversationID: userID,
        conversationType: ZIMConversationType.peer,
    );
}));
Join a group chat
1. Get the groupID that is generated using your own business logic. (the groupID here refers to the group chat you want to join.)
2. Fill in the groupID parameter and run the following code:
ZIMKit().joinGroup(groupID).then((int errorCode) {
    if (errorCode == 0) {
    Navigator.push(context, MaterialPageRoute(builder: (context) {
        return ZIMKitMessageListPage(
        conversationID: groupID,
        conversationType: ZIMConversationType.group,
        );
    }));
    }
});
Update user’s avatar and username
You can use the updateUserInfo method to update the user’s avatar and username.
await ZIMKit().updateUserInfo(avatarUrl: avatarUrl, name: name);Conclusion:
In summary, implementing an in-app chat feature is crucial for enhancing user interaction but can be resource-intensive and complex to develop independently. ZEGOCLOUD’s In-app Chat UIKit offers an efficient and reliable alternative, empowering developers to integrate robust chat functionality with ease, allowing them to focus on delivering a superior user experience.
Need help or want to raise your questions? Click the button below to join our Discord community to get quick responses.
Let’s Build APP Together
Start building with real-time video, voice & chat SDK for apps today!
