


Creating karaoke videos is an enjoyable way to merge music with creativity, allowing singers to showcase their talent alongside their favorite tracks. The process involves selecting a song, removing or reducing the original vocals, and adding lyrics in sync with the music. This guide will walk you through the basic steps for how to make a karaoke video, from choosing the right software to fine-tuning your final product for an engaging and fun singing experience. Whether you’re a seasoned performer or just looking to have fun with friends, making karaoke videos can be a rewarding and entertaining endeavor.
Elements of a Good Karaoke Video
Creating an engaging karaoke video involves careful consideration of several elements to ensure an enjoyable and seamless singing experience. Let’s delve deeper into four key aspects:
1. Synchronized Lyrics
Synchronization of lyrics with the music is crucial. This means that each word should appear on the screen exactly when it needs to be sung. Advanced karaoke videos often use color changes, highlighting, or bouncing balls to indicate the current word or phrase, making it easier for singers to follow along in real-time. Achieving perfect synchronization requires careful timing and may involve using specialized software that allows for precise adjustment of lyrics timing about the music.
2. Readable Text
The readability of the text is vital to keep the singer engaged and confident. This involves selecting a font that is clear and easy to read in various sizes. The color of the text should contrast sharply with the background to ensure visibility in all lighting conditions. Additionally, considering the placement of text is important; it should ideally be in a consistent location that does not move around too much, usually centered at the bottom of the screen, so the singer doesn’t have to shift their focus away from the main content area.
3. Visually Appealing Backgrounds
The choice of background can significantly affect the mood and engagement level of the karaoke video. While some creators prefer static images or simple gradients, incorporating motion graphics or thematic video clips related to the song can elevate the experience. It’s important, however, to ensure that these visuals do not overpower the lyrics. The background should complement the music and lyrics, perhaps reflecting the song’s emotion or story without causing distractions.
4. Good Use of Color and Contrast
Effective use of color and contrast not only makes the video more visually appealing but also aids in the readability of the lyrics. Bright colors for the text can be eye-catching, but they need to stand out against the background. This might involve adding shadows or outlines to the text or using a semi-transparent overlay beneath the lyrics to ensure they remain legible against complex backgrounds. Additionally, changing the color of the text as it needs to be sung, or using different colors to distinguish between singers in duets or group songs, can help guide the performance.
5. Interactive Elements (Bonus)
Introducing interactive elements such as live feedback on pitch accuracy, performance scoring, and sing-along guides can transform a simple karaoke video into an immersive experience. These features not only make singing more fun but also provide singers with valuable feedback to improve their performance. Implementing these elements requires more sophisticated software and can increase the complexity of video production, but the result is often a more engaging and rewarding experience for users.
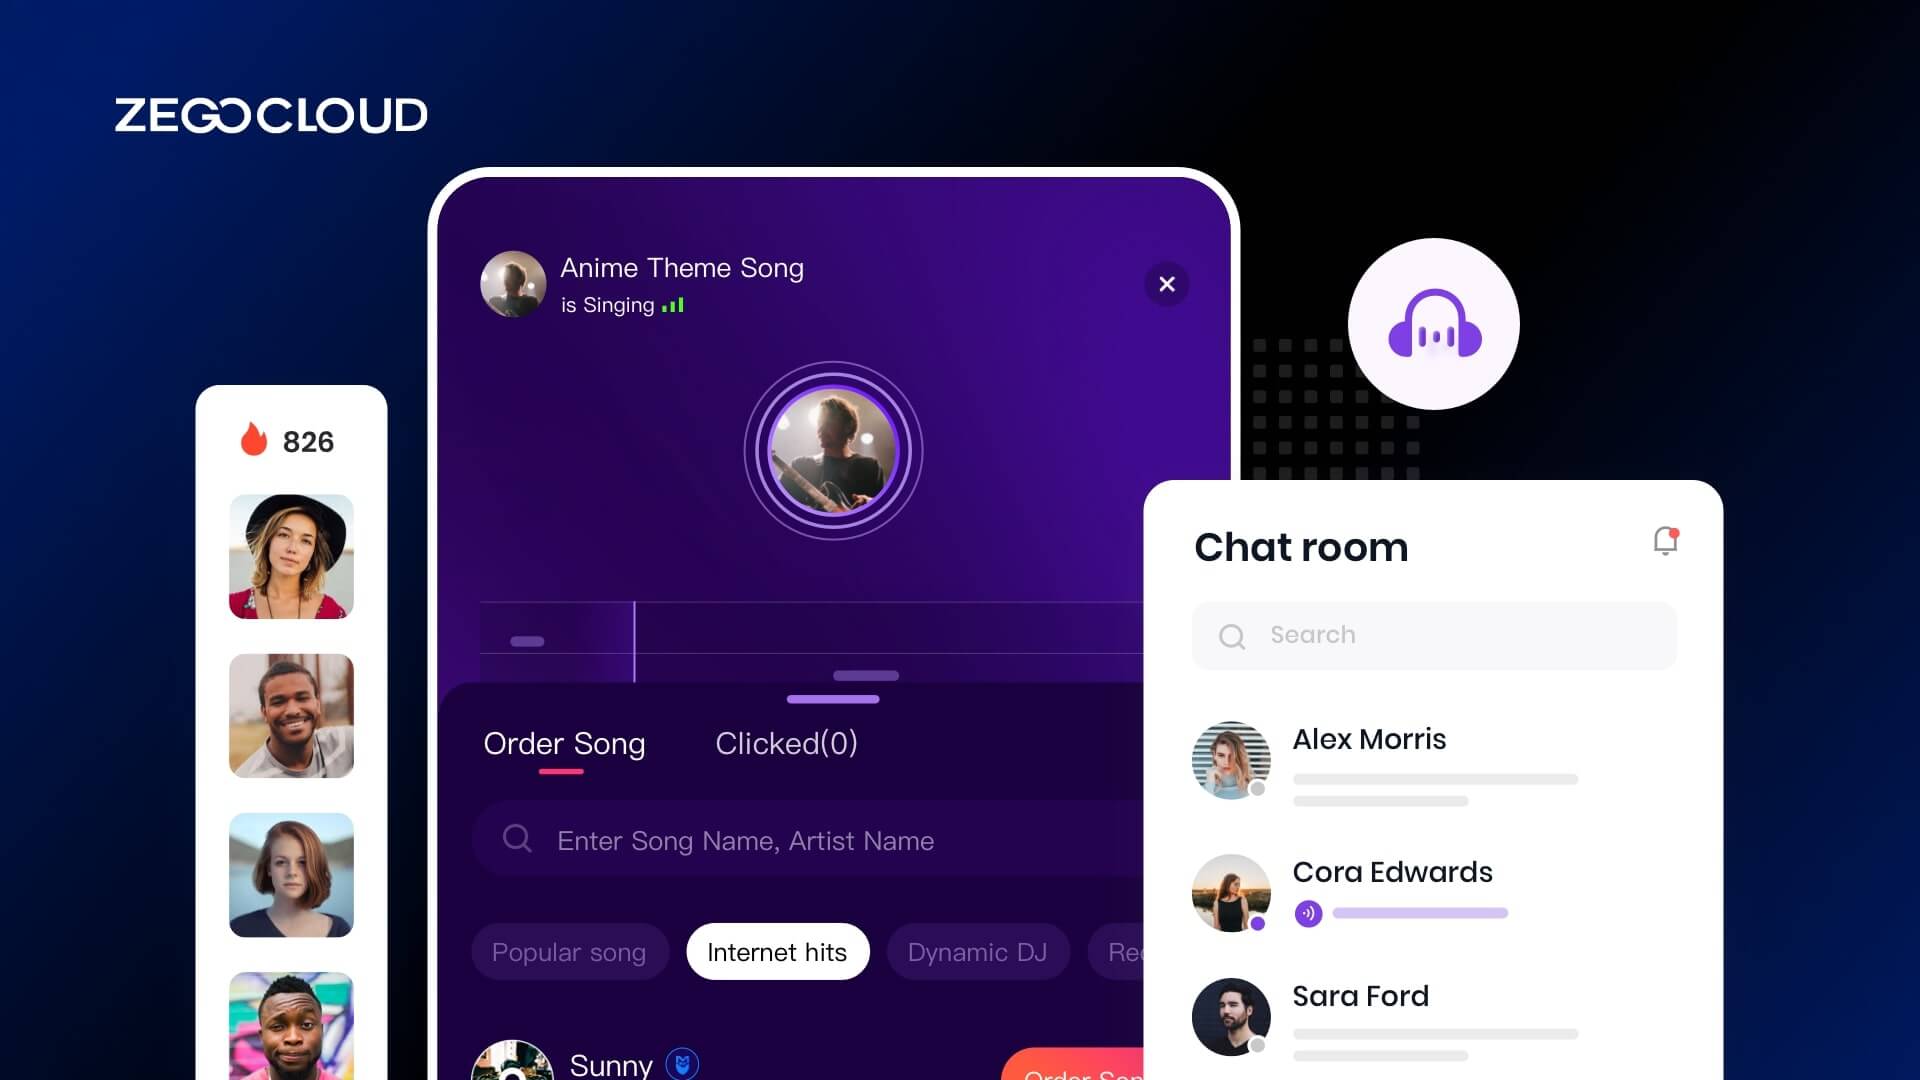
How to Make a Karaoke Video with ZEGOCLOUD
Are you a budding karaoke star looking to take your performances to the next level? Or maybe you’re just looking for a fun and entertaining activity to do with your friends. Either way, learning how to make video karaoke is a great way to unleash your inner rockstar and have some fun. With the help of ZEGOCLOUD API, creating a video karaoke has never been easier! This powerful tool allows you to easily create and customize your own karaoke videos, using a wide range of features and options to create a professional-looking performance.
So if you’re ready to learn how to make a video karaoke, grab a microphone and get ready to sing your heart out. With ZEGOCLOUD APIs like the UIKits, you’ll be well on your way to becoming the ultimate karaoke superstar.
Are you looking to take your karaoke performances to the next level and create a professional-looking video? Look no further than the Live Audio Room Kit SDK that is included in UIKits!
Live Audio Room Kit SDK Introduction
Live Audio Room Kit SDK allows you to easily create and customize your own karaoke videos, using a wide range of features and options to create a high-quality performance. Whether you’re a seasoned karaoke performer or just starting out, Live Audio Room Kit SDK makes it easy to create a karaoke video that you can be proud of.
So if you’re ready to learn how to make a karaoke video that will impress your friends and followers, give Live Audio Room Kit SDK a try. With its powerful tools and features, you’ll be well on your way to becoming a karaoke superstar! So, ZEGOCLOUD’s Live Audio Room Kit SDK is a great choice if you want to make a karaoke video.
Why Use Live Audio Room Kit SDK for Video Karaoke
There are several reasons why you might want to use Live Audio Room Kit SDK to create your karaoke videos:
1. Ease of use: Live Audio Room Kit SDK is designed to be user-friendly, with a simple and intuitive interface that makes it easy to create and customize your karaoke videos.
2. Wide range of features: Live Audio Room Kit SDK offers a variety of features and options that allow you to create professional-looking karaoke videos, including the ability to add background music, customize the lyrics display, and even apply special effects to your singing voice.
3. High-quality output: Live Audio Room Kit SDK produces high-quality karaoke videos that look and sound great, whether you’re sharing them online or playing them back on your TV or other devices.
4. Customization options: Live Audio Room Kit SDK allows you to customize your karaoke videos to your liking, so you can create a performance that truly reflects your style and personality.
Overall, Live Audio Room Kit SDK is a powerful and easy-to-use tool that can help you create professional-quality karaoke videos that you’ll be proud to share with the world.
Apart from the above reasons, below are some other features to consider in the Live Audio Room Kit SDK:
- Ready-to-use Live Audio Room
- Remove speakers
- Changes in speaker seats
- Seat layouts that can be changed
- Extendable menu bar
- Device and network management
- UI style that can be changed
- Text chat in real-time with other people
Preparation
- A ZEGOCLOUD developer account – Sign up
- A computer with Flutter installed and configured
- Android or iOS devices with audio and internet connectivity
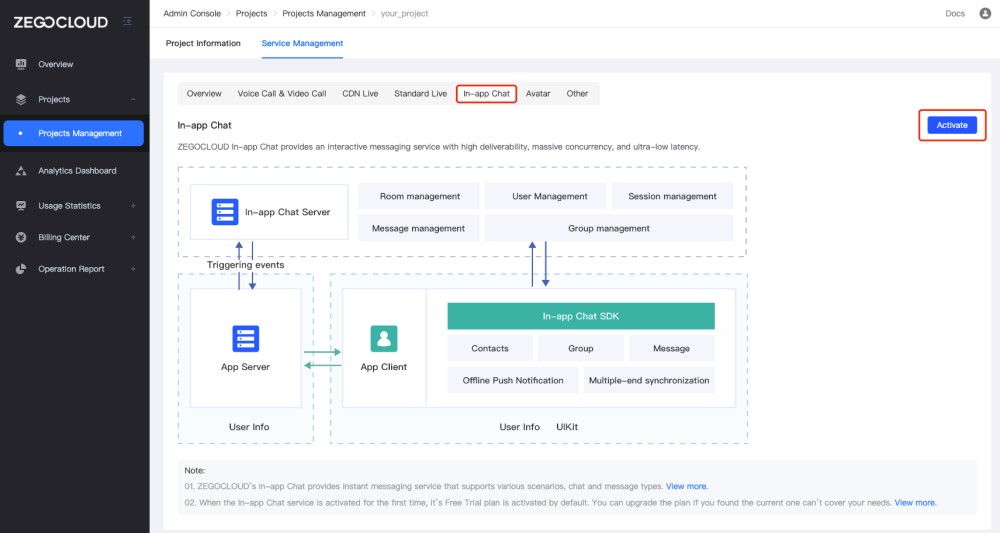
- Navigate to the ZEGOCLOUD Admin Console and take these steps:
- Create a new project, and make note of the generated AppID and AppSign.
- Enable the In-app Chat service by activating it within the console.
Live Audio Room SDK Integration for Karaoke Videos
1. Add the ZegoUIKitPrebuiltLiveAudioRoom to your project directory.
Run the following code in the root directory of your project to get the dependency:
flutter pub add zego_uikit_prebuilt_live_audio_room2. import the SDK.
Import the Live Audio Room Kit SDK into your main.dart file.
How to Use the Live Audio Room Kit to Make Video Karaoke
To connect to the Live Audio Room Kit service, you will need to provide both your userID and userName. The roomID corresponds to the live audio room that you wish to create or join. Please make sure to specify these details accurately to successfully access the service.
class LivePage extends StatelessWidget {
  final String roomID;
  final bool isHost;

  const LivePage({Key? key, required this.roomID, this.isHost = false}) : super(key: key);

  @override
  Widget build(BuildContext context) {
    return SafeArea(
      child: ZegoUIKitPrebuiltLiveAudioRoom(
        appID: yourAppID, // Fill in the appID that you get from ZEGOCLOUD Admin Console.
        appSign: yourAppSign, // Fill in the appSign that you get from ZEGOCLOUD Admin Console.
        userID: 'user_id',
        userName: 'user_name',
        roomID: roomID,
        config: isHost
            ? ZegoUIKitPrebuiltLiveAudioRoomConfig.host()
            : ZegoUIKitPrebuiltLiveAudioRoomConfig.audience(),
      ),
    );
  }
}
You can then create a live audio room. In addition, by entering the roomID, the audience can enter the live audio room.
Configure your project (Android)
1. Modify compileSdkVersion.
If you used Flutter 2.x.x to create your project, open the your_project/android/app/build.gradle file and change the compileSdkVersion to 33.
2. Add permission.
To add app permissions to your project, you will need to open the AndroidManifest.xml file located in the app/src/main directory of your project. Once you have opened the file, you can add the necessary permissions by adding the following lines of code:
<uses-permission android:name="android.permission.ACCESS_WIFI_STATE" />
<uses-permission android:name="android.permission.RECORD_AUDIO" />
<uses-permission android:name="android.permission.INTERNET" />
<uses-permission android:name="android.permission.ACCESS_NETWORK_STATE" />
<uses-permission android:name="android.permission.CAMERA" />
<uses-permission android:name="android.permission.BLUETOOTH" />
<uses-permission android:name="android.permission.MODIFY_AUDIO_SETTINGS" />
<uses-permission android:name="android.permission.WRITE_EXTERNAL_STORAGE" />
<uses-permission android:name="android.permission.READ_PHONE_STATE" />
<uses-permission android:name="android.permission.WAKE_LOCK" />
3. Prevent code obfuscation
If you want to prevent the obfuscation of the public class names in the SDK, you can take the following steps:
- In your project’s
android > appfolder, create a file namedproguard-rules.pro.
In the proguard-rules.pro file, add the following line of code:
-keep class **.zego.** { *; }This will tell Proguard, the tool that performs code obfuscation, to preserve the class names of the SDK.
- In the release section of the
your_project/android/app/build.gradlefile, add the following config code:
proguardFiles getDefaultProguardFile('proguard-android.txt'), 'proguard-rules.pro'This will include the proguard-rules.pro file in the code obfuscation process.
By following these steps, you can ensure that the public class names of the SDK are not obfuscated during the build process, and your app will function properly.
Configure your project (iOS)
To add app permissions and disable Bitcode in your iOS project, you can take the following steps:
- Open the
Podfilefile located in theyour_project/iosdirectory. - In the post_install do |installer| section, add the following code snippet:
# Start of the permission_handler configuration
target.build_configurations.each do |config|
  config.build_settings['GCC_PREPROCESSOR_DEFINITIONS'] ||= [
    '$(inherited)',
    'PERMISSION_CAMERA=1',
    'PERMISSION_MICROPHONE=1',
  ]
end
# End of the permission_handler configuration
This will enable camera and microphone permissions in your app.
- Open the
Info.plistfile located in theyour_project/ios/Runnerdirectory.
In the dict section, add the following lines of code:
<key>NSCameraUsageDescription</key>
<string>We need camera access to connect to a live</string>
<key>NSMicrophoneUsageDescription</key>
<string>We need microphone access to connect to a live</string>
This will provide descriptions for the camera and microphone permissions that will be displayed to the user when they are requested.
- To disable Bitcode, open the
Runner.xcworkspacefile located in theyour_project > iOSdirectory. Select your target project, and follow the instructions in the images provided to disable Bitcode.
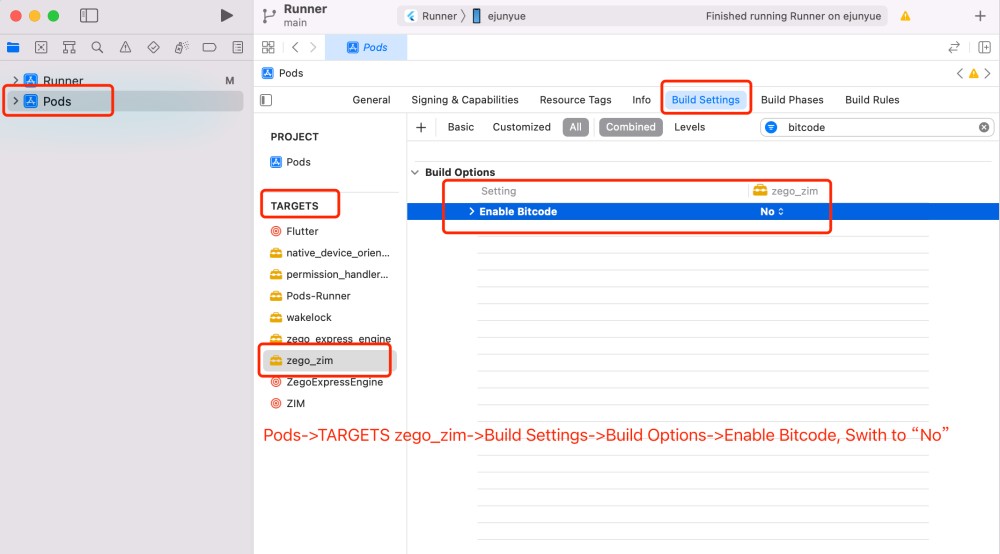

By following these steps, you can add app permissions and disable Bitcode in your iOS project.
Run a Demo
Gone are the days of laboriously typing out commands in the terminal – with just a single click, you can now launch and test your application on your chosen device with ease. Simply hit the Run or Debug button and watch your creation come to life!
Conclusion
In conclusion, making a karaoke video with the ZEGOCLOUD API is a powerful and convenient way to create professional-quality videos with ease. With this API, you have access to a wide range of features and tools that can help you add lyrics and other visual elements to your music, customize the look and feel of your video, and share your creation with others.
Whether you are a professional musician or simply looking for a fun way to express your love of music, the ZEGOCLOUD API is a great resource for creating high-quality karaoke videos. By following the steps outlined in this tutorial, you can easily learn how to make a karaoke video and start creating your own musical masterpieces.
Are you prepared to make your karaoke video a reality? Don’t look any further! You’ll have everything you need to get started on your project with our comprehensive demo source code.
However, if you have more advanced goals in mind, such as streaming capabilities, noise cancellation, or censorship features, consider using our well-regarded ZEGOCLOUD Core SDK.
Read More:
FAQ
Q1: How can I synchronize lyrics with music accurately in a karaoke video?
To achieve precise synchronization of lyrics with music, consider using specialized karaoke software or video editing tools that allow you to manually adjust the timing of each lyric line. Tools like Karafun or Adobe Premiere Pro can be helpful. The key is to play the song and carefully align the lyrics with the vocal line, making adjustments as needed to ensure the text appears in sync with the music.
Q2: What’s the best way to ensure text readability in karaoke videos against varying backgrounds?
Ensure text readability by choosing high-contrast colors between your text and background. Utilize outlines or shadow effects on your text to make it stand out. Additionally, consider using semi-transparent background panels behind your lyrics or dynamically adjusting the text color based on the background to maintain visibility.
Q3: How can I make my karaoke video accessible to a wider audience, including those with hearing impairments?
To make karaoke videos more accessible, include options for closed captioning or subtitles, which describe not just the lyrics but also musical cues and changes in tone. Ensure that your video player or platform supports these features and that they can be easily toggled on or off by the user. Also, consider the clarity of your visual cues for lyric timing to assist those who may rely on reading lips or the written word to sing along.
Let’s Build APP Together
Start building with real-time video, voice & chat SDK for apps today!
