


In a world where remote learning and virtual teamwork have become the norm, interactive whiteboard tools are more essential than ever. These applications help users sketch, annotate, and brainstorm together in real time. In this tutorial, you’ll learn how to build a fully functional collaborative whiteboard using Flutter and the ZEGOCLOUD Superboard SDK. You’ll start by launching a live demo to get a feel for the SDK’s capabilities, then follow a step-by-step guide to integrate it into your Flutter project. Finally, you’ll explore practical API calls to bring your whiteboard to life. By the end, you’ll have a polished, real-time drawing tool ready to support online classrooms, remote teams, or any app that thrives on collaboration.
Step 1: Getting Started with ZEGOCLOUD Superboard SDK in Flutter
To build an interactive whiteboard in your Flutter app, the first step is to set up your ZEGOCLOUD project and development environment. In this section, you’ll learn how to create a project in the ZEGOCLOUD Admin Console, retrieve your App credentials, and prepare your tools and devices for both Android and iOS development. Once everything is in place, you’ll be ready to start integrating the Superboard SDK into your app with confidence.
1. Create a ZEGOCLOUD Project
- Visit the ZEGOCLOUD Admin Console.
- Set up a new project.
- Note down the AppID and AppSign, which are required for SDK initialization.
2. Prepare the Environment
Flutter Version
Use Flutter 1.10.0 through 3.13.7 (inclusive).
Device and Tool Requirements
For Android Development
- A network-connected Android device running Android 5.0 (API level 21) or higher with audio/video support.
- Android Studio 3.0 or above.
- Android SDK Platform 29, Build-Tools 29.0.2 or newer, and Platform-Tools 29.x.x or later.
For iOS Development
- Xcode 12 or later.
- Use an iOS device or simulator running iOS 9.0 or later with audio and video support.
- (For best results, we recommend testing on a real device.)
- Make sure the device or simulator is connected to the Internet.
- Install CocoaPods before proceeding.
Step 2: Run the ZEGOCLOUD Superboard Flutter Demo
To test the Superboard SDK in action, you’ll now download and run the official Flutter demo. This process includes fetching the code, configuring your credentials, and installing the necessary dependencies.
Download the Demo Project
Visit the ZEGOCLOUD demo download page and download the sample package.
After downloading, extract the contents and locate the superboard_view_flutter folder.
Provide the authentication info
After unzipping it, you can see the superboard_view_flutter folder. Open this folder in Android Studio or Visual Studio Code.
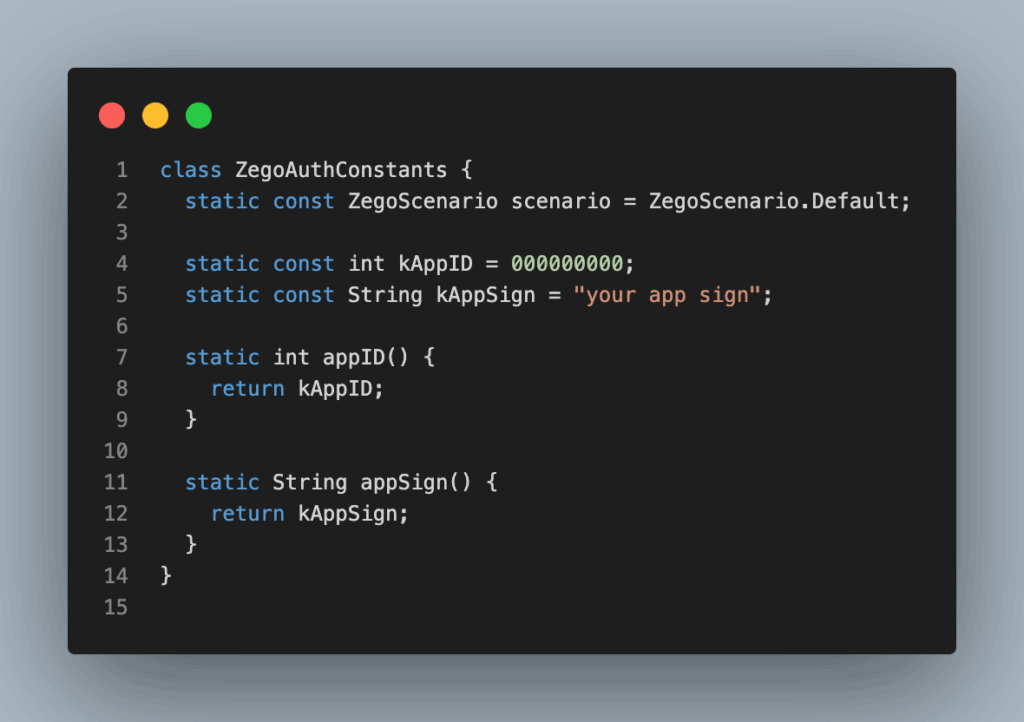
The sample code does not include the AppID and AppSign needed for SDK initialization. To set them up, edit the example/lib/utils/zego_auth_constants.dart file and enter the AppID and AppSign you obtained before.
Install dependencies
Go to the superboard_view_flutter folder, open a terminal, and run either flutter pub get or flutter pub upgrade.
Launch the demo
You can deploy and run the demo across both iOS and Android devices.
On Android devices
- Open the
superboard_view_flutterfolder in Android Studio or Visual Studio Code. - Connect a physical Android device to your development machine.
- Run the sample code.
On iOS devices
- Connect a physical iOS device to your computer.
- Open the
superboard_view_flutter/ios/Runner.xcworkspacefile in the sample code directory using Xcode. - Sign in with your Apple ID:
- In Xcode, go to Xcode > Settings (top-left corner).
- Click the Accounts tab, then click the + button at the bottom left, and choose to add an Apple ID.
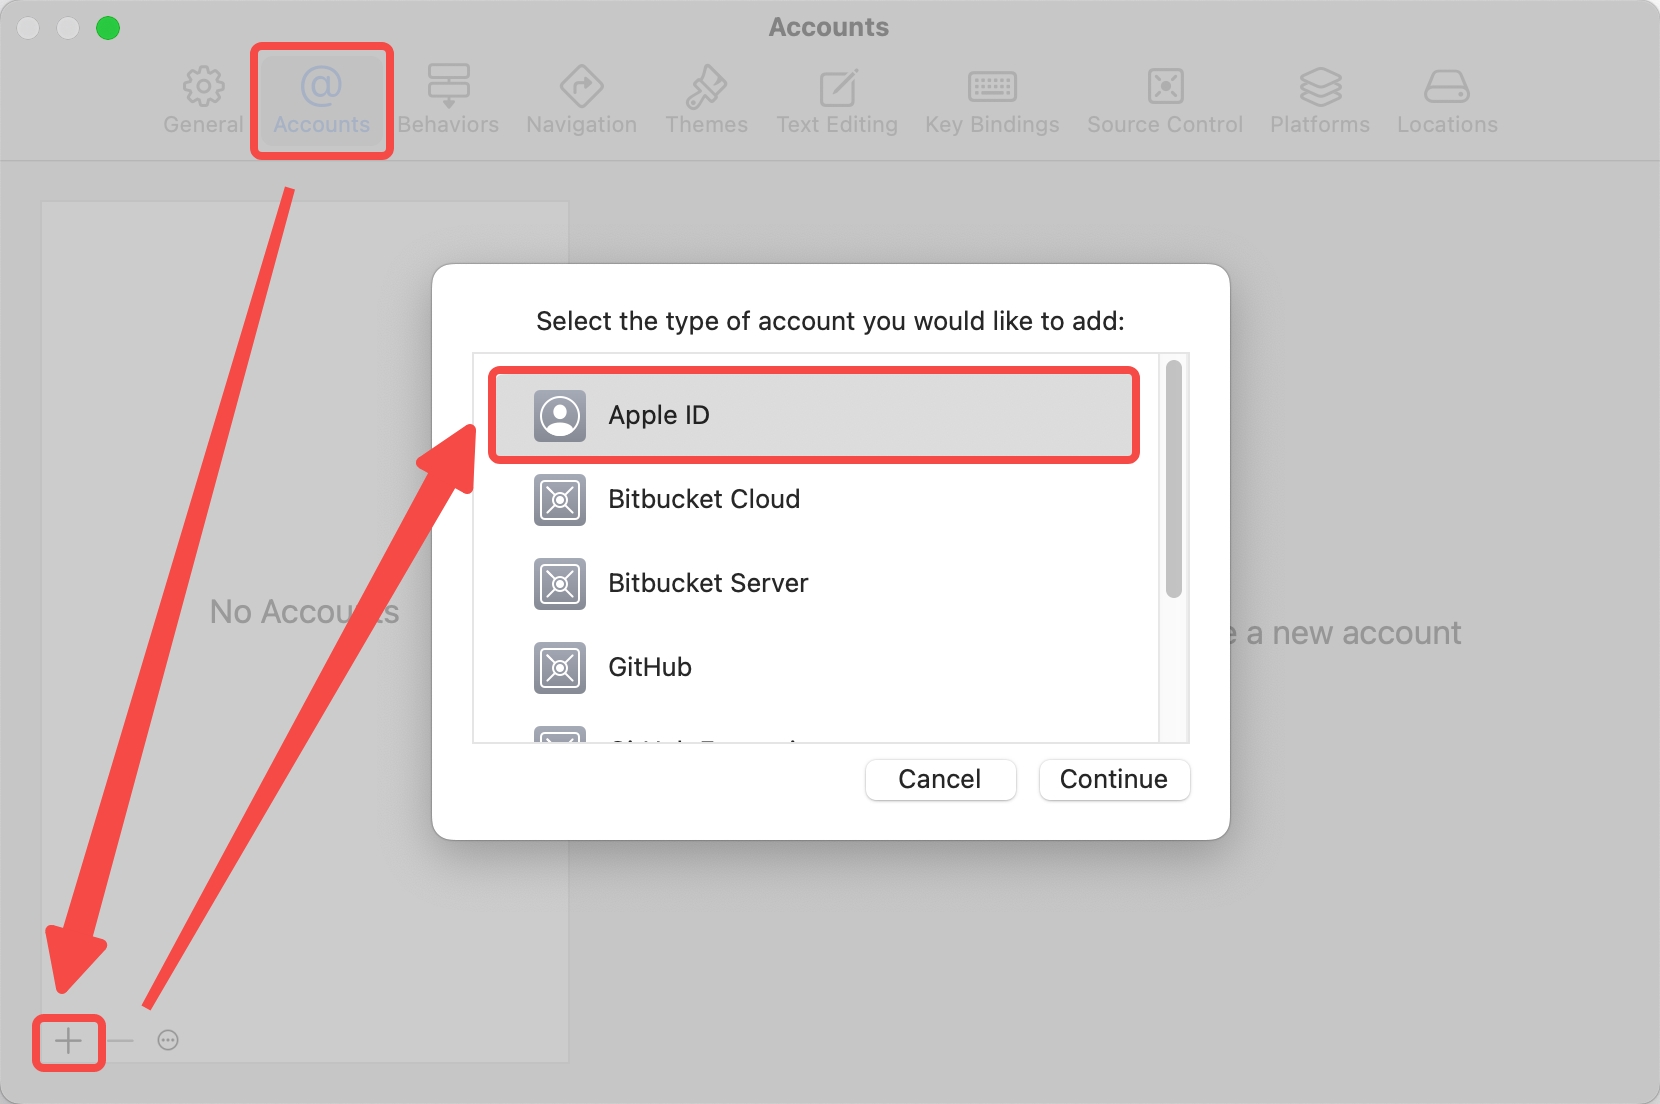
- Enter your Apple ID and password.

- Update the developer certificate and bundle identifier:
- Click the Runner project on the left side of Xcode.
- In the Runner page, under TARGETS, select Runner.
- Go to the Signing & Capabilities tab.
- In the Signing section, choose your developer team for Team, and modify the Bundle Identifier as needed.

- Run the sample code: You can run the sample either with Visual Studio Code or with Xcode:
- Using Visual Studio Code
- Open the sample code in Visual Studio Code.
- Click Run > Start Debugging from the top menu.
- In the pop-up window, select your connected iOS device to launch the project.
- Using Xcode
- In the terminal, navigate to the sample’s iOS directory and install dependencies:
cd ios/ pod install - Open
superboard_demo/ios/Runner.xcworkspacein Xcode, click the Run button at the top, and the project will launch.
- In the terminal, navigate to the sample’s iOS directory and install dependencies:
- Using Visual Studio Code
Now that you’ve completed the setup, you can preview the dynamic whiteboard effects showcased in the ZEGOCLOUD Flutter demo.
Step 3: Integrate ZEGOCLOUD Superboard SDK into Your Flutter project
To enable whiteboard capabilities in your Flutter app, the first step is integrating the ZEGOCLOUD Superboard SDK. This involves setting up the SDK, adding necessary dependencies, and preparing your project to render interactive whiteboard views. In the following section, you’ll walk through the integration process to get your app ready for real-time drawing and collaboration.
Get the required SDKs
In your Flutter project, open the pubspec.yaml file and add the zego_superboard and zego_express_engine dependencies as followed.
    ...
    dependencies:
        zego_superboard: 2.5.0+7 # This version number is just an example; for other integrable versions, please refer to the version information (https://pub.dev/packages/zego_superboard/versions) of zego_superboard
        zego_express_engine: 3.10.3-whiteboard
    ...
After adding and saving the file, run flutter pub get in the terminal.
Import the SDKs
In your project, import the required header files for the zego_superboard and zego_express_engine SDKs:
    import 'package:zego_superboard/zego_superboard.dart';
    import 'package:zego_express_engine/zego_express_engine.dart';
Configure the projects
For your Android whiteboard app based on flutter
Import the ZEGOCLOUD Superboard SDK libraries for Android
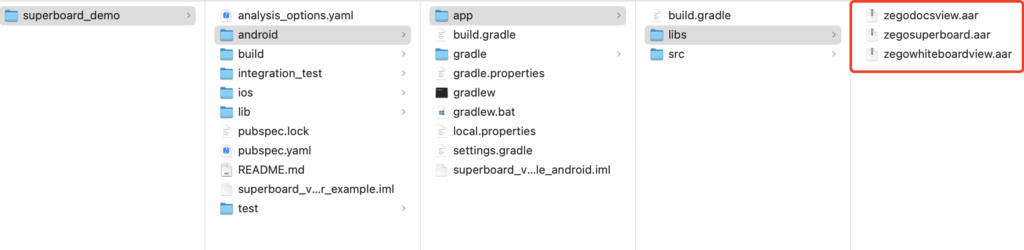
Open the superboard_view_flutter folder from the demo you ran earlier, navigate to /android/libs, and copy all the .aar files into your own project’s YourProject/android/app/libs directory.
Open the /android/app/src/main/AndroidManifest.xml file in your project, and add the following content:
  <!-- Permissions that the SDK must use -->
  <uses-permission android:name="android.permission.ACCESS_WIFI_STATE" />
  <uses-permission android:name="android.permission.INTERNET" />
  <uses-permission android:name="android.permission.ACCESS_NETWORK_STATE" />
  <uses-permission android:name="android.permission.WRITE_EXTERNAL_STORAGE" />
  <uses-permission android:name="android.permission.READ_EXTERNAL_STORAGE" />
Open your project’s android/app/build.gradle file and add the following dependencies:
dependencies {
    implementation "org.jetbrains.kotlin:kotlin-stdlib-jdk7:$kotlin_version"
    testImplementation 'org.jetbrains.kotlin:kotlin-test'
    testImplementation 'org.mockito:mockito-core:5.0.0'
    implementation fileTree(dir: 'libs', include: ['*.jar', '*.aar'])
}
Still in the android/app/build.gradle file, update the minSdkVersion to 21:
defaultConfig {
    minSdkVersion 21
}
For your iOS whiteboard app based on flutter
Open your_project/iOS/Runner.xcworkspace with Xcode. In the interface, click to open the Podfile and add the following code:
install! 'cocoapods', :disable_input_output_paths => true
# You can modify the iOS version here.
# Note: The iOS version must not be lower than 11.0.
platform :ios, '11.0'
use_frameworks!  # please use this way to import the library
inhibit_all_warnings!
Step 4: Call ZEGOCLOUD APIs to Build the Whiteboard
Before diving into code, it’s important to understand how the ZEGOCLOUD Superboard SDK fits in. It provides whiteboard rendering, real-time sync, and annotation capabilities.
1. Initialize the SDKs
Initialize the ZEGO Express Video SDK
Use the createEngineWithProfile method of the Express Video SDK to create a singleton engine instance. Pass in the appID and appSign you obtained from the ZEGO console.
int appID = ; // Your AppID
String appSign = ''; // Your AppSign
ZegoScenario scenario = ZegoScenario.Default;
ZegoEngineProfile profile = ZegoEngineProfile(appID, scenario, enablePlatformView: false, appSign: appSign);
await ZegoExpressEngine.createEngineWithProfile(profile);
Initialize the ZegoSuperBoard SDK
Now that the Express SDK is initialized, you can proceed to initialize the Superboard SDK using initWithConfig. Here’s how:
Next, initialize the ZegoSuperBoard SDK by calling the initWithConfig method.
If the method returns 0, initialization was successful and you can continue to use other SuperBoard features.
/**
 * appID: Your AppID issued by ZEGOCLOUD. Apply for one at <https://console.zego.im>.
 * appSign: Your AppSign issued by ZEGOCLOUD. Apply for one at <https://console.zego.im>.
 */

String userID = 'userid';
ZegoSuperBoardInitConfig boardInitConfig = ZegoSuperBoardInitConfig(appID, appSign, userID: userID);
ZegoSuperBoardError boardError = await ZegoSuperBoardManager.instance.initWithConfig(boardInitConfig);
Make sure to initialize both the ZegoExpress Video SDK and the ZegoSuperBoard SDK successfully before calling any other methods.
2. Listen for Event Callbacks
After initializing the ZegoSuperBoard SDK, you can then register event callbacks based on your application’s needs. These callbacks help you handle scenarios such as error reporting, remote addition or deletion of whiteboard files, and switching between boards.
Meanwhile, the SuperBoard SDK automatically manages multi-device synchronization. You only need to update your local UI in response to remote notification callbacks, making the overall integration simple and efficient.
Key callbacks include:
onError: Reports SDK error codes.onRemoteSuperBoardSubViewAdded: Notifies when a whiteboard is added remotely.onRemoteSuperBoardSubViewRemoved: Notifies when a whiteboard is removed remotely.onRemoteSuperBoardSubViewSwitched: Notifies when the active whiteboard is switched remotely.
You can register these callbacks as shown below:
ZegoSuperBoardEventHandler.onError = (errorCode) {
  if (kDebugMode) {
    print('[Flutter][onError]: $errorCode');
  }
};

ZegoSuperBoardEventHandler.onRemoteSuperBoardSubViewAdded = (subViewModel) {
  if (kDebugMode) {
    print('[Flutter][onRemoteSuperBoardSubViewAdded]: $subViewModel');
  }
};

ZegoSuperBoardEventHandler.onRemoteSuperBoardSubViewRemoved = (subViewModel) {
  if (kDebugMode) {
    print('[Flutter][onRemoteSuperBoardSubViewRemoved]: $subViewModel');
  }
};

ZegoSuperBoardEventHandler.onRemoteSuperBoardSubViewSwitched = (uniqueID) {
  if (kDebugMode) {
    print('[Flutter][onRemoteSuperBoardSubViewSwitched]: $uniqueID');
  }
};

ZegoSuperBoardEventHandler.onRemoteSuperBoardAuthChanged = (authInfo) {
  if (kDebugMode) {
    print('[Flutter][onRemoteSuperBoardAuthChanged]: $authInfo');
  }
};

ZegoSuperBoardEventHandler.onRemoteSuperBoardGraphicAuthChanged = (authInfo) {
  if (kDebugMode) {
    print('[Flutter][onRemoteSuperBoardGraphicAuthChanged]: $authInfo');
  }
};

ZegoSuperBoardEventHandler.onSuperBoardSubViewScrollChanged = (uniqueID, page, pageCount) {
  if (kDebugMode) {
    print('[Flutter][onSuperBoardSubViewScrollChanged] uniqueID: $uniqueID, page: $page, pageCount: $pageCount');
  }
};

ZegoSuperBoardEventHandler.onSuperBoardSubViewSizeChanged = (uniqueID, size) {
  if (kDebugMode) {
    print('[Flutter][onSuperBoardSubViewSizeChanged] uniqueID: $uniqueID, size: $size');
  }
};
3. Log in to the Room
Call the loginRoom method of ZegoExpressEngine to log in to a room. If the specified room does not exist, it will be automatically created during login.
When generating the roomID and user parameters locally, make sure they follow these rules:
roomIDmust be globally unique within the sameappID.userIDmust also be globally unique within the sameappID. It is recommended to linkuserIDto your own business user account system.- Neither
userIDnoruserNamecan benil; otherwise, room login will fail. - The ZegoUser constructor sets
userNameto the same value asuserIDby default if you pass only theuserID.
void loginRoom() {
  // Generate a globally unique room ID.
  String roomID = "room1";

  // Create a user object.
  ZegoUser user = ZegoUser('user1', 'userName');

  // Set user status notifications
  ZegoRoomConfig config = ZegoRoomConfig.defaultConfig();
  config.isUserStatusNotify = true;

  // Log in to the room
  ZegoExpressEngine.instance
      .loginRoom(roomID, user, config: config)
      .then((result) {
        if (kDebugMode) {
          print('[Flutter][loginRoom]: $result');
        }
      });
}
4. Add a Whiteboard View
Before adding a whiteboard view, ensure that you have successfully initialized the ZegoSuperBoard SDK and logged into a room. Then, call the createCanvasView method to get the business scenario Widget. This widget represents the whiteboard view (ZegoSuperBoardView) and can be directly added to your app’s view hierarchy.
Example:
// Add this widget to your page's render tree to display the whiteboard
_containerWidget = await ZegoSuperBoardManager.instance.createCanvasView((viewID) {
  if (kDebugMode) {
    print('[Flutter][createCanvasView]: viewID $viewID');
  }
});
5. Create a Whiteboard
Before creating a whiteboard, you must ensure the room login is successful. It is recommended to call the whiteboard creation API in the callback triggered upon successful room login.
// Check for a successful login before creating a whiteboard.
// The status should be ZegoRoomState.Connected.
ZegoExpressEngine.onRoomStateUpdate = (
  String roomID,
  ZegoRoomState state,
  int errorCode,
  Map<String, dynamic> extendedData
) {
  if (state == ZegoRoomState.Connected && errorCode == 0) {
    // Login successful; you can now create a whiteboard here
  }
};
You can use the Super Board to create a common whiteboard, which is defined by its width, height, and number of pages, and allows users to draw on it in real time.
Note:
- A maximum of 50 whiteboards can exist in a single room.
- If the number exceeds 50, whiteboard creation will fail.
- To check the current number of whiteboards, use the
querySuperBoardSubViewListmethod.
Example:
ZegoCreateWhiteboardConfig whiteboardConfig = ZegoCreateWhiteboardConfig(
  'A test whiteboard',
  perPageWidth: 16,
  perPageHeight: 9,
  pageCount: ZogoManager.instance.pageCount,
);

ZegoSuperBoardManagerCreateResult? result =
    await ZegoSuperBoardManager.instance.createWhiteboardView(config: whiteboardConfig);
6. Destroy a Whiteboard
To destroy a specific whiteboard, call the destroySuperBoardSubView method, passing in its uniqueID.
After destruction, the SDK will automatically display another whiteboard, typically the one that was displayed before the destroyed whiteboard.
await ZegoSuperBoardManager.instance.destroySuperBoardSubView('uniqueID');7. Test Your App
Run your project on multiple devices, and then log in using the same room ID. Next, press and move your finger within the ZegoSuperBoardView on any device. As a result, you’ll see the drawing effects instantly synchronized and displayed across all connected devices in real time.
Conclusion
This tutorial walked you through the full process: running the demo, integrating the SDK, and calling APIs to build your own real-time whiteboard. With ZEGOCLOUD Superboard, you can deliver interactive, collaborative whiteboard experiences across platforms with ease.
Ready to enhance your app with real-time whiteboarding? Sign up for ZEGOCLOUD and start building today.
FAQ
Q1: How do I build a real-time collaborative whiteboard in Flutter?
To get started, create a drawing canvas using CustomPainter. Then, sync user input in real time using tools like Firebase, WebSocket, or ZEGOCLOUD. For convenience, ZEGOCLOUD’s Superboard SDK provides built-in support for real-time drawing and multi-user collaboration.
Q2: What is the best Flutter package for building a whiteboard app?
Currently, there’s no official package. However, CustomPaint and flutter_drawing_board are commonly used for custom drawing. If you need real-time, production-ready features, ZEGOCLOUD Superboard offers a more complete solution.
Q3: How can I add drawing and annotation features to my Flutter app?
First, use GestureDetector to capture input and CustomPainter to render strokes. To handle advanced features like replay or multi-device sync more easily, consider using ZEGOCLOUD’s Superboard SDK.
Let’s Build APP Together
Start building with real-time video, voice & chat SDK for apps today!
