


Bringing conversational AI into Flutter apps is becoming a practical way to enhance user experience, especially as voice-driven interfaces gain wider adoption. One of Flutter’s strongest advantages is its unified Dart codebase, allowing voice interaction logic to run seamlessly on both Android and iOS without separate native implementations.
Traditionally, implementing real-time voice conversation required assembling multiple components: speech recognition, natural language processing, text-to-speech, audio streaming, and platform-specific audio handling. Managing these pieces individually often resulted in complex architecture and long development cycles.
Using ZEGOCLOUD’s Conversational AI SDK, these capabilities are packaged into a single workflow. The SDK provides real-time audio streaming, automatic speech recognition, LLM-based response generation, and natural voice synthesis, all accessible directly from Flutter. This significantly reduces the engineering effort required to build a production-ready voice conversational system.
In this guide, we will develop a complete conversational AI app with Flutter. The app will listen to the user’s voice, process it through the AI chain, speak the response, and present real-time subtitles during the conversation.
Flutter Conversational AI Built by ZEGOCLOUD
ZEGOCLOUD is a real-time audio and video communication platform that provides fully managed infrastructure, SDKs, and APIs for building interactive experiences. Its Conversational AI solution combines low-latency RTC streaming with AI processing pipelines, enabling apps to support natural voice interaction without maintaining separate speech recognition or language model services.
For Flutter developers, the key advantage is that all user-AI interactions can be handled through a unified Dart integration. ZEGOCLOUD manages the full chain internally, including:
- Real-time audio transmission between the device and the cloud
- Automatic Speech Recognition for converting voice to text
- LLM-based response generation to deliver contextual replies
- Text-to-Speech output that produces natural spoken responses
In addition to handling the conversational pipeline, ZEGOCLOUD provides UIKits that simplify the interface setup for voice calls, video calls, live interaction, and in-app chat. These components reduce repetitive UI work and allow developers to focus on application logic instead of audio routing, low-latency networking, or media engine configuration.
By integrating ZEGOCLOUD’s AI and RTC capabilities, Flutter applications can deliver continuous, streaming-based conversations with near real-time response, making it suitable for education, customer support, social interaction, and other voice-driven use cases.
Get the Code for Flutter Conversational AI
If you want to skip ahead or just see the finished product:
| What | Where |
|---|---|
| Server + Web App | github.com/ZEGOCLOUD/blog-aiagent-server-and-web |
| Flutter App | github.com/ZEGOCLOUD/blog-aiagent-flutter |
Before We Start
Before moving into the implementation, ensure the following prerequisites are prepared:
- Flutter 3.0 or above
Confirm your version by runningflutter --version - A ZEGOCLOUD account
Sign up on the official console if you have not registered yet - Basic understanding of Dart
Fundamental syntax knowledge is sufficient for following this guide - A backend service
We will use a simple server built with Next.js and hosted on Vercel, and the free tier is already enough for this tutorial
Once these are ready, you can proceed with the setup and integration steps.
How Does Conversational AI Work?
Before implementing the conversational flow, it is useful to understand the overall architecture and how the different components interact.
The Two-Part Setup
ZEGOCLOUD handles the core AI pipeline in the cloud, including speech recognition, language model processing, and text-to-speech output. These processes run on the server side, allowing the application to deliver end-to-end voice interaction without maintaining local AI models.
But we need two pieces on our end:
| Piece | What It Does |
|---|---|
| Your Server | Keeps your API keys safe, hands out tokens, tells ZEGO when to start/stop the AI |
| Flutter App | The brain converts speech to text, thinks, and speaks back |
| ZEGO Cloud | The brains converts speech to text, thinks, and speaks back |
Architecture Overview
This architecture connects the Flutter client, a secure backend server, and ZEGOCLOUD’s AI and RTC services to deliver end-to-end real-time voice conversations. The client handles audio input and output, the server manages credentials and tokens, and ZEGOCLOUD processes speech recognition, LLM responses, and speech synthesis in the cloud. This separation keeps sensitive data secure and ensures a smooth conversational experience.
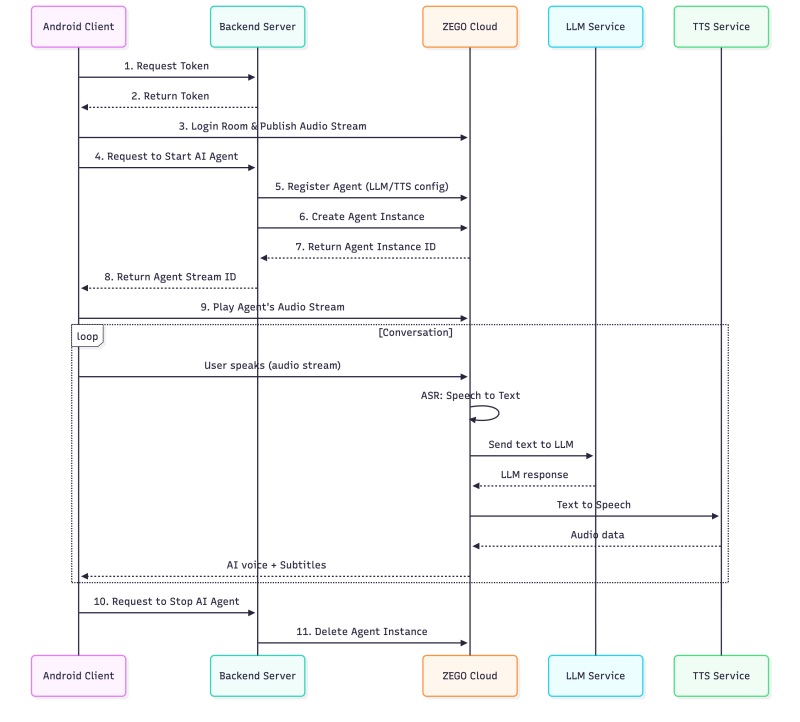
Your secrets stay on your server, and the Flutter app just deals with the audio and UI.
How to Build a Conversational AI with Flutter
With the architecture and core components understood, we can now begin implementing the real-time voice interaction features in Flutter. The following steps will guide you through backend setup, SDK integration, audio streaming, and AI response handling to complete a fully working conversational AI experience.
Step 1: Setting Up the Server
First, we need a backend service. Next.js works well for this, and deploying to Vercel is very simple. You only need to push your code to Git, and it will handle the deployment process for you.
1.1 Environment Variables
Chuck these in a .env.local file:
# ZEGO Configuration (from ZEGOCLOUD Console: https://console.zegocloud.com/)
NEXT_PUBLIC_ZEGO_APP_ID=your_app_id
ZEGO_SERVER_SECRET=your_server_secret_32_chars

# AI Agent Configuration
ZEGO_AGENT_ID=aiAgent1
ZEGO_AGENT_NAME=AI Assistant

# System Prompt - Define your AI's personality
SYSTEM_PROMPT="You are my best friend who I can talk to about anything. You're warm, understanding, and always there for me. Respond naturally like a close friend would - be supportive, share opinions, and engage in genuine conversation."

# LLM Configuration (Large Language Model)
LLM_URL=https://your-llm-provider.com/api/chat/completions
LLM_API_KEY=your_llm_api_key
LLM_MODEL=your_model_name

# TTS Configuration (Text-to-Speech)
TTS_VENDOR=ByteDance
TTS_APP_ID=zego_test
TTS_TOKEN=zego_test
TTS_CLUSTER=volcano_tts
TTS_VOICE_TYPE=zh_female_wanwanxiaohe_moon_bigtts
How to obtain these values:
| Variable | Description | How to Obtain |
|---|---|---|
NEXT_PUBLIC_ZEGO_APP_ID | Your ZEGO application ID | ZEGOCLOUD Console → Project Settings |
ZEGO_SERVER_SECRET | 32-character secret key | ZEGOCLOUD Console → Project Settings |
SYSTEM_PROMPT | AI personality definition | Customize based on your use case |
LLM_URL | LLM API endpoint | From your LLM provider (OpenAI, Doubao, Claude, etc.) |
LLM_API_KEY | LLM authentication key | From your LLM provider dashboard |
LLM_MODEL | Model name to use | e.g., gpt-4, doubao-1-5-pro-32k |
TTS_* | Text-to-Speech config | Use zego_test for testing, or your own TTS service |
1.2 Token Generation API
The token API generates authentication tokens for clients to connect to ZEGO’s RTC service:
// app/api/zego/token/route.ts
import { NextRequest, NextResponse } from 'next/server';
import crypto from 'crypto';

function generateToken(appId: number, userId: string, secret: string,
                       effectiveTimeInSeconds: number): string {
  const tokenInfo = {
    app_id: appId,
    user_id: userId,
    nonce: Math.floor(Math.random() * 2147483647),
    ctime: Math.floor(Date.now() / 1000),
    expire: Math.floor(Date.now() / 1000) + effectiveTimeInSeconds,
    payload: ''
  };

  const plainText = JSON.stringify(tokenInfo);
  const nonce = crypto.randomBytes(12);
  const cipher = crypto.createCipheriv('aes-256-gcm', secret, nonce);
  const encrypted = Buffer.concat([cipher.update(plainText, 'utf8'),
                                   cipher.final(), cipher.getAuthTag()]);

  const buf = Buffer.concat([
    Buffer.alloc(8).fill(0),
    Buffer.from([0, 12]), nonce,
    Buffer.from([encrypted.length >> 8, encrypted.length & 0xff]), encrypted,
    Buffer.from([1]) // GCM mode
  ]);
  buf.writeBigInt64BE(BigInt(tokenInfo.expire), 0);
  return '04' + buf.toString('base64');
}

export async function POST(request: NextRequest) {
  const { userId } = await request.json();
  const token = generateToken(
    parseInt(process.env.NEXT_PUBLIC_ZEGO_APP_ID!),
    userId,
    process.env.ZEGO_SERVER_SECRET!,
    3600
  );
  return NextResponse.json({ code: 0, data: { token } });
}
1.3 AI Agent API with Signature
The signature mechanism ensures secure communication with ZEGO’s server APIs:
// app/api/zego/utils.ts
import crypto from 'crypto';

// Generate API signature: MD5(AppId + SignatureNonce + ServerSecret + Timestamp)
export function generateSignature(appId: number, signatureNonce: string,
                                  serverSecret: string, timestamp: number): string {
  const str = appId.toString() + signatureNonce + serverSecret + timestamp.toString();
  return crypto.createHash('md5').update(str).digest('hex');
}

// Send request to ZEGO AI Agent API
export async function sendZegoRequest<T>(action: string, body: object): Promise<T> {
  const appId = parseInt(process.env.NEXT_PUBLIC_ZEGO_APP_ID!);
  const serverSecret = process.env.ZEGO_SERVER_SECRET!;
  const signatureNonce = crypto.randomBytes(8).toString('hex');
  const timestamp = Math.floor(Date.now() / 1000);
  const signature = generateSignature(appId, signatureNonce, serverSecret, timestamp);

  const url = new URL('https://aigc-aiagent-api.zegotech.cn');
  url.searchParams.set('Action', action);
  url.searchParams.set('AppId', appId.toString());
  url.searchParams.set('SignatureNonce', signatureNonce);
  url.searchParams.set('Timestamp', timestamp.toString());
  url.searchParams.set('Signature', signature);
  url.searchParams.set('SignatureVersion', '2.0');

  const response = await fetch(url.toString(), {
    method: 'POST',
    headers: { 'Content-Type': 'application/json' },
    body: JSON.stringify(body)
  });

  const result = await response.json();
  return result.Data as T;
}
1.4 Deploy to Vercel
Deploy your Next.js server to Vercel with these steps:
- Push your code to GitHub
- Go to Vercel and import your repository
- Add all environment variables in Vercel’s project settings
- Click “Deploy”
Your server will be available at https://your-project.vercel.app.
Step 2: Build the Flutter Client
Now, let’s build conversational AI for Flutter step by step.
2.1 Create Flutter Project
Create a new Flutter project:
flutter create --org com.zegocloud --project-name aiagent_demo .2.2 Configure Dependencies
Add the required dependencies to pubspec.yaml:
dependencies:
  flutter:
    sdk: flutter
  cupertino_icons: ^1.0.8

  # ZEGO Express SDK for real-time audio/video
  zego_express_engine: ^3.22.0

  # HTTP client for API calls
  http: ^1.2.0

  # Permission handling
  permission_handler: ^11.3.0
Then run:
flutter pub get2.3 Platform Configuration
Android Permissions
Add these permissions to android/app/src/main/AndroidManifest.xml:
<manifest xmlns:android="http://schemas.android.com/apk/res/android">
    <!-- Permissions for ZEGO Express SDK -->
    <uses-permission android:name="android.permission.RECORD_AUDIO" />
    <uses-permission android:name="android.permission.INTERNET" />
    <uses-permission android:name="android.permission.ACCESS_NETWORK_STATE" />
    <uses-permission android:name="android.permission.ACCESS_WIFI_STATE" />
    <uses-permission android:name="android.permission.MODIFY_AUDIO_SETTINGS" />
    <uses-permission android:name="android.permission.BLUETOOTH" />
    ...
</manifest>
iOS Permissions
Add these to ios/Runner/Info.plist:
<!-- Microphone permission for voice chat -->
<key>NSMicrophoneUsageDescription</key>
<string>This app needs microphone access to enable voice conversation with AI Agent.</string>
<!-- Background audio mode -->
<key>UIBackgroundModes</key>
<array>
    <string>audio</string>
</array>
2.4 App Configuration
Create a configuration file to centralize all settings:
// lib/config/app_config.dart
class AppConfig {
  // ZEGO Express SDK App ID - must match your backend server
  static const int appID = 0; // TODO: Replace with your App ID

  // Backend server URL (your Vercel deployment)
  static const String serverURL = 'https://your-server.netlify.app';

  // Generate unique IDs for testing
  static String generateRoomId() {
    final random = DateTime.now().millisecondsSinceEpoch % 100000;
    return 'room$random';
  }

  static String generateUserId() {
    final random = DateTime.now().millisecondsSinceEpoch % 100000;
    return 'user$random';
  }
}Important: The
appIDhere must matchNEXT_PUBLIC_ZEGO_APP_IDin your backend’s.env.localfile.
2.5 API Service
Now let’s hook up to our backend. Nothing fancy here — just some HTTP calls to get tokens and manage the AI agent:
// lib/services/api_service.dart
import 'dart:convert';
import 'package:http/http.dart' as http;
import '../config/app_config.dart';

class ApiService {
  /// Step 1-2: Request authentication token from backend
  static Future<String?> getToken(String userId) async {
    try {
      final response = await http.post(
        Uri.parse('${AppConfig.serverURL}/api/zego/token'),
        headers: {'Content-Type': 'application/json'},
        body: jsonEncode({'userId': userId}),
      );

      if (response.statusCode == 200) {
        final data = jsonDecode(response.body);
        return data['data']['token'] as String?;
      }
    } catch (e) {
      print('Failed to get token: $e');
    }
    return null;
  }

  /// Step 4, 5-8: Request backend to create AI Agent instance
  static Future<String?> startAgent({
    required String roomId,
    required String userId,
    required String userStreamId,
  }) async {
    try {
      final response = await http.post(
        Uri.parse('${AppConfig.serverURL}/api/zego/start'),
        headers: {'Content-Type': 'application/json'},
        body: jsonEncode({
          'roomId': roomId,
          'userId': userId,
          'userStreamId': userStreamId,
        }),
      );

      if (response.statusCode == 200) {
        final data = jsonDecode(response.body);
        // Server registers agent with ZEGO, creates instance, and returns stream ID
        return data['data']['agentStreamId'] as String?;
      }
    } catch (e) {
      print('Failed to start agent: $e');
    }
    return null;
  }

  /// Step 10-11: Request backend to stop AI Agent
  static Future<bool> stopAgent(String roomId) async {
    try {
      final response = await http.post(
        Uri.parse('${AppConfig.serverURL}/api/zego/stop'),
        headers: {'Content-Type': 'application/json'},
        body: jsonEncode({'roomId': roomId}),
      );
      return response.statusCode == 200;
    } catch (e) {
      print('Failed to stop agent: $e');
    }
    return false;
  }
}
2.6 Initialize ZEGO Express Engine
Here’s where we set up ZEGO. I like using a singleton pattern for this — keeps things tidy:
// lib/services/zego_express_manager.dart
import 'dart:convert';
import 'package:zego_express_engine/zego_express_engine.dart';
import '../config/app_config.dart';
import '../models/subtitle_message.dart';

class ZegoExpressManager {
  static final ZegoExpressManager _instance = ZegoExpressManager._internal();
  factory ZegoExpressManager() => _instance;
  ZegoExpressManager._internal();

  Function(String, ZegoRoomStateChangedReason, int)? onRoomStateChanged;
  Function(SubtitleMessage)? onSubtitleReceived;

  Future<void> initEngine() async {
    // Set engine config for AI conversation
    final engineConfig = ZegoEngineConfig(advancedConfig: {
      'set_audio_volume_ducking_mode': '1',
      'enable_rnd_volume_adaptive': 'true',
    });
    await ZegoExpressEngine.setEngineConfig(engineConfig);

    // Create engine profile
    final profile = ZegoEngineProfile(
      AppConfig.appID,
      ZegoScenario.HighQualityChatroom,
      enablePlatformView: false,
    );

    await ZegoExpressEngine.createEngineWithProfile(profile);
    _setupEventHandlers();
    await _configureAudioSettings();
  }

  void _setupEventHandlers() {
    ZegoExpressEngine.onRoomStateChanged = (roomID, reason, errorCode, _) {
      onRoomStateChanged?.call(roomID, reason, errorCode);
    };

    // Handle experimental API for subtitle messages
    ZegoExpressEngine.onRecvExperimentalAPI = (content) {
      _parseSubtitleMessage(content);
    };
  }

  Future<void> _configureAudioSettings() async {
    final engine = ZegoExpressEngine.instance;
    await engine.enableAGC(true);
    await engine.enableAEC(true);
    await engine.setAECMode(ZegoAECMode.AIBalanced);
    await engine.enableANS(true);
    await engine.setANSMode(ZegoANSMode.Medium);
  }
}
2.7 Room Login, Publishing & Playing Streams
The RTC bits are pretty straightforward. Login to a room, publish your audio, play the AI’s audio:
// Login to room with token
Future<int> loginRoom(String roomId, String userId, String token) async {
  final user = ZegoUser(userId, userId);
  final config = ZegoRoomConfig(0, true, token);

  final result = await ZegoExpressEngine.instance.loginRoom(
    roomId,
    user,
    config: config,
  );
  return result.errorCode;
}

// Start publishing local audio (user's voice)
Future<void> startPublishing(String streamId) async {
  await ZegoExpressEngine.instance.muteMicrophone(false);
  await ZegoExpressEngine.instance.startPublishingStream(streamId);
}

// Start playing remote audio (AI agent's voice)
Future<void> startPlaying(String streamId) async {
  await ZegoExpressEngine.instance.startPlayingStream(streamId);
}
2.8 Display Subtitles
Good news — ZEGOCLOUD provides a ready-made subtitles component! No need to write all that parsing logic yourself. Grab it from their GitHub repo and drop it into lib/audio/subtitles/.
The component includes:
message_dispatcher.dart– Dispatches subtitle messages to handlersmessage_protocol.dart– Protocol models for ASR/LLM messagesmodel.dart– ViewModel for managing subtitle stateview.dart– UI widget for displaying subtitles
Integrate the Subtitles Component
In your chat page, implement ZegoSubtitlesEventHandler and register the callbacks:
// lib/widgets/chat_page.dart
import '../audio/subtitles/view.dart';
import '../audio/subtitles/model.dart';
import '../audio/subtitles/message_protocol.dart';
import '../audio/subtitles/message_dispatcher.dart';

class _ChatPageState extends State<ChatPage> implements ZegoSubtitlesEventHandler {
  late ZegoSubtitlesViewModel _subtitlesModel;

  @override
  void initState() {
    super.initState();
    _subtitlesModel = ZegoSubtitlesViewModel();

    // Register subtitle event handler
    ZegoExpressEngine.onRecvExperimentalAPI = _onRecvExperimentalAPI;
    ZegoSubtitlesMessageDispatcher().registerEventHandler(this);
  }

  @override
  void dispose() {
    ZegoExpressEngine.onRecvExperimentalAPI = null;
    ZegoSubtitlesMessageDispatcher().unregisterEventHandler(this);
    super.dispose();
  }

  void _onRecvExperimentalAPI(String content) {
    ZegoSubtitlesMessageDispatcher.handleExpressExperimentalAPIContent(content);
  }

  @override
  void onRecvAsrChatMsg(ZegoSubtitlesMessageProtocol message) {
    _subtitlesModel.handleRecvAsrMessage(message);
  }

  @override
  void onRecvLLMChatMsg(ZegoSubtitlesMessageProtocol message) {
    _subtitlesModel.handleRecvLLMMessage(message);
  }
}
The component automatically handles:
- ASR messages (Cmd=3): Full text replacement for user speech
- LLM messages (Cmd=4): Incremental text accumulation for AI responses
- Message ordering: Sorts by SeqId to handle out-of-order delivery
2.9 UI Layout
The layout follows the same pattern as Android/iOS: top section for status and controls, bottom for subtitles using the official component:
// lib/widgets/chat_page.dart
@override
Widget build(BuildContext context) {
  return Scaffold(
    body: SafeArea(
      child: Column(
        children: [
          // Top: Control Panel
          _buildControlPanel(),
          const Divider(height: 1),
          // Bottom: Subtitles View (using official component)
          Expanded(child: ZegoSubtitlesView(model: _subtitlesModel)),
        ],
      ),
    ),
  );
}

Widget _buildControlPanel() {
  return Container(
    padding: const EdgeInsets.symmetric(vertical: 40, horizontal: 20),
    color: Colors.grey[100],
    child: Column(
      children: [
        const Text('ZEGO AI Agent',
          style: TextStyle(fontSize: 24, fontWeight: FontWeight.bold)),
        const SizedBox(height: 20),
        // Status indicator
        Row(
          mainAxisAlignment: MainAxisAlignment.center,
          children: [
            Container(
              width: 12, height: 12,
              decoration: BoxDecoration(
                shape: BoxShape.circle,
                color: _viewModel.isConnected ? Colors.green : Colors.grey,
              ),
            ),
            const SizedBox(width: 8),
            Text(_viewModel.statusText),
          ],
        ),
        const SizedBox(height: 20),
        // Call button
        SizedBox(
          width: 120, height: 120,
          child: ElevatedButton(
            onPressed: _viewModel.isConnected
                ? _viewModel.endCall
                : _viewModel.startCall,
            style: ElevatedButton.styleFrom(
              shape: const CircleBorder(),
              backgroundColor: _viewModel.isConnected ? Colors.red : Colors.green,
            ),
            child: Icon(
              _viewModel.isConnected ? Icons.call_end : Icons.call,
              size: 48, color: Colors.white,
            ),
          ),
        ),
      ],
    ),
  );
}
2.10 Complete Call Flow
Here’s how all the pieces work together. The ViewModel orchestrates the complete flow when the user taps “Start Call”:
// lib/viewmodels/chat_viewmodel.dart
Future<void> startCall() async {
  _isLoading = true;
  notifyListeners();

  try {
    // Generate unique IDs for this session
    final roomId = AppConfig.generateRoomId();
    final userId = AppConfig.generateUserId();
    final userStreamId = '${roomId}_${userId}_main';

    // Initialize ZEGO Engine
    await _zegoManager.initEngine();

    // Step 1-2: Request token from backend
    final token = await ApiService.getToken(userId);
    if (token == null) throw Exception('Failed to get token');

    // Step 3: Login to ZEGO room
    final loginResult = await _zegoManager.loginRoom(roomId, userId, token);
    if (loginResult != 0) throw Exception('Failed to login room');

    // Step 3: Publish local audio stream (user's voice)
    await _zegoManager.startPublishing(userStreamId);

    // Step 4-8: Request backend to create AI Agent
    final agentStreamId = await ApiService.startAgent(
      roomId: roomId,
      userId: userId,
      userStreamId: userStreamId,
    );
    if (agentStreamId == null) throw Exception('Failed to start agent');

    // Step 9: Play AI Agent's audio stream
    await _zegoManager.startPlaying(agentStreamId);

    _isConnected = true;
    _currentRoomId = roomId;
  } catch (e) {
    _errorMessage = e.toString();
  } finally {
    _isLoading = false;
    notifyListeners();
  }
}

// Step 10-11: End call and cleanup
Future<void> endCall() async {
  if (_currentRoomId != null) {
    await ApiService.stopAgent(_currentRoomId!);
    await _zegoManager.logoutRoom(_currentRoomId!);
  }
  _isConnected = false;
  _currentRoomId = null;
  notifyListeners();
}
This flow corresponds to steps 1-11 in the System Architecture diagram:
| Step | Action | Code |
|---|---|---|
| 1-2 | Request Token | ApiService.getToken() |
| 3 | Login Room & Publish Stream | loginRoom() + startPublishing() |
| 4-8 | Start AI Agent | ApiService.startAgent() |
| 9 | Play Agent Stream | startPlaying() |
| 10-11 | Stop AI Agent | ApiService.stopAgent() |
Running the App
# Run on iOS simulator
flutter run -d ios

# Run on Android emulator
flutter run -d android

# Run on connected device
flutter run
Run a demo
Conclusion
Using Flutter together with ZEGOCLOUD makes it much easier to add conversational AI features to an app. With real-time audio, speech recognition, language response, and voice output all handled in the cloud, the client-side code stays simple and focused on the user interface.
The same approach can be used in many scenarios, such as virtual assistants, customer support, learning tools, or subtitle display. As your project grows, you can continue exploring more APIs, UIKits, and features from ZEGOCLOUD to build richer voice interaction experiences.
Let’s Build APP Together
Start building with real-time video, voice & chat SDK for apps today!
