


Since Facebook introduced its Facebook Avatar Maker, it has been a popular feature among users. People have used it to showcase their creativity by designing many unique features. If you also want to know how to make a Facebook Avatar and the science behind it, this article will help you. It will also describe the process in case you want to make your avatar maker app.
What is Facebook Avatar Maker
Before understanding how to make a Facebook Avatar, learning more about Facebook Avatars and the Face Avatar Maker is essential. Facebook Avatars are the virtual avatars people can create to emulate their real selves. The process you use to create your look-alike avatar happens in the Facebook Avatar Maker.
It is a user-friendly tool with numerous options for creating an avatar as real to you as possible. When it comes to features, it even includes options like nose and ear piercings with different clothing and headwear options. Moreover, you can use the Facebook Avatar Maker on both mobile apps and the web.
How to Make Facebook Avatar
Now that you have understood what Facebook Avatar is, let’s review its creation process. Facebook has made it very easy for users to create their desired avatars. It offers many unique additions during the creation process. Here is how to make an avatar on Facebook:
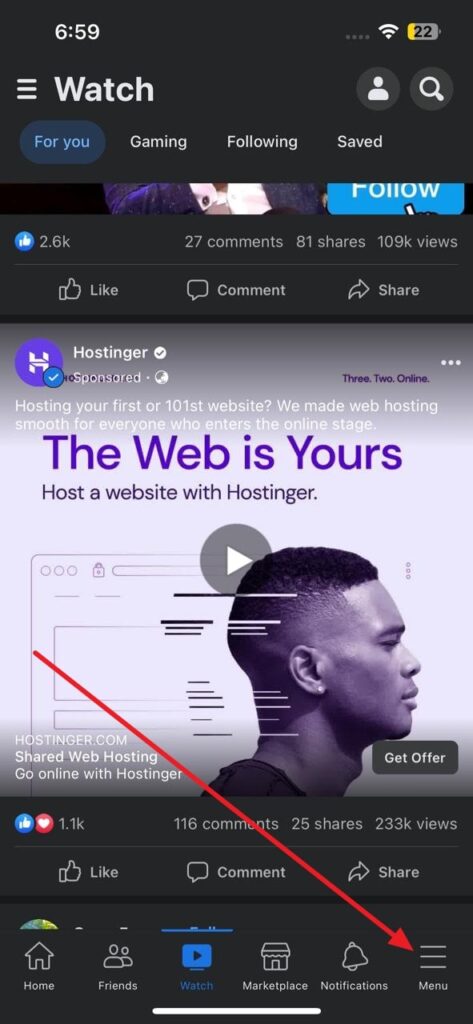
Step 1: Launch the Facebook app on your smartphone and press the “Three Horizontal” lines to open the profile menu. For Android devices, it is in the upper right corner with a profile icon, while iOS users can find it at the bottom right corner of their device.
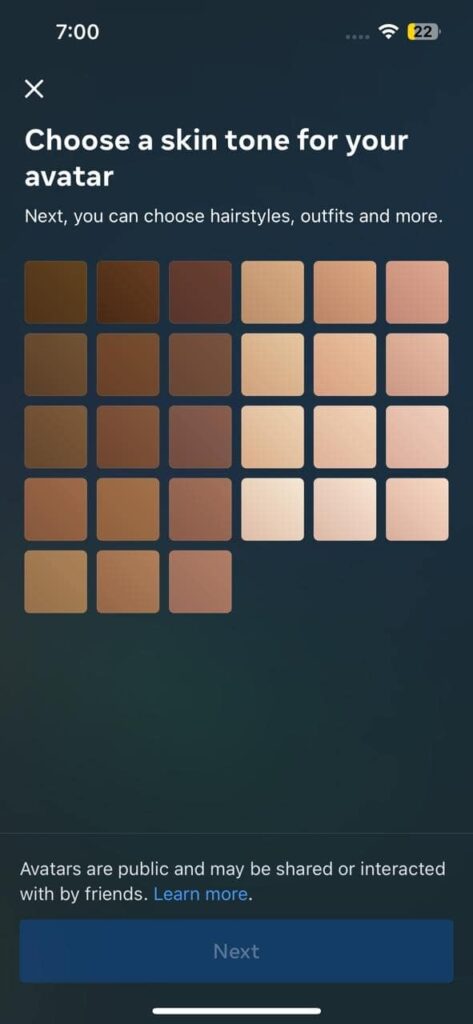
Step 2: On the next screen, tap “See More” and select “Avatars.” It will load the avatar maker screen, and here you need to choose a skin tone for your avatar. After selecting the skin tone, press “Next” to proceed.
Step 3: Now, you will need to customize your avatar, starting with hairstyle and color. Next, choose an outfit, body type, eye shape, color, and makeup. Afterward, you need to customize the eyebrows, nose, and lips.
Step 4: Similarly, continue to define face, jawline, facial hair, ear piercings, glasses, and headwear details. When you have completed everything, tap “Done” from the top right corner. Once the avatar is complete, press “Next” and then “Done” to end the process.
How to Use Your Facebook Avatar
With your avatar created on Facebook, the question what can you use it for? After creating a Facebook Avatar, you can use it for many things, from setting it as your profile pic to sharing it as a comment. These are the possible ways you can use your Facebook Avatar after creating one through how to make FB avatar process:
- Profile Picture: You can set your Facebook Avatar as your profile picture, so your friends can see your personalized avatar instead of a regular photo. With this, you can also ensure your privacy if you don’t want to use a real photo.
- Comments: The Facebook Avatar is also great for using in comments on posts and messages to express your emotions and reactions. Moreover, it makes commenting on other posts more fun and engaging.
- Messenger Conversations: Using the Facebook Avatar in Messenger Conversations is a fun way to represent yourself. You can use it to greet your friend during group conversations.
- Facebook Stories: Do you love to add stories to your Facebook account? You can use your Avatar in Facebook Stories as stickers to share with your friends and followers.
- Facebook Gaming: If you’re a Facebook Gaming creator or viewer, you can use your Avatar to personalize your gaming experience. Using unique and creative avatars during gameplay can help increase your audience.
Best Video and Voice Call SDK & API Provider – ZEGOCLOUD
ZEGOCLOUD emerges as a leading provider in the realm of real-time communication, offering robust Video and Voice Call SDK & API solutions that redefine digital interactions. Tailored for seamless integration, ZEGOCLOUD empowers developers and businesses to enhance their applications with superior-quality video and voice calls, fostering more engaging and meaningful connections.
Key Features:
- Crystal-Clear Video and Voice Calls: Utilizing advanced codecs and optimization techniques, ZEGOCLOUD ensures high-definition video and crystal-clear audio, even in challenging network conditions.
- Ultra-Low Latency: With a global network of data centers, ZEGOCLOUD delivers real-time communication with minimal delay, enabling natural and fluid conversations.
- Cross-Platform Compatibility: Comprehensive SDKs and APIs for iOS, Android, and web platforms allow for the development of consistent and accessible user experiences across devices.
- Scalable Infrastructure: Whether for one-on-one chats or large group broadcasts, ZEGOCLOUD’s scalable solutions adapt to varying demands, maintaining performance without compromise.
- Robust Security Measures: Prioritizing privacy and security, ZEGOCLOUD implements end-to-end encryption and complies with international data protection regulations, safeguarding all communication.
- Simplified Integration: Designed with developers in mind, ZEGOCLOUD offers straightforward integration processes, extensive documentation, and support, streamlining the development cycle.
Conclusion
Creating your Facebook avatar is a fun way to express your personality and add a personal touch to your interactions on the platform. With just a few taps, you can design an avatar that mirrors your style or represents your whimsical side. Dive into this creative process and enjoy bringing your digital self to life, ready to enhance your comments, stories, and messages with a unique, personalized flair.
Let’s Build APP Together
Start building with real-time video, voice & chat SDK for apps today!
