A custom avatar is one that you have modeled to look exactly the way you want. In other words, it is an avatar that you own. There is a high chance that you have used a custom avatar or even created one if you’ve used Facebook, Instagram or Snapchat before. It is almost mandatory on Snapchat to create profile pictures using their custom avatar creator.
This article will show you how to create and customize avatars using the ZEGOCLOUD avatar solution.
Introduction: ZegoAvatar SDK for Custom Avatar Creation
The ZegoAvatar SDK is a powerful virtual avatar creation tool. It provides all the necessary toolsets you could ever need to create and customize avatars. It allows users to create and customize their virtual avatars for social media, games, virtual events, and other applications.
There’s no doubt it’s the best avatar creator out there, as it comes with a powerful avatar customizer that takes avatar customization to a whole new level.
Excited, right? This is just a stepping stone. Because you’ll see how awesome the ZegoAvatar SDK is when we start with the building process.
In the next section, we’ll learn how to build custom avatars with ease using the ZegoAvatar SDK.
Preparation
- A ZEGOCLOUD developer account — Sign in
- Xcode 5.0 or later.
- Real devices with iOS 12.0 or later with audio, video, and camera support
- Basic understanding of iOS development
ZegoAvatar SDK integration
I know this is the part you have been waiting for as an avid fan of the game. We’ll learn how to integrate the ZegoAvatar SDK in this section. This service will help us create a custom avatar that stands out from the crowd with ease.
Follow the steps below to integrate the ZegoAvatar SDK for iOS applications :
Create project
The first step in building any app is creating a project. In this phase, we’re going to define many parameters for our project. We can create a project by following the steps below :
1. Launch Xcode
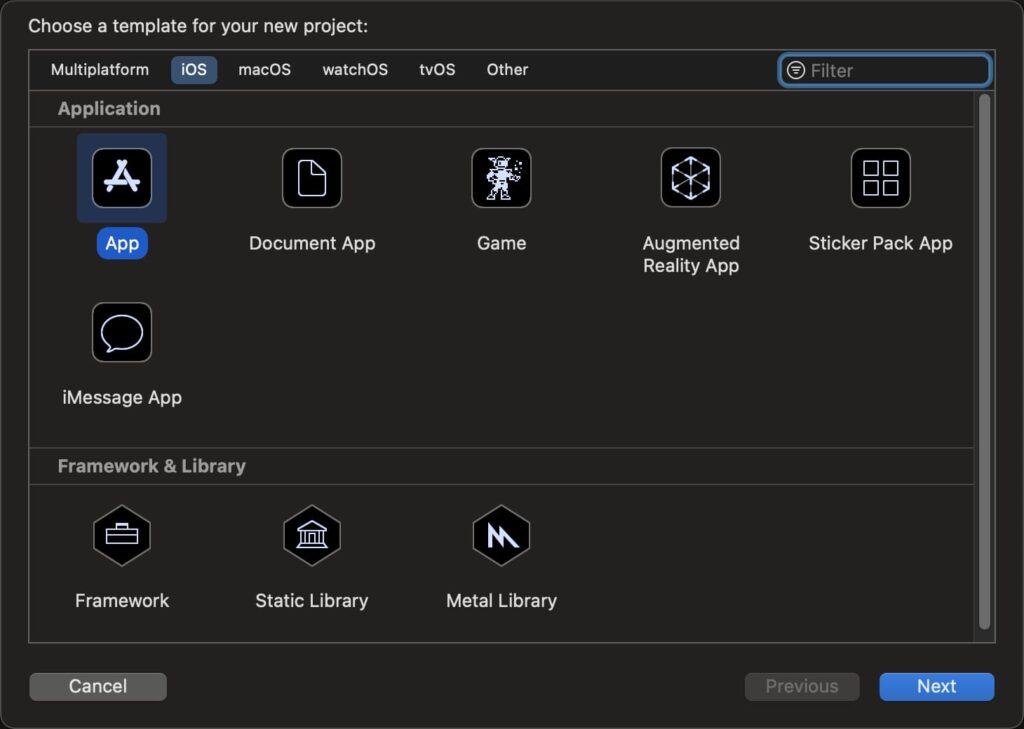
To kickstart our custom avatar creation journey, launch Xcode and select Create a new Xcode project or select File → New → Project. Another window will open; select the iOS application since that’s the platform on which we’re building our custom avatar creator. select Application → App, and click Next.
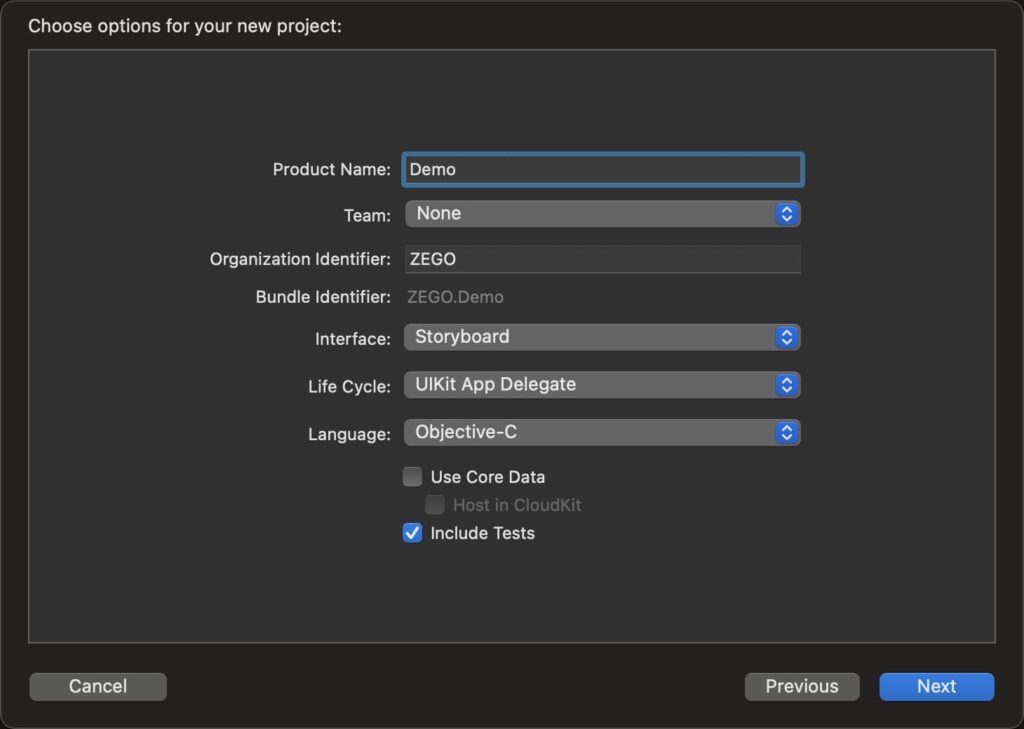
2. Add a product name and an organization identifier.
These details are very important to our application. They act as a bundle identifier that provides unique identification for our app in the entire system. After entering the necessary details, click on “Next.”
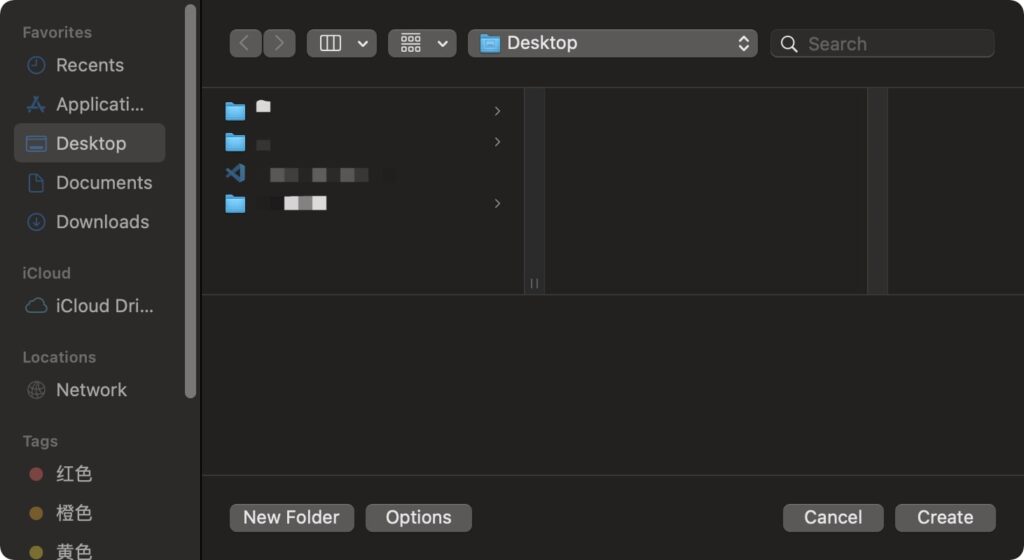
We’re also done with project creation. After clicking on Next, select the project storage path, and finally click on Create to create the project.
Import SDK
We can import the ZegoAvatar SDK, which we’ll use as an avatar customizer, through the following steps:
1. Download the SDK.
We have to download and install the ZegoAvatar SDK to proceed with our custom avatar creation. Go to the SDK download page to get it. The page is generic, like the one in the image below.
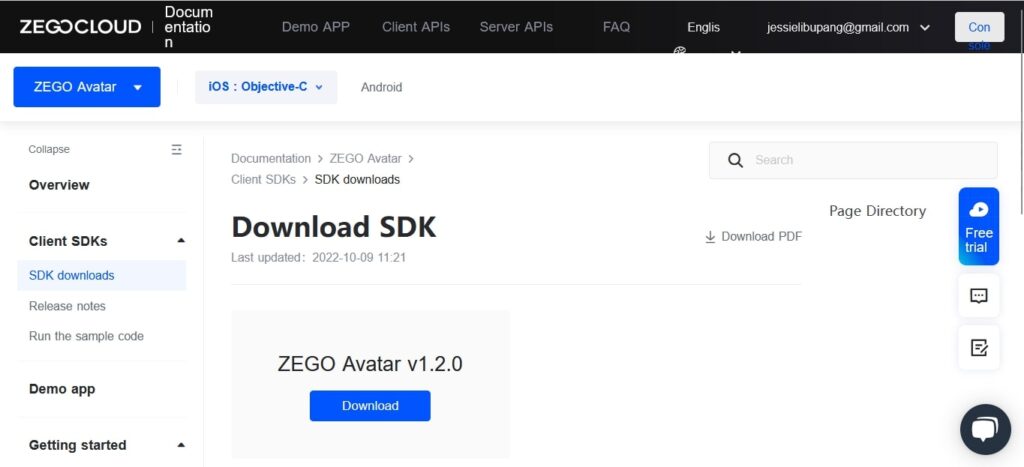
After downloading the file, you can see that it’s compressed. Decompress the package to extract all the SDK’s files.
2. Adding the SDK Library to the project directory
The first library file we need to add is the dynamic library file ZegoAvatar.xcframework. We can do this by copying the file manually to our project’s directory. These steps can be further simplified into this: Open Xcode, select **File **→ Add Files to [Project Name], and add the SDK Library file to the project.
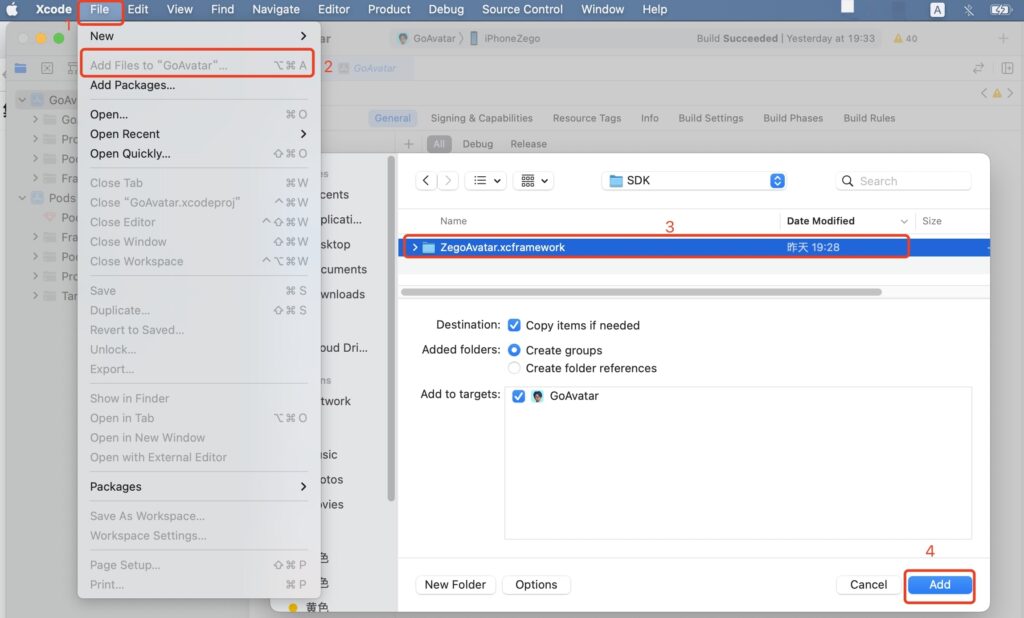
3. TARGETS Configurations
If you’re new to iOS app development, you may be wondering what these TARGETS are. Target specifies a product to build and contains the instructions for building the product from a set of files in a project. So we’re basically going to use Target to point to our custom avatar creation project and instructions from our SDK Library file.
Below are some Target configurations needed in our project:
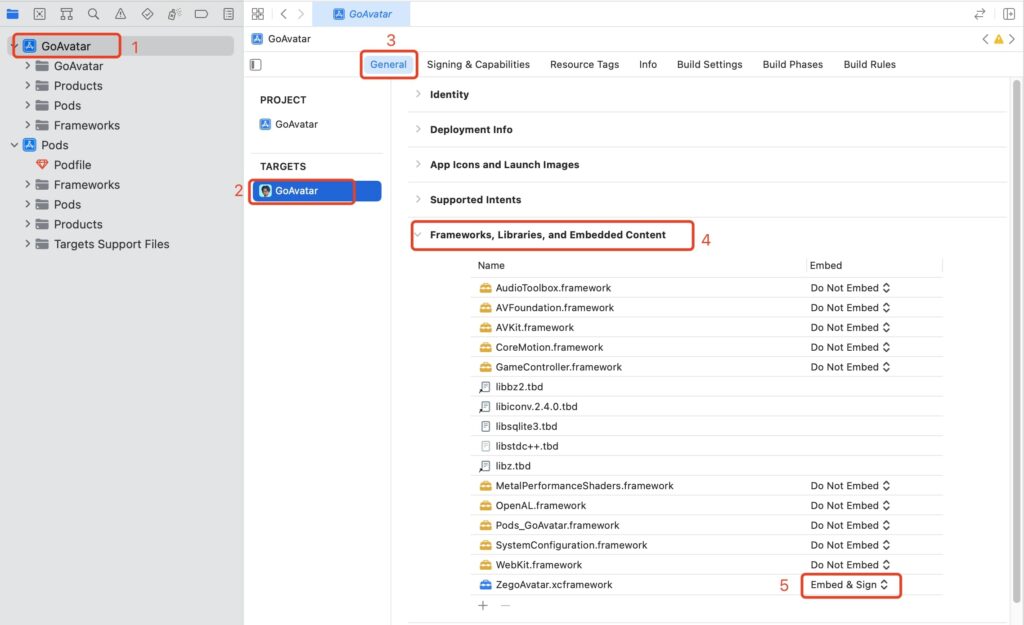
Select Targets → General → Frameworks, Libraries, and Embedded Content, add ZegoAvatar.xcframework, and set Embed to Embed & Sign.
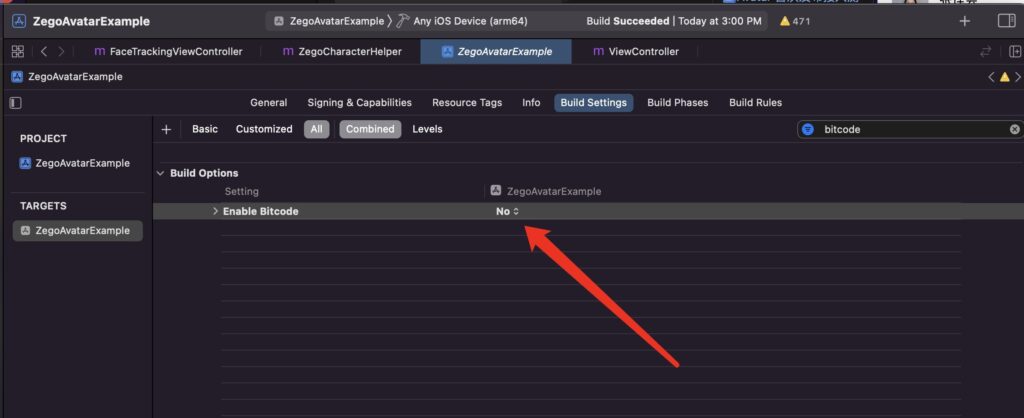
Select TARGETS → Build Settings, → Build Options, and set Enable Bitcode to NO.
4. Set Permission
We will need some permission in order to be able to access some device resources, like the camera and storage, for instance. We’re going to set the permissions required by our custom avatar application.
This can be done through the following steps:
- Select TARGETS → Info → Custom iOS Target Properties.
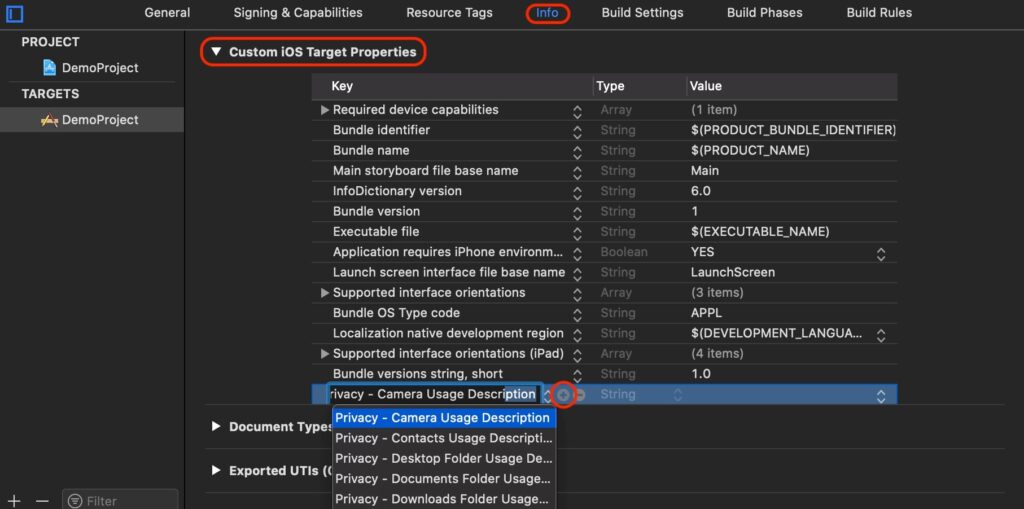
- Click the plus icon (+) and add the camera and microphone permissions: We’ll use the camera to capture facial expressions using the mirroring feature [
Privacy - Camera Usage Description]. and a microphone will be used for speech simulation [Privacy - Microphone Usage Description].

import resource packages
In order to use the AI capabilities provided by the ZegoAvatar SDK, we have to import the corresponding resource packages. Visit the SDK Downloads page to get the needed resource packages.
You can import these packages in two ways: “dynamic downloading” or the “added from local” method.
Follow the steps below to import packages:
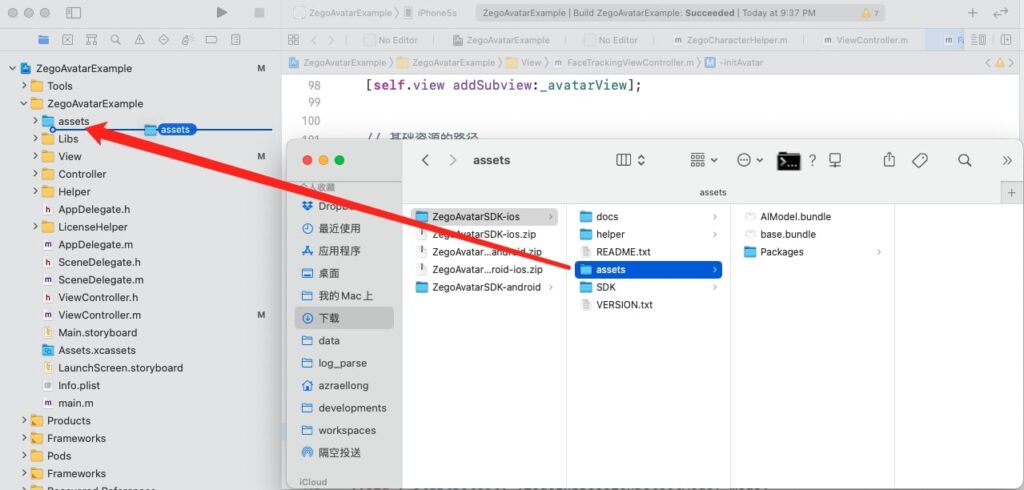
- Locate the assets folder, and drag the folder into your project folder.
- A dialogue box will appear after dropping the package folder into your project. Select Create folder references to add the folder.
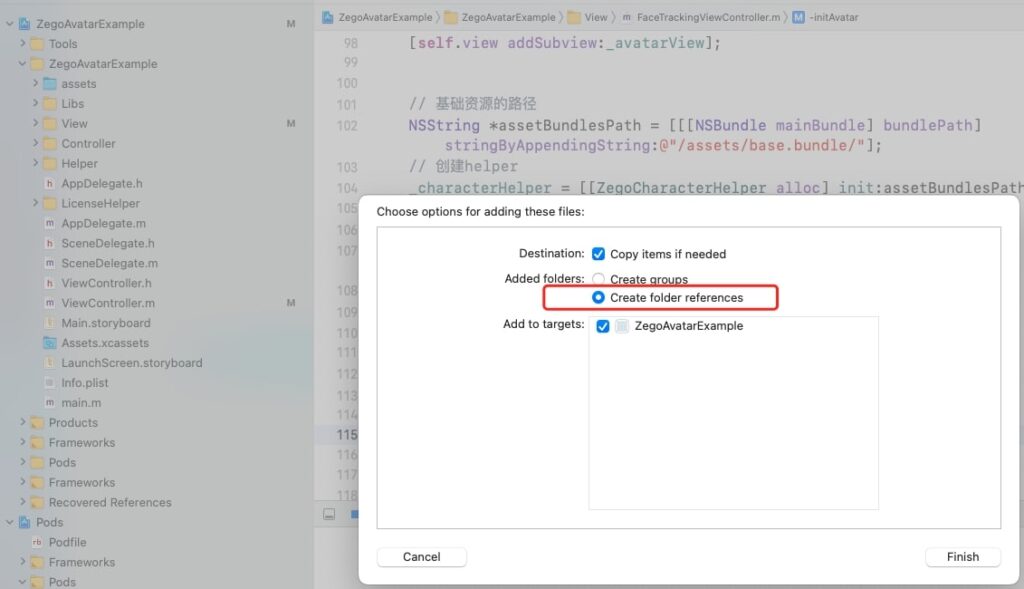
Your folder structure will change and look like the one below. This shows that the following assets:AIModel.bundle, base.bundle, and Packages have been added to our project directory.

How to Create a Custom Avatar in iOS
We’re done integrating the ZegoAvatar SDK; it is now time to start creating our custom avatar. We can create virtual avatars by following the following steps :
1. Apply for authentication and licensing.
The first thing on our prerequisite list is creating a ZEGOCLOUD developer account, and I believe you’ve done that. This account is very important, as we’re going to use it to obtain the license file for our custom avatar creator project.
Authentication can be carried out through the following steps :
- Login to the ZegoCloud Admin Console.
- Create a project on the ZEGOCLOUD Admin Console and get the AppID and AppSign of your project.
- Contact Zegocloud technical support and provide the Bundle ID of your project to enable related permissions.
- Copy the source code in the LicenseHelper folder of the sample source code obtained from the SDK folder to our project.
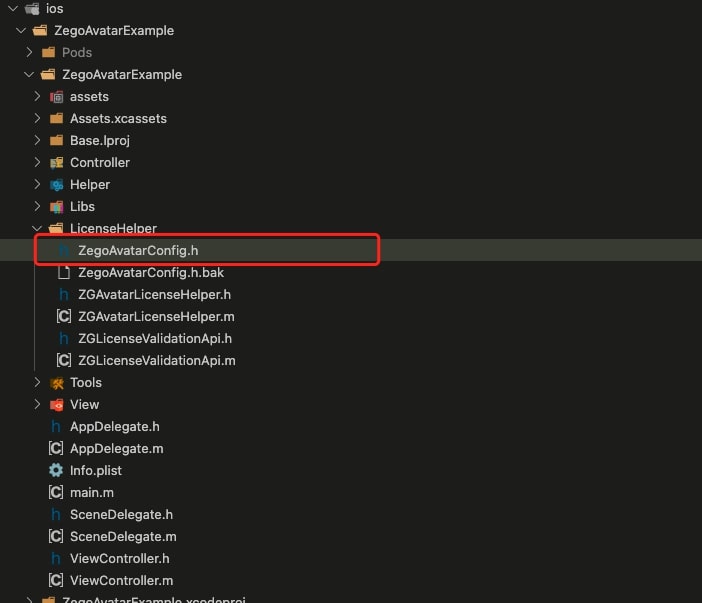
- Open and modify the
ZegoAvatarConfig.hfile. Enter theAppIDandAppSignfrom the ZegoCloud Admin Console for sample source code to run. Otherwise, the sample source code cannot run.
// The address of the authentication server.
static NSString *AVATAR_BASE_URL = @"https://aieffects-api.zego.im?Action=DescribeAvatarLicense";
// The AppID from ZEGOCLOUD. The AppID is bound to the Bundle ID. Set Bundle Identifier to the Bundle ID provided during AppID application.
static NSUInteger AVATAR_APPID = YOUR_APP_ID;
// The AppSign from ZEGOCLOUD.
static NSString *AVATAR_APP_SIGN = YOUR_APP_SIGN;- In the project environment, select TARGETS → Signing & Capabilities and set Bundle Identifier to the
Bundle IDprovided duringAppIDapplication.

Install dependency libraries.
After integrating the custom avatar SDK (i.e., ZegoAvatar) and getting the required permissions, it is now time to install the dependencies needed for our projects. This can be achieved through the following steps:
- Open a
terminaland switch to the project directory. Run the command below to introduce the dependency libraries.
pod YTKNetwork- Run the code below to install all the dependencies.
pod installObtain the license.
RequestLicense API in ZGAvatarLicenseHelper to obtain the authentication license from the ZEGCLOUD server.
// Initiate a network request to obtain the license.
[ZGAvatarLicenseHelper requestLicense:^(NSString * _Nonnull license) {
    if (license.length > 0) {
        /// Initialize ZegoAvatarService.
        [self initAvatarService: license];
    }
}];
Introduction to ZegoCharacterHelper
Like the name suggests, ZegoCharacterHelper helps with creating virtual avatars with an awesome avatar customizer. ZegoCharacterHelper is used for introducing virtual avatar data like clothing materials, makeup, facial features, and even in setting view parameters such as the width, height, and position of avatars.
Initialize AvatarService
We’re almost there. It is time to initialize AvatarService so that we can start off with the avatar creation process. Follow the steps below to initialize AvatarService.
- import header file
// Import header file.
#import <ZegoAvatar/ZegoAvatarService.h>- Introduce the obtained authentication license to initialize
AvatarServiceby calling theinitWithConfigmethod.
// Initialize AvatarService.
- (void) initAvatarService: (NSString*) license{
    /// Create config.
    ZegoServiceConfig *config = [[ZegoServiceConfig alloc] init];
    // Import the obtained license file.
    config.license = license;
    // Specify the AI model storage path.
    config.AIPath = [[[NSBundle mainBundle] bundlePath] stringByAppendingString:@"/assets/AIModel.bundle"];
    // Listen for the initialization status. Run addServiceObserver on the main thread.
    [[ZegoAvatarService sharedInstance] addServiceObserver:self];
    // Initialize ZegoAvatarService.
    [[ZegoAvatarService sharedInstance] initWithConfig:config];
}- Listen for the
onStateChangecallback to receive related event notifications for the initialization status.
// avatarService initialization status callback.
- (void)onStateChange:(ZegoAvatarServiceState)state {
    // SDK initialized.
    if (state == ZegoAvatarServiceState_InitSucceed) {
        // Initialize the virtual avatar.
        [self initAvatar];
    }
}
After initializing AvatarService, we can now create our custom avatar with ease. We’ll focus on creating avatars for iOS devices. The process is not that distinct for other platforms. You can visit the avatar creation page for more insights.
Without further ado, let’s get started with the custom avatar creation process!
Implementation steps
We can now generate our custom avatar by following the following steps:
- Prepare the UI image required for creating a virtual avatar: This image can be an uploaded image from your files. It is recommended to use images from phone cameras.
- After preparing the image, call the
detectFaceFeatureAPI and introduce the UI Image to generate a virtual avatar.
// Extract facial features based on the introduced image.
ZegoFaceFeature *feature = [[[ZegoAvatarService sharedInstance] getInteractEngine] detectFaceFeature:image];- Set avatar creation data: After a virtual avatar is created, call the
applyFaceFeatureAPI fromZegoCharacterHelperand introduce the feature parameter to set the dimensions of facial parts.
// Set the appearance of the avatar based on facial features.
[_characterHelper applyFaceFeature:feature];
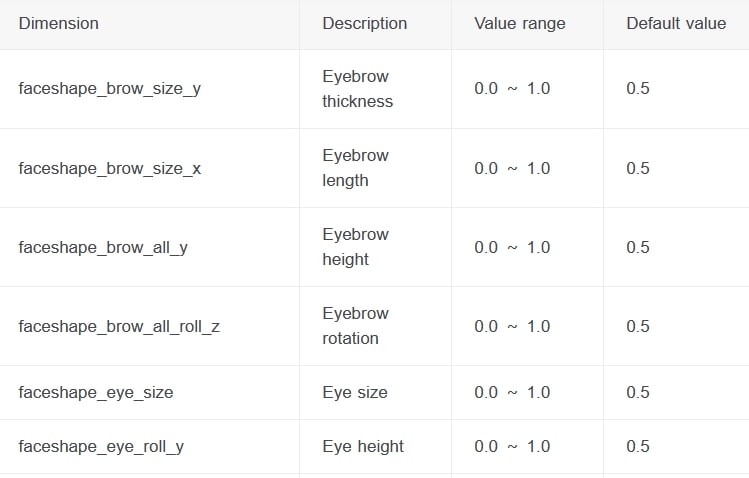
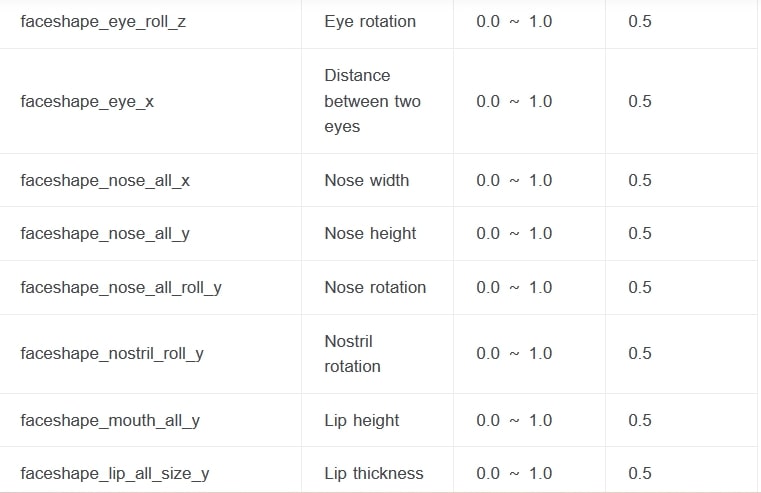
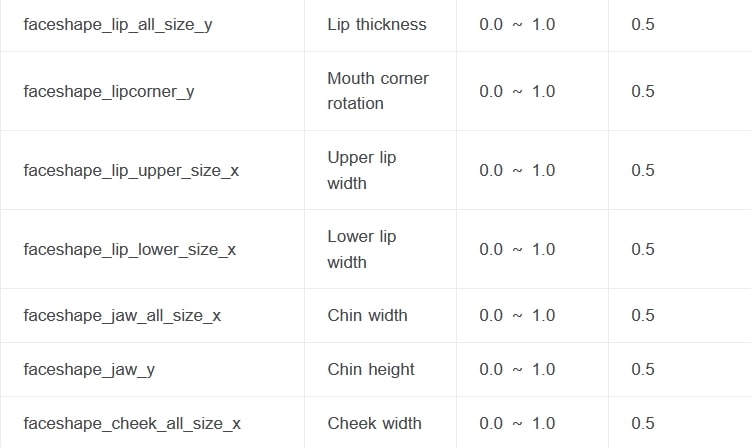
These avatars can be customized further, as ZegoAvatar offers great avatar customization features. Avatars can be customized to a certain range. The image below shows various avatar parts and customization ranges:
Conclusion
From the above samples and guides, you can see that it is fairly easy to integrate avatar creation capabilities into our apps.
You can run the sample code if you want to develop applications with avatar creation features.
To learn more about avatar customization, please visit the following pages:
If you encounter any issue while using any of ZegoCloud’s products, you can always reach our 24-hour support team.
Read More
Talk to Expert
Learn more about our solutions and get your question answered.


