


Conversational AI is reshaping mobile apps by enabling voice-driven, real-time interactions between users and intelligent systems. From customer support assistants to AI language tutors, voice conversational AI on iOS unlocks a wide range of innovative use cases. In this tutorial, we’ll walk you through creating a Conversational AI for iOS using ZEGOCLOUD’s Conversational AI SDK. By the end, you’ll have a working prototype that supports natural conversation on iPhone devices, including speech recognition, LLM-generated replies, and text-to-speech output.
Conversational AI for iOS Built by ZEGOCLOUD
ZEGOCLOUD provides a complete conversational AI solution for iOS apps. It helps developers build voice interactions that can understand speech, generate replies, and speak responses back to the user. The SDK includes speech recognition, LLM-based reasoning, and text-to-speech, so you can connect all parts into a smooth conversation experience on iPhone.
The solution captures voice, converts it to text, sends the message to an AI model, and returns a clear response. It is designed to work with native iOS projects, and supports flexible expansion based on your app’s needs.
You can adjust prompts, change the AI model, design your own UI, or refine dialog logic. Whether you want to create an assistant, a language coach, or a voice companion, ZEGOCLOUD offers the core tools to build conversational AI features on iOS.
Download Complete Source Code
Get the full working examples from GitHub:
| Component | Repository |
|---|---|
| Backend Server + Web Client | github.com/ZEGOCLOUD/blog-aiagent-server-and-web |
| iOS Client | github.com/ZEGOCLOUD/blog-aiagent-ios |
Prerequisites
Before we begin building our conversational AI software for iOS, make sure you have:
- Xcode 15 or later
- A ZEGOCLOUD Console account
- Basic knowledge of Swift and iOS development
- Your backend server is ready (we’ll use Next.js deployed on Vercel)
Architecture Overview
Before diving into implementation, let’s understand how ZEGOCLOUD’s Conversational AI works and why we need both a server and a client.
Why Do We Need Both Server and Client?
ZEGOCLOUD’s Conversational AI is a cloud-based service that orchestrates three AI capabilities: ASR (Automatic Speech Recognition), LLM (Large Language Model), and TTS (Text-to-Speech). The architecture separates concerns for security and functionality:
| Component | Responsibilities |
|---|---|
| Backend Server | Securely stores credentials (AppID, ServerSecret, LLM API keys), generates authentication tokens, and manages AI agent lifecycle via ZEGO’s server APIs |
| iOS Client | Captures user’s voice, streams audio to/from ZEGO’s RTC cloud, plays AI responses, and displays real-time subtitles |
| ZEGO Cloud | Hosts the AI Agent that processes audio streams, runs ASR→LLM→TTS pipeline, and manages real-time communication |
System Architecture
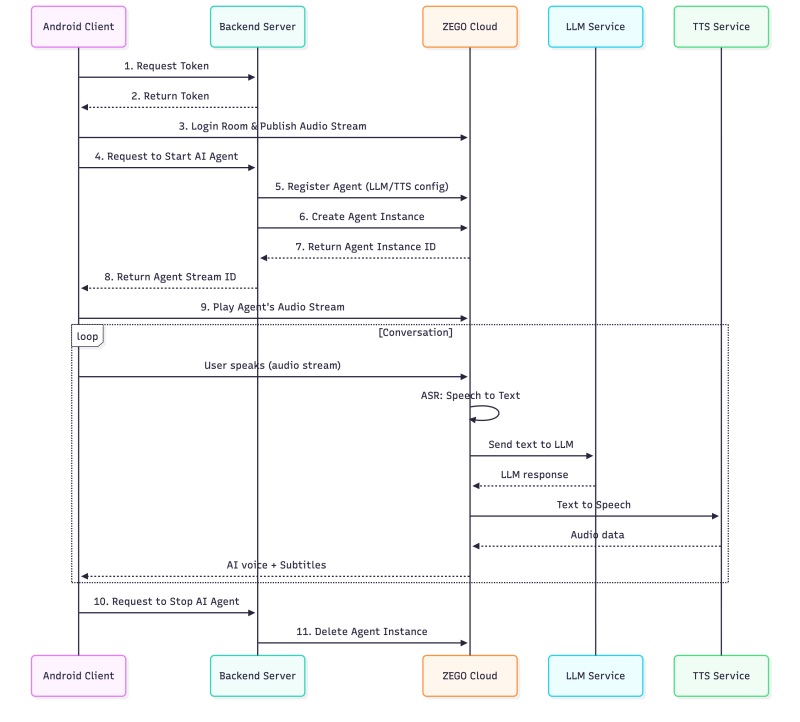
This architecture ensures your sensitive credentials never leave your server while providing a seamless, real-time voice conversation experience.
How to Build a Real-time Conversational AI on iOS
The process of building a conversational AI on iOS mainly involves voice capture, text understanding, and response generation. Below is a simple workflow that shows how to put these pieces together using ZEGOCLOUD’s Conversational AI SDK.
Step 1: Set Up Your Backend Server
The backend server handles token generation and communicates with ZEGOCLOUD’s AI Agent APIs. We’ll use a Next.js server that can be easily deployed to Vercel.
1.1 Environment Variables
Create a .env.local file with the following configuration:
# ZEGO Configuration (from ZEGOCLOUD Console: https://console.zegocloud.com/)
NEXT_PUBLIC_ZEGO_APP_ID=your_app_id
ZEGO_SERVER_SECRET=your_server_secret_32_chars

# AI Agent Configuration
ZEGO_AGENT_ID=aiAgent1
ZEGO_AGENT_NAME=AI Assistant

# System Prompt - Define your AI's personality
SYSTEM_PROMPT="You are my best friend who I can talk to about anything."

# LLM Configuration (Large Language Model)
LLM_URL=https://your-llm-provider.com/api/chat/completions
LLM_API_KEY=your_llm_api_key
LLM_MODEL=your_model_name

# TTS Configuration (Text-to-Speech)
TTS_VENDOR=ByteDance
TTS_APP_ID=zego_test
TTS_TOKEN=zego_test
TTS_CLUSTER=volcano_tts
TTS_VOICE_TYPE=zh_female_wanwanxiaohe_moon_bigtts
1.2 Token Generation API
The token API generates authentication tokens for clients to connect to ZEGO’s RTC service:
// app/api/zego/token/route.ts
import { NextRequest, NextResponse } from 'next/server';
import crypto from 'crypto';

function generateToken(appId: number, userId: string, secret: string,
                       effectiveTimeInSeconds: number): string {
  // Token generation logic...
}

export async function POST(request: NextRequest) {
  const { userId } = await request.json();
  const token = generateToken(
    parseInt(process.env.NEXT_PUBLIC_ZEGO_APP_ID!),
    userId,
    process.env.ZEGO_SERVER_SECRET!,
    3600
  );
  return NextResponse.json({ code: 0, data: { token } });
}
1.3 Deploy to Vercel
Deploy your Next.js server to Vercel:
- Push your code to GitHub
- Go to Vercel and import your repository
- Add all environment variables in Vercel’s project settings
- Click “Deploy”
Your server will be available at https://your-project.vercel.app.
Step 2: Build the iOS Client
Now, let’s build conversational AI for iOS step by step.
2.1 Create iOS Project
Create a new iOS project in Xcode with:
- Interface: SwiftUI
- Language: Swift
- Minimum Deployment: iOS 14.0
2.2 Integrate ZEGO Express SDK
CRITICAL: You MUST use the AI Agent optimized SDK version (v3.22.0.46173)
The standard SDK from CocoaPods does NOT support the
onRecvExperimentalAPIcallback required for subtitle functionality. If you use the standard SDK, subtitles will NOT work!
Download the AI Agent optimized SDK:
- Visit the ZEGO SDK Download Page
- Download the iOS SDK (ZegoExpressVideo-ios-shared-objc.zip)
- Extract and add
ZegoExpressEngine.xcframeworkto your Xcode project
Manual Integration Steps:
- Drag
ZegoExpressEngine.xcframeworkinto your Xcode project - In “Frameworks, Libraries, and Embedded Content”, set it to “Embed & Sign”
- Add required frameworks in Build Phases → Link Binary With Libraries:
libc++.tbdlibresolv.tbdAVFoundation.frameworkAudioToolbox.framework
2.3 Configure Info.plist
Add microphone permission and background audio mode:
<key>NSMicrophoneUsageDescription</key>
<string>This app needs access to your microphone for voice conversations with AI.</string>
<key>UIBackgroundModes</key>
<array>
    <string>audio</string>
</array>
2.4 App Configuration
Create a configuration file to store your app settings:
// AppConfig.swift
struct AppConfig {
    // ZEGO App ID - Must match your backend configuration
    static let appID: UInt32 = 1234567890

    // Backend server URL (your Vercel deployment)
    static let serverURL = "https://your-project.vercel.app"

    static func generateUserId() -> String {
        return "user\(Int(Date().timeIntervalSince1970) % 100000)"
    }

    static func generateRoomId() -> String {
        return "room\(Int(Date().timeIntervalSince1970) % 100000)"
    }
}
2.5 API Service
Create a service to communicate with your backend:
// ApiService.swift
class ApiService {
    static let shared = ApiService()

    struct TokenResponse: Codable {
        let code: Int?
        let data: TokenData?
    }

    struct TokenData: Codable {
        let token: String?
    }

    struct AgentResponse: Codable {
        let code: Int?
        let data: AgentData?
    }

    struct AgentData: Codable {
        let agentInstanceId: String?
        let agentStreamId: String?
    }

    func getToken(userId: String) async throws -> TokenResponse {
        let url = URL(string: "\(AppConfig.serverURL)/api/zego/token")!
        var request = URLRequest(url: url)
        request.httpMethod = "POST"
        request.setValue("application/json", forHTTPHeaderField: "Content-Type")
        request.httpBody = try JSONEncoder().encode(["userId": userId])

        let (data, _) = try await URLSession.shared.data(for: request)
        return try JSONDecoder().decode(TokenResponse.self, from: data)
    }

    func startAgent(roomId: String, userId: String, userStreamId: String) async throws -> AgentResponse {
        let url = URL(string: "\(AppConfig.serverURL)/api/zego/start")!
        var request = URLRequest(url: url)
        request.httpMethod = "POST"
        request.setValue("application/json", forHTTPHeaderField: "Content-Type")

        let body = ["roomId": roomId, "userId": userId, "userStreamId": userStreamId]
        request.httpBody = try JSONEncoder().encode(body)

        let (data, _) = try await URLSession.shared.data(for: request)
        return try JSONDecoder().decode(AgentResponse.self, from: data)
    }
}
2.6 ZEGO Express Manager
The core manager handles RTC operations and subtitle parsing:
// ZegoExpressManager.swift
import ZegoExpressEngine

struct SubtitleMessage {
    let cmd: Int           // 3=ASR(user), 4=LLM(AI)
    let text: String
    let messageId: String
    let endFlag: Bool

    var isUserMessage: Bool { cmd == 3 }
    var isAgentMessage: Bool { cmd == 4 }
}

class ZegoExpressManager: NSObject {
    static let shared = ZegoExpressManager()

    var onSubtitleReceived: ((SubtitleMessage) -> Void)?

    func initEngine() {
        // Configure engine for AI conversation
        let engineConfig = ZegoEngineConfig()
        engineConfig.advancedConfig = [
            "set_audio_volume_ducking_mode": "1",
            "enable_rnd_volume_adaptive": "true"
        ]
        ZegoExpressEngine.setEngineConfig(engineConfig)

        // Create engine
        let profile = ZegoEngineProfile()
        profile.appID = AppConfig.appID
        profile.scenario = .highQualityChatroom
        ZegoExpressEngine.createEngine(with: profile, eventHandler: self)

        // Enable 3A audio processing
        let engine = ZegoExpressEngine.shared()
        engine.enableAGC(true)
        engine.enableAEC(true)
        engine.setAECMode(.aiBalanced)
        engine.enableANS(true)
        engine.setANSMode(.medium)
    }

    func loginRoom(roomId: String, userId: String, token: String,
                   callback: @escaping (Int32) -> Void) {
        let user = ZegoUser(userID: userId)
        let config = ZegoRoomConfig()
        config.token = token
        ZegoExpressEngine.shared().loginRoom(roomId, user: user, config: config) { errorCode, _ in
            callback(errorCode)
        }
    }

    func startPublishing(streamId: String) {
        ZegoExpressEngine.shared().startPublishingStream(streamId)
    }

    func startPlaying(streamId: String) {
        ZegoExpressEngine.shared().startPlayingStream(streamId)
    }
}

extension ZegoExpressManager: ZegoEventHandler {
    func onRecvExperimentalAPI(_ content: String) {
        // Parse subtitle message from experimental API
        guard let data = content.data(using: .utf8),
              let json = try? JSONSerialization.jsonObject(with: data) as? [String: Any],
              let method = json["method"] as? String,
              method == "liveroom.room.on_recive_room_channel_message",
              let params = json["params"] as? [String: Any],
              let msgContent = params["msg_content"] as? String,
              let msgData = msgContent.data(using: .utf8),
              let msgJson = try? JSONSerialization.jsonObject(with: msgData) as? [String: Any],
              let cmd = msgJson["Cmd"] as? Int,
              let dataDict = msgJson["Data"] as? [String: Any] else {
            return
        }

        let message = SubtitleMessage(
            cmd: cmd,
            text: dataDict["Text"] as? String ?? "",
            messageId: dataDict["MessageId"] as? String ?? "",
            endFlag: dataDict["EndFlag"] as? Bool ?? false
        )
        onSubtitleReceived?(message)
    }
}
2.7 Official Subtitle Component (Objective-C)
ZEGOCLOUD provides an official subtitle component written in Objective-C. You can download the complete subtitle component from the ZEGO AI Agent iOS Documentation.
The component consists of several files organized in a Subtitles folder:
Subtitles/
├── core/
│   ├── ZegoAIAgentSubtitlesDefines.h/m      # State enums and message classes
│   └── ZegoAIAgentSubtitlesColors.h/m       # Color configuration
├── protocol/
│   ├── ZegoAIAgentSubtitlesEventHandler.h   # Event handler protocol
│   ├── ZegoAIAgentSubtitlesMessageProtocol.h/m  # Message parsing
│   └── ZegoAIAgentSubtitlesMessageDispatcher.h/m # Message dispatcher singleton
├── views/
│   ├── ZegoAIAgentSubtitlesMessageModel.h/m     # Message model
│   ├── ZegoAIAgentSubtitlesCellLabelView.h/m    # Cell label view
│   └── ZegoAIAgentSubtitlesTableViewCell.h/m    # Table view cell
└── ZegoAIAgentSubtitlesTableView.h/m        # Main table view component
Create a Bridging Header to expose Objective-C classes to Swift:
// AIAgentDemo-Bridging-Header.h
#import "Subtitles/core/ZegoAIAgentSubtitlesDefines.h"
#import "Subtitles/core/ZegoAIAgentSubtitlesColors.h"
#import "Subtitles/protocol/ZegoAIAgentSubtitlesEventHandler.h"
#import "Subtitles/protocol/ZegoAIAgentSubtitlesMessageProtocol.h"
#import "Subtitles/protocol/ZegoAIAgentSubtitlesMessageDispatcher.h"
#import "Subtitles/views/ZegoAIAgentSubtitlesMessageModel.h"
#import "Subtitles/views/ZegoAIAgentSubtitlesCellLabelView.h"
#import "Subtitles/views/ZegoAIAgentSubtitlesTableViewCell.h"
#import "Subtitles/ZegoAIAgentSubtitlesTableView.h"
Configure the bridging header in Build Settings → Swift Compiler → Objective-C Bridging Header.
2.8 Chat ViewModel with Official Subtitle Component
The main ViewModel implements ZegoAIAgentSubtitlesEventHandler protocol to receive subtitle messages. It holds a ZegoAIAgentSubtitlesTableView instance for displaying subtitles:
// ChatViewModel.swift
@MainActor
class ChatViewModel: NSObject, ObservableObject, ZegoAIAgentSubtitlesEventHandler {
    @Published var isConnected = false
    @Published var statusText = "Disconnected"

    /// Official subtitle TableView component
    let subtitlesTableView: ZegoAIAgentSubtitlesTableView

    override init() {
        subtitlesTableView = ZegoAIAgentSubtitlesTableView(frame: .zero, style: .plain)
        super.init()
        setupZegoManager()
    }

    private func setupZegoManager() {
        ZegoExpressManager.shared.initEngine()

        // Register as subtitle event handler
        ZegoAIAgentSubtitlesMessageDispatcher.sharedInstance().register(self)

        // Forward experimental API content to subtitle dispatcher
        ZegoExpressManager.shared.onRecvExperimentalAPI = { content in
            ZegoAIAgentSubtitlesMessageDispatcher.sharedInstance().handleExpressExperimentalAPIContent(content)
        }
    }

    // MARK: - ZegoAIAgentSubtitlesEventHandler

    nonisolated func onRecvChatStateChange(_ state: ZegoAIAgentSessionState) {
        // Handle chat state changes
    }

    nonisolated func onRecvAsrChatMsg(_ message: ZegoAIAgentAudioSubtitlesMessage) {
        // ASR: User speech transcription (full replacement)
        DispatchQueue.main.async { [weak self] in
            self?.subtitlesTableView.handleRecvAsrMessage(message)
        }
    }

    nonisolated func onRecvLLMChatMsg(_ message: ZegoAIAgentAudioSubtitlesMessage) {
        // LLM: AI response (incremental accumulation)
        DispatchQueue.main.async { [weak self] in
            self?.subtitlesTableView.handleRecvLLMMessage(message)
        }
    }

    nonisolated func onExpressExperimentalAPIContent(_ content: String) {
        // Raw content callback for debugging
    }

    // Complete call flow orchestration
    func startCall() async {
        statusText = "Connecting..."

        do {
            // Generate unique IDs for this session
            let roomId = AppConfig.generateRoomId()
            let userId = AppConfig.generateUserId()
            let userStreamId = "\(roomId)_\(userId)_main"

            // Step 1-2: Request token from backend
            let tokenResponse = try await ApiService.shared.getToken(userId: userId)
            guard let token = tokenResponse.data?.token else {
                throw NSError(domain: "", code: -1, userInfo: [NSLocalizedDescriptionKey: "Failed to get token"])
            }

            // Step 3: Login to ZEGO room
            try await withCheckedThrowingContinuation { continuation in
                ZegoExpressManager.shared.loginRoom(roomId: roomId, userId: userId, token: token) { errorCode in
                    if errorCode == 0 {
                        continuation.resume()
                    } else {
                        continuation.resume(throwing: NSError(domain: "", code: Int(errorCode)))
                    }
                }
            } as Void

            // Step 3: Publish local audio stream (user's voice)
            ZegoExpressManager.shared.startPublishing(streamId: userStreamId)

            // Step 4-8: Request backend to create AI Agent
            let agentResponse = try await ApiService.shared.startAgent(
                roomId: roomId, userId: userId, userStreamId: userStreamId)
            guard let agentStreamId = agentResponse.data?.agentStreamId else {
                throw NSError(domain: "", code: -1, userInfo: [NSLocalizedDescriptionKey: "Failed to start agent"])
            }

            // Step 9: Play AI Agent's audio stream
            ZegoExpressManager.shared.startPlaying(streamId: agentStreamId)

            currentRoomId = roomId
            isConnected = true
            statusText = "Connected"
        } catch {
            statusText = "Error: \(error.localizedDescription)"
        }
    }

    // Step 10-11: End call and cleanup
    func endCall() async {
        if let roomId = currentRoomId {
            try? await ApiService.shared.stopAgent(roomId: roomId)
            ZegoExpressManager.shared.logoutRoom(roomId: roomId)
        }
        isConnected = false
        currentRoomId = nil
        statusText = "Disconnected"
    }

    private var currentRoomId: String?
}
This flow corresponds to steps 1-11 in the System Architecture diagram:
| Step | Action | Code |
|---|---|---|
| 1-2 | Request Token | ApiService.shared.getToken() |
| 3 | Login Room & Publish Stream | loginRoom() + startPublishing() |
| 4-8 | Start AI Agent | ApiService.shared.startAgent() |
| 9 | Play Agent Stream | startPlaying() |
| 10-11 | Stop AI Agent | ApiService.shared.stopAgent() |
2.9 SwiftUI Views
Create the user interface:
// ContentView.swift
struct ContentView: View {
    @StateObject private var viewModel = ChatViewModel()

    var body: some View {
        HStack(spacing: 0) {
            // Left: Control Panel
            VStack(spacing: 24) {
                Text("ZEGO AI Agent")
                    .font(.title)

                HStack(spacing: 8) {
                    Circle()
                        .fill(viewModel.isConnected ? Color.green : Color.gray)
                        .frame(width: 12, height: 12)
                    Text(viewModel.statusText)
                }

                Button(action: {
                    Task {
                        if viewModel.isConnected {
                            await viewModel.endCall()
                        } else {
                            await viewModel.startCall()
                        }
                    }
                }) {
                    Text(viewModel.isConnected ? "End Call" : "Start AI Call")
                        .foregroundColor(.white)
                        .frame(width: 180, height: 50)
                        .background(viewModel.isConnected ? Color.red : Color.blue)
                        .cornerRadius(25)
                }
            }
            .frame(maxWidth: .infinity)

            // Right: Chat Messages - Using official subtitle component
            VStack(spacing: 0) {
                HStack {
                    Text("Conversation")
                        .font(.headline)
                    Spacer()
                }
                .padding(.horizontal)
                .padding(.vertical, 12)

                // Official ZegoAIAgentSubtitlesTableView wrapped for SwiftUI
                SubtitlesTableViewWrapper(tableView: viewModel.subtitlesTableView)
            }
            .frame(maxWidth: .infinity)
        }
    }
}

/// UIViewRepresentable wrapper for the official ZegoAIAgentSubtitlesTableView
struct SubtitlesTableViewWrapper: UIViewRepresentable {
    let tableView: ZegoAIAgentSubtitlesTableView

    func makeUIView(context: Context) -> ZegoAIAgentSubtitlesTableView {
        return tableView
    }

    func updateUIView(_ uiView: ZegoAIAgentSubtitlesTableView, context: Context) {
        // TableView updates automatically via handleRecvAsrMessage/handleRecvLLMMessage
    }
}
Step 3: Run a Demo
Conclusion
Building a conversational AI for iOS opens up new possibilities for creating apps that communicate, assist, and engage users through real-time interactions. With ZEGOCLOUD’s Conversational AI SDK, developers can integrate speech recognition, generate LLM responses, and deliver clear text-to-speech output directly within native iOS applications.
Whether you are building an intelligent assistant, a speaking tutor, or a customer service agent, the essential steps remain similar. Capture voice input, understand user intent, and provide natural responses. With the right tools in place, turning these ideas into a working iOS prototype can be straightforward.
Now that you understand the basic process, you can continue exploring advanced prompts, multi-turn conversation design, or deeper conversation logic to shape the experience you want. The foundations are here, so it is time to start building.
For more information, visit the ZEGOCLOUD Documentation.
Let’s Build APP Together
Start building with real-time video, voice & chat SDK for apps today!
