


Building conversational AI for Android is becoming one of the most in-demand capabilities in modern mobile applications. With the rising adoption of real-time voice assistants, interactive agents, and AI-driven communication interfaces, developers are increasingly looking for efficient ways to integrate natural voice interaction into their apps.
In the past, implementing conversational AI on Android required complex setup and multiple technology stacks, such as speech recognition, large language models, text-to-speech, and low-latency audio processing. This often resulted in long development cycles and significant engineering effort.
ZEGOCLOUD simplifies this process by providing ready-to-use components for voice conversational AI. In this tutorial, we will walk through how to create an AI bot for Android using ZEGOCLOUD, from integration to real-time voice interaction. By the end, you will have a working demo that supports natural, continuous voice conversations powered by AI, suitable for production environments. Let’s get started.
Conversational AI for Android Built by ZEGOCLOUD
ZEGOCLOUD provides a conversational AI solution tailored for Android applications. It helps developers add voice interactions that understand user speech, generate LLM-based replies, and return spoken responses through text-to-speech. The SDK is designed to fit naturally into Android projects, whether you are working with Kotlin, Java, or Jetpack-based UI frameworks.
The Android solution supports fast voice capture, accurate speech recognition, and multi-turn conversation logic. It works smoothly with native Android APIs for permissions, audio input, and lifecycle control, which makes the integration process direct and predictable. You can build features that run well across different Android devices, screen sizes, and hardware levels.
Developers can customize prompts, connect to different AI model endpoints, or design UI components that follow Android patterns such as Material Design. Use it to create AI assistants, language learning apps, customer support agents, or voice companions that operate within your own activity or fragment layouts. With ZEGOCLOUD’s tools, you can bring conversational AI to Android and build reliable voice experiences that feel native to the platform.
Download Complete Source Code
Why reinvent the wheel? Here’s the complete working code:
| Component | Repository |
|---|---|
| Backend Server + Web Client | github.com/ZEGOCLOUD/blog-aiagent-server-and-web |
| Android Client | github.com/ZEGOCLOUD/blog-aiagent-android |
Prerequisites
Before moving into implementation, ensure that the basic development environment is prepared:
- Android Studio (latest stable version)
- A ZEGOCLOUD account for accessing SDK features and console configuration
- Familiarity with Kotlin, as the tutorial will be based on modern Android development practices
- A backend service for handling AI interaction logic. In this example, we will use a simple Next.js deployment on Vercel to manage requests
Once these prerequisites are ready, you can proceed with the integration steps and begin building the conversational AI experience on Android.
Architecture Overview
Before moving into the implementation, it is helpful to understand the basic workflow of ZEGOCLOUD’s Conversational AI and the roles of both the client and the server in the process.
Why Do We Need Both Server and Client?
ZEGOCLOUD’s Conversational AI is a cloud-based service that handles the core processing required for real-time voice interaction. It performs automatic speech recognition to convert audio into text, leverages large language models to generate intelligent responses, and applies text-to-speech to output natural voice replies. This allows the application to provide an end-to-end conversational experience without requiring complex local processing.
| Component | Responsibilities |
|---|---|
| Backend Server | Securely stores credentials (AppID, ServerSecret, LLM API keys), generates authentication tokens, and manages AI agent lifecycle via ZEGO’s server APIs |
| Android Client | Captures user’s voice, streams audio to/from ZEGO’s RTC cloud, plays AI responses, and displays real-time subtitles |
| ZEGOCLOUD | Hosts the AI Agent that processes audio streams, runs ASR→LLM→TTS pipeline, and manages real-time communication |
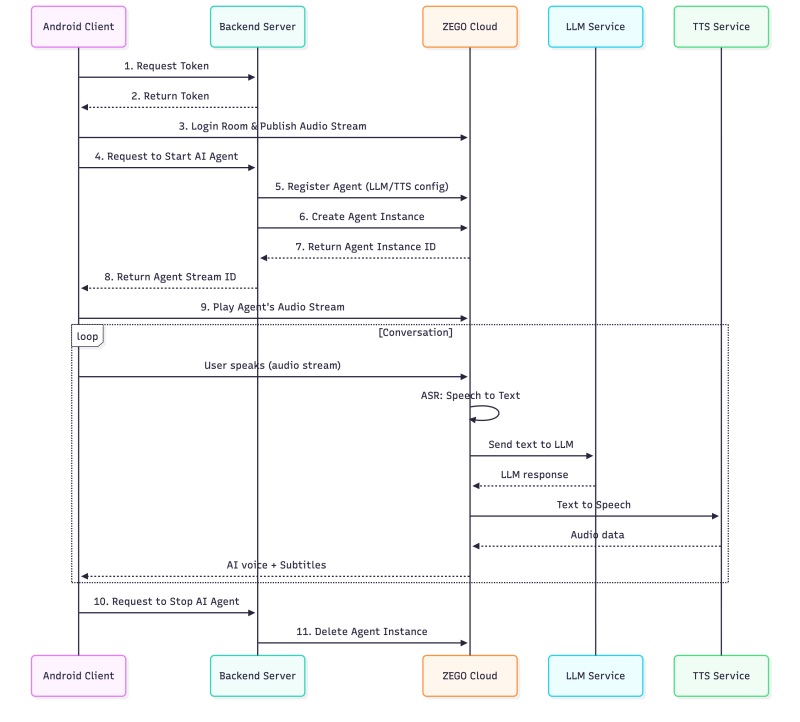
System Architecture
This architecture ensures that all sensitive credentials remain securely on your server, while the client and ZEGOCLOUD handle real-time communication and AI processing. It provides a secure and efficient foundation for delivering seamless voice-based conversational experiences.
How to Build a Real-time Conversational AI on Android
To build a real-time conversational AI on Android, you mainly need to handle voice input, convert it to text, send it to an AI model, and return a spoken reply. Below are the basic steps using ZEGOCLOUD’s Conversational AI SDK.
Step 1: Set Up Your Backend Server
The backend server is responsible for generating authentication tokens and handling communication with ZEGOCLOUD’s AI Agent APIs. For this tutorial, we will use a simple backend built with Next.js, which can be deployed on Vercel for convenience and fast configuration.
1.1 Environment Variables
Create a .env.local file with the following configuration:
# ZEGO Configuration (from ZEGOCLOUD Console: https://console.zegocloud.com/)
NEXT_PUBLIC_ZEGO_APP_ID=your_app_id
ZEGO_SERVER_SECRET=your_server_secret_32_chars

# AI Agent Configuration
ZEGO_AGENT_ID=aiAgent1
ZEGO_AGENT_NAME=AI Assistant

# System Prompt - Define your AI's personality
SYSTEM_PROMPT="You are my best friend who I can talk to about anything. You're warm, understanding, and always there for me. Respond naturally like a close friend would - be supportive, share opinions, and engage in genuine conversation."

# LLM Configuration (Large Language Model)
LLM_URL=https://your-llm-provider.com/api/chat/completions
LLM_API_KEY=your_llm_api_key
LLM_MODEL=your_model_name

# TTS Configuration (Text-to-Speech)
TTS_VENDOR=ByteDance
TTS_APP_ID=zego_test
TTS_TOKEN=zego_test
TTS_CLUSTER=volcano_tts
TTS_VOICE_TYPE=zh_female_wanwanxiaohe_moon_bigtts
How to obtain these values:
| Variable | Description | How to Obtain |
|---|---|---|
NEXT_PUBLIC_ZEGO_APP_ID | Your ZEGO application ID | ZEGOCLOUD Console → Project Settings |
ZEGO_SERVER_SECRET | 32-character secret key | ZEGOCLOUD Console → Project Settings |
SYSTEM_PROMPT | AI personality definition | Customize based on your use case |
LLM_URL | LLM API endpoint | From your LLM provider (OpenAI, Doubao, Claude, etc.) |
LLM_API_KEY | LLM authentication key | From your LLM provider dashboard |
LLM_MODEL | Model name to use | e.g., gpt-4, doubao-1-5-pro-32k |
TTS_* | Text-to-Speech config | Use zego_test for testing, or your own TTS service |
1.2 Token Generation API
The token API generates authentication tokens for clients to connect to ZEGO’s RTC service:
// app/api/zego/token/route.ts
import { NextRequest, NextResponse } from 'next/server';
import crypto from 'crypto';

function generateToken(appId: number, userId: string, secret: string,
                       effectiveTimeInSeconds: number): string {
  const tokenInfo = {
    app_id: appId,
    user_id: userId,
    nonce: Math.floor(Math.random() * 2147483647),
    ctime: Math.floor(Date.now() / 1000),
    expire: Math.floor(Date.now() / 1000) + effectiveTimeInSeconds,
    payload: ''
  };

  const plainText = JSON.stringify(tokenInfo);
  const nonce = crypto.randomBytes(12);
  const cipher = crypto.createCipheriv('aes-256-gcm', secret, nonce);
  const encrypted = Buffer.concat([cipher.update(plainText, 'utf8'),
                                   cipher.final(), cipher.getAuthTag()]);

  const buf = Buffer.concat([
    Buffer.alloc(8).writeBigInt64BE(BigInt(tokenInfo.expire), 0) || Buffer.alloc(8),
    Buffer.from([0, 12]), nonce,
    Buffer.from([encrypted.length >> 8, encrypted.length & 0xff]), encrypted,
    Buffer.from([1]) // GCM mode
  ]);
  return '04' + buf.toString('base64');
}

export async function POST(request: NextRequest) {
  const { userId } = await request.json();
  const token = generateToken(
    parseInt(process.env.NEXT_PUBLIC_ZEGO_APP_ID!),
    userId,
    process.env.ZEGO_SERVER_SECRET!,
    3600
  );
  return NextResponse.json({ token });
}
1.3 AI Agent API with Signature
The signature mechanism ensures secure communication with ZEGO’s server APIs:
// app/api/zego/utils.ts
import crypto from 'crypto';

// Generate API signature: MD5(AppId + SignatureNonce + ServerSecret + Timestamp)
export function generateSignature(appId: number, signatureNonce: string,
                                  serverSecret: string, timestamp: number): string {
  const str = appId.toString() + signatureNonce + serverSecret + timestamp.toString();
  return crypto.createHash('md5').update(str).digest('hex');
}

// Send request to ZEGO AI Agent API
export async function sendZegoRequest<T>(action: string, body: object): Promise<T> {
  const appId = parseInt(process.env.NEXT_PUBLIC_ZEGO_APP_ID!);
  const serverSecret = process.env.ZEGO_SERVER_SECRET!;
  const signatureNonce = crypto.randomBytes(8).toString('hex');
  const timestamp = Math.floor(Date.now() / 1000);
  const signature = generateSignature(appId, signatureNonce, serverSecret, timestamp);

  const url = new URL('https://aigc-aiagent-api.zegotech.cn');
  url.searchParams.set('Action', action);
  url.searchParams.set('AppId', appId.toString());
  url.searchParams.set('SignatureNonce', signatureNonce);
  url.searchParams.set('Timestamp', timestamp.toString());
  url.searchParams.set('Signature', signature);
  url.searchParams.set('SignatureVersion', '2.0');

  const response = await fetch(url.toString(), {
    method: 'POST',
    headers: { 'Content-Type': 'application/json' },
    body: JSON.stringify(body)
  });

  const result = await response.json();
  return result.Data as T;
}
1.4 Deploy to Vercel
Deploy your Next.js server to Vercel with these steps:
- Push your code to GitHub
- Go to Vercel and import your repository
- Add all environment variables in Vercel’s project settings
- Click “Deploy”
Your server will be available at https://your-project.vercel.app.
Step 2: Build the Android Client
Now, let’s build conversational AI for Android step by step.
2.1 Create Android Project
Create a new Android project in Android Studio with:
- Language: Kotlin
- Minimum SDK: API 24
2.2 Configure Dependencies
CRITICAL: Use AI Agent Optimized SDK
You MUST use the AI Agent optimized version of ZEGO Express SDK to receive subtitle messages via
onRecvExperimentalAPI. The standard SDK from Maven (im.zego:express-video) does NOT support this feature, and subtitles will not work!Download the optimized SDK from: ZEGO AI Agent SDK Download Page
Step 1: Download and integrate the SDK manually
- Download the AI Agent optimized SDK (v3.22.0.46173 or later) from the link above
- Extract the ZIP and copy files to your project:
- Copy
ZegoExpressEngine.jartoapp/libs/ - Copy
arm64-v8a/libZegoExpressEngine.sotoapp/libs/arm64-v8a/ - Copy
armeabi-v7a/libZegoExpressEngine.sotoapp/libs/armeabi-v7a/
Step 2: Configure app/build.gradle
android {
    // ...
    defaultConfig {
        ndk {
            abiFilters 'armeabi-v7a', 'arm64-v8a'
        }
    }

    sourceSets {
        main {
            jniLibs.srcDirs = ['libs']
        }
    }
}

dependencies {
    // ZEGO Express SDK (AI Agent optimized version - DO NOT use Maven version!)
    implementation files('libs/ZegoExpressEngine.jar')

    // Network & JSON
    implementation 'com.squareup.okhttp3:okhttp:4.12.0'
    implementation 'com.google.code.gson:gson:2.10.1'

    // Coroutines for async operations
    implementation 'org.jetbrains.kotlinx:kotlinx-coroutines-android:1.7.3'
}
Why not use Maven? The AI Agent optimized SDK includes special features for receiving room channel messages (subtitles) that are not available in the standard public SDK. This is required for the
onRecvExperimentalAPIcallback to work properly.
2.3 Required Permissions
Add these permissions to AndroidManifest.xml:
<uses-permission android:name="android.permission.INTERNET" />
<uses-permission android:name="android.permission.ACCESS_NETWORK_STATE" />
<uses-permission android:name="android.permission.RECORD_AUDIO" />
<uses-permission android:name="android.permission.MODIFY_AUDIO_SETTINGS" />
2.4 App Configuration
Create a configuration file to centralize all settings. This makes it easy to switch between environments:
// config/AppConfig.kt
object AppConfig {
    // ZEGO App ID - must match your backend server
    const val APP_ID: Long = 123456789L  // Replace with your App ID

    // Backend server URL (your Vercel deployment)
    const val SERVER_URL = "https://your-project.vercel.app"

    // Generate unique IDs for testing
    fun generateUserId(): String = "user${System.currentTimeMillis() % 100000}"
    fun generateRoomId(): String = "room${System.currentTimeMillis() % 100000}"
}Important: The
APP_IDhere must matchNEXT_PUBLIC_ZEGO_APP_IDin your backend’s.env.localfile.
2.5 Initialize ZEGO Express Engine
Create a manager class with optimized audio settings for AI conversation:
class ZegoExpressManager(private val application: Application) {
    private var engine: ZegoExpressEngine? = null

    fun initEngine() {
        val profile = ZegoEngineProfile().apply {
            appID = AppConfig.APP_ID  // Use config value
            scenario = ZegoScenario.HIGH_QUALITY_CHATROOM
            application = this@ZegoExpressManager.application
        }

        engine = ZegoExpressEngine.createEngine(profile, eventHandler)

        // Optimize audio settings for AI conversation
        engine?.apply {
            enableAGC(true)  // Automatic Gain Control
            enableANS(true)  // Automatic Noise Suppression
            setANSMode(ZegoANSMode.MEDIUM)
        }
    }
}
2.6 Room Login, Publishing & Playing Streams
Implement the core RTC logic:
// Login to room with token
fun loginRoom(roomId: String, userId: String, token: String, callback: (Int) -> Unit) {
    val user = ZegoUser(userId)
    val config = ZegoRoomConfig().apply {
        this.token = token
    }
    engine?.loginRoom(roomId, user, config) { errorCode, _ ->
        callback(errorCode)
    }
}

// Start publishing local audio (user's voice)
fun startPublishing(streamId: String) {
    engine?.startPublishingStream(streamId)
}

// Start playing remote audio (AI agent's voice)
fun startPlaying(streamId: String) {
    engine?.startPlayingStream(streamId)
}
2.7 Room Login, Publishing & Playing Streams
Alright, here’s the core RTC logic – this is steps 3 and 9 from our architecture diagram:
// Login to room with token
fun loginRoom(roomId: String, userId: String, token: String, callback: (Int) -> Unit) {
    val user = ZegoUser(userId)
    val config = ZegoRoomConfig().apply {
        this.token = token
    }
    engine?.loginRoom(roomId, user, config) { errorCode, _ ->
        callback(errorCode)
    }
}

// Start publishing local audio (user's voice)
fun startPublishing(streamId: String) {
    engine?.startPublishingStream(streamId)
}

// Start playing remote audio (AI agent's voice)
fun startPlaying(streamId: String) {
    engine?.startPlayingStream(streamId)
}
2.8 Display Subtitles
ZEGO provides official subtitle components that handle message parsing, sorting, and UI display. Use AudioChatMessageParser to parse messages and AIChatListView to display them:
// Create the parser
private val audioChatMessageParser = AudioChatMessageParser()

// Set up the listener
audioChatMessageParser.setAudioChatMessageListListener(object : AudioChatMessageParser.AudioChatMessageListListener {
    override fun onMessageListUpdated(messagesList: MutableList<AudioChatMessage>) {
        runOnUiThread {
            binding.messageList.onMessageListUpdated(messagesList)
        }
    }
    override fun onAudioChatStateUpdate(statusMessage: AudioChatAgentStatusMessage) {
        // Handle agent status updates if needed
    }
})

// In onRecvExperimentalAPI callback, parse the message
zegoManager.onRecvExperimentalAPI = { content ->
    try {
        val json = JSONObject(content)
        if (json.getString("method") == "liveroom.room.on_recive_room_channel_message") {
            val msgContent = json.getJSONObject("params").getString("msg_content")
            audioChatMessageParser.parseAudioChatMessage(msgContent)
        }
    } catch (e: Exception) { e.printStackTrace() }
}
Official Components: Download
AudioChatMessageParser.javaandAIChatListView.javafrom ZEGO AI Agent Subtitle Guide. These handle ASR (Cmd=3) and LLM (Cmd=4) message merging automatically.
2.9 UI Layout
The layout is simple: top section for status and controls, bottom for subtitles:
<ConstraintLayout>
    <!-- Top: Status and Call Button -->
    <LinearLayout android:id="@+id/topSection">
        <TextView android:id="@+id/tvStatus" />
        <Button android:id="@+id/btnCall" android:text="Start Call" />
    </LinearLayout>

    <!-- Bottom: Conversation Subtitles -->
    <com.zegocloud.aiagent.subtitle.AIChatListView
        android:id="@+id/messageList" />
</ConstraintLayout>
2.10 Complete Call Flow
Here’s how all the pieces work together. The ViewModel orchestrates the complete flow when the user taps “Start Call”:
// viewmodel/MainViewModel.kt
class MainViewModel(private val zegoManager: ZegoExpressManager) : ViewModel() {

    fun startCall() {
        viewModelScope.launch {
            _isLoading.value = true
            try {
                // Generate unique IDs for this session
                val roomId = AppConfig.generateRoomId()
                val userId = AppConfig.generateUserId()
                val userStreamId = "${roomId}_${userId}_main"

                // Initialize ZEGO Engine
                zegoManager.initEngine()

                // Step 1-2: Request token from backend
                val token = ApiService.getToken(userId)
                    ?: throw Exception("Failed to get token")

                // Step 3: Login to ZEGO room
                val loginResult = zegoManager.loginRoom(roomId, userId, token)
                if (loginResult != 0) throw Exception("Failed to login room")

                // Step 3: Publish local audio stream (user's voice)
                zegoManager.startPublishing(userStreamId)

                // Step 4-8: Request backend to create AI Agent
                val agentStreamId = ApiService.startAgent(roomId, userId, userStreamId)
                    ?: throw Exception("Failed to start agent")

                // Step 9: Play AI Agent's audio stream
                zegoManager.startPlaying(agentStreamId)

                _isConnected.value = true
                _currentRoomId = roomId
            } catch (e: Exception) {
                _error.value = e.message
            } finally {
                _isLoading.value = false
            }
        }
    }

    // Step 10-11: End call and cleanup
    fun endCall() {
        viewModelScope.launch {
            _currentRoomId?.let { roomId ->
                ApiService.stopAgent(roomId)
                zegoManager.logoutRoom(roomId)
            }
            _isConnected.value = false
            _currentRoomId = null
        }
    }
}
This flow corresponds to steps 1-11 in the System Architecture diagram:
| Step | Action | Code |
|---|---|---|
| 1-2 | Request Token | ApiService.getToken() |
| 3 | Login Room & Publish Stream | loginRoom() + startPublishing() |
| 4-8 | Start AI Agent | ApiService.startAgent() |
| 9 | Play Agent Stream | startPlaying() |
| 10-11 | Stop AI Agent | ApiService.stopAgent() |
Step 3: Run a demo
Conclusion
And with that, you now have a fully functional conversational AI system running on Android.
What once required weeks of development can now be achieved in a much shorter time, thanks to simplified workflows and modern real-time AI tooling.
Here is a quick overview of what you accomplished:
- A secure backend with proper token generation
- A clean and modular Android client built with the ZEGO Express SDK
- Real-time voice interaction with AI
- Live subtitle support for improved accessibility
A few practical recommendations as you continue exploring:
- Refine the
SYSTEM_PROMPTto shape your AI’s role, tone, and behavior. This step significantly impacts the user experience. - Consider integrating visual avatars for a more engaging interface.
- Always validate performance on real devices, as microphone handling can differ from emulator environments.
This architecture is flexible and can be extended to customer support assistants, language learning platforms, AI companions, and many other real-time interaction scenarios.
If you are interested in building your own voice-driven application, get started with ZEGOCLOUD. The free tier provides more than enough resources for prototyping and experimentation.
Let’s Build APP Together
Start building with real-time video, voice & chat SDK for apps today!
