


Android apps with voice calling features stand out from basic messaging apps. Users spend more time in apps that let them talk directly with contacts. Adding voice calls to your Android project creates a more complete communication experience.
Building voice calling used to require complex audio programming skills. Modern Android development tools have changed this completely. You can now add professional voice calling features without learning difficult audio concepts.
This tutorial teaches you to build Android voice call app from start to finish. We use Android’s built-in frameworks and free development resources. Each step includes working code examples that you can test immediately. Your finished app will handle clear voice calls between any Android devices running your software.
How to Build a Voice Call App with Android
Voice call on Android becomes easy when you use ZEGOCLOUD’s voice call SDK for real-time communication. Major messaging platforms rely on similar technology to handle millions of voice calls daily. With ZEGOCLOUD, you get enterprise-grade audio processing without building complex networking infrastructure from scratch.
We will create a complete Android voice calling app that connects users through clear audio conversations. The app will manage multiple participants, handle network issues automatically, and provide intuitive controls for microphone and speaker settings.
Prerequisites
Before starting development, ensure you have these requirements ready:
- A ZEGOCLOUD account – signup here.
- AppID and AppSign from console.zegocloud.com.
- Android Studio 2020.3.1 or later version.
- Android SDK with API level 19 (Android 4.4) minimum support.
- A physical Android device for testing real audio functionality.
- Basic understanding of Android development and Java programming.
These tools provide everything needed to build professional voice calling features into your Android application.
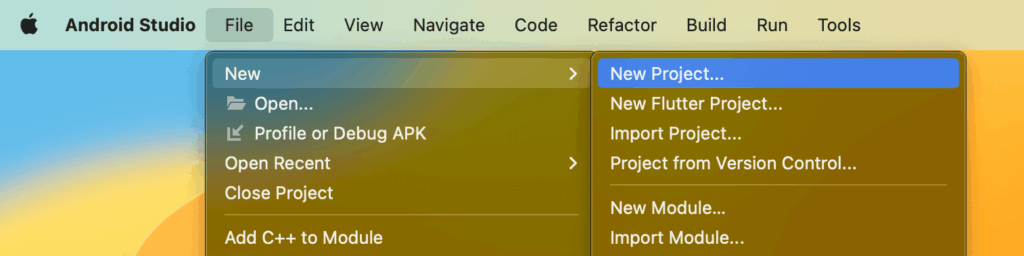
Step 1. Create Your Android Project
- Open Android Studio and start a new project by selecting “Empty Activity” from the available templates. This gives you a clean foundation without unnecessary components that might interfere with voice calling functionality.
- Configure your project with a meaningful application name and set your package name to follow standard naming conventions. Choose API level 19 as your minimum SDK to ensure compatibility with older Android devices while still supporting modern audio features.
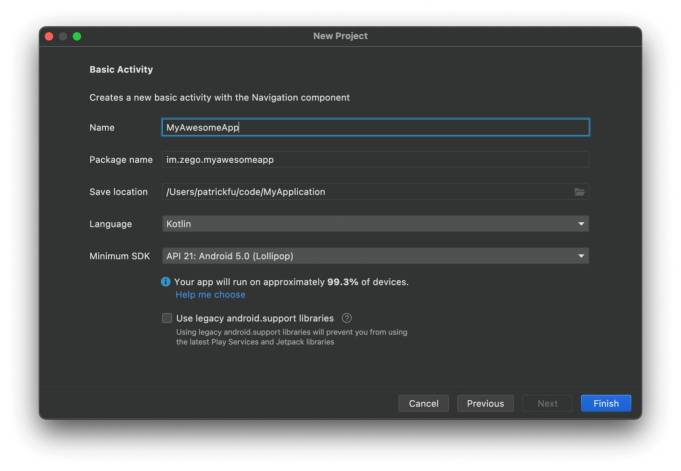
- Select a location to save your project files and click “Finish” to generate the basic project structure. Android Studio will create all necessary files including the main activity, layout files, and manifest configuration that we’ll modify for voice calling.
Step 2. Install ZEGOCLOUD SDK
Add the ZEGOCLOUD repository to your project’s dependency management system. Open the settings.gradle file in your project root directory and locate the dependencyResolutionManagement section.
Add the ZEGOCLOUD maven repository URL to enable downloading the voice calling SDK:
dependencyResolutionManagement {
    repositoriesMode.set(RepositoriesMode.FAIL_ON_PROJECT_REPOS)
    repositories {
        maven { url 'https://maven.zego.im' }
        google()
        mavenCentral()
    }
}
Navigate to your app-level build.gradle file and add the Express Audio SDK dependency. This specific version focuses on voice calling without video components, reducing your app size:
dependencies {
    implementation 'im.zego:express-audio:3.0.0'
    // Your existing dependencies remain here
}
Sync your project to download and integrate the SDK files. Android Studio will automatically handle the dependency resolution and make the ZEGOCLOUD classes available for your code.
Step 3. Add Device Permissions
Voice calling requires several Android permissions to access microphone, network, and audio routing features. Open your AndroidManifest.xml file located in the app/src/main directory.
Add these permission declarations before the <application> tag to ensure your app can access all necessary hardware and system features:
<uses-permission android:name="android.permission.ACCESS_WIFI_STATE" />
<uses-permission android:name="android.permission.RECORD_AUDIO" />
<uses-permission android:name="android.permission.INTERNET" />
<uses-permission android:name="android.permission.ACCESS_NETWORK_STATE" />
<uses-permission android:name="android.permission.BLUETOOTH" />
<uses-permission android:name="android.permission.MODIFY_AUDIO_SETTINGS" />
<uses-permission android:name="android.permission.READ_PHONE_STATE" />
Modern Android versions require runtime permission requests for sensitive permissions like microphone access. Add this permission checking method to your main activity:
private static final int PERMISSION_REQUEST_CODE = 1001;

private void checkAudioPermissions() {
    if (Build.VERSION.SDK_INT >= Build.VERSION_CODES.M) {
        String[] permissions = {Manifest.permission.RECORD_AUDIO};

        if (ContextCompat.checkSelfPermission(this, Manifest.permission.RECORD_AUDIO)
            != PackageManager.PERMISSION_GRANTED) {
            ActivityCompat.requestPermissions(this, permissions, PERMISSION_REQUEST_CODE);
        } else {
            initializeVoiceEngine();
        }
    } else {
        initializeVoiceEngine();
    }
}

@Override
public void onRequestPermissionsResult(int requestCode, String[] permissions, int[] grantResults) {
    super.onRequestPermissionsResult(requestCode, permissions, grantResults);

    if (requestCode == PERMISSION_REQUEST_CODE) {
        if (grantResults.length > 0 && grantResults[0] == PackageManager.PERMISSION_GRANTED) {
            initializeVoiceEngine();
        } else {
            Toast.makeText(this, "Microphone permission required for voice calls",
                         Toast.LENGTH_LONG).show();
        }
    }
}
Step 4. Set Up Your App Configuration
Create a dedicated configuration class to manage your ZEGOCLOUD credentials and generate unique identifiers for users and rooms. Add a new Java file called AppConfig.java:
public class AppConfig {
    // Replace with your actual ZEGOCLOUD credentials
    public static final long APP_ID = your_app_id_here;
    public static final String APP_SIGN = "your_app_sign_here";

    // Generate unique user identifiers
    public static String generateUserID() {
        return "user_" + System.currentTimeMillis() % 100000;
    }

    // Create room identifiers for voice calls
    public static String generateRoomID() {
        return "voice_room_" + (int)(Math.random() * 10000);
    }

    // Default stream naming convention
    public static String createStreamID(String userID) {
        return "audio_stream_" + userID;
    }
}
Replace your_app_id_here and your_app_sign_here with the actual values from your ZEGOCLOUD Admin Console. These credentials authenticate your application and enable access to voice calling services.
Step 5. Create the Voice Engine
Initialize the ZEGO Express Engine with settings optimized for voice calling. Add this setup code to your main activity:
import im.zego.zegoexpress.*;
import im.zego.zegoexpress.callback.*;
import im.zego.zegoexpress.constants.*;
import im.zego.zegoexpress.entity.*;

public class MainActivity extends AppCompatActivity {
    private ZegoExpressEngine engine;
    private String currentRoomID;
    private String currentUserID;
    private String currentStreamID;
    private boolean isInCall = false;
    private boolean isMicMuted = false;

    @Override
    protected void onCreate(Bundle savedInstanceState) {
        super.onCreate(savedInstanceState);
        setContentView(R.layout.activity_main);

        setupUserInterface();
        checkAudioPermissions();
    }

    private void initializeVoiceEngine() {
        ZegoEngineProfile profile = new ZegoEngineProfile();
        profile.appID = AppConfig.APP_ID;
        profile.appSign = AppConfig.APP_SIGN;
        profile.scenario = ZegoScenario.STANDARD_VOICE_CALL;
        profile.application = getApplication();

        engine = ZegoExpressEngine.createEngine(profile, null);

        if (engine != null) {
            setupEngineEventHandlers();
            Toast.makeText(this, "Voice engine initialized", Toast.LENGTH_SHORT).show();
        } else {
            Toast.makeText(this, "Failed to initialize voice engine", Toast.LENGTH_LONG).show();
        }
    }
}
The ZegoScenario.STANDARD_VOICE_CALL setting optimizes the engine specifically for voice communication, managing audio quality, network adaptation, and battery usage automatically.
Step 6. Handle Voice Call Events
Set up comprehensive event handlers to manage voice streams, room connections, and user activities. Add this event handling system:
private void setupEngineEventHandlers() {
    engine.setEventHandler(new IZegoEventHandler() {

        @Override
        public void onRoomStreamUpdate(String roomID, ZegoUpdateType updateType,
                                     ArrayList<ZegoStream> streamList, JSONObject extendedData) {
            // Handle incoming and outgoing audio streams
            runOnUiThread(() -> {
                for (ZegoStream stream : streamList) {
                    if (updateType == ZegoUpdateType.ADD) {
                        // New user started speaking - play their audio
                        engine.startPlayingStream(stream.streamID);
                        updateParticipantsList("User joined: " + stream.streamID);
                    } else {
                        // User stopped speaking - stop playing their audio
                        engine.stopPlayingStream(stream.streamID);
                        updateParticipantsList("User left: " + stream.streamID);
                    }
                }
            });
        }

        @Override
        public void onRoomStateChanged(String roomID, ZegoRoomStateChangedReason reason,
                                     int errorCode, JSONObject extendedData) {
            // Manage room connection status changes
            runOnUiThread(() -> {
                switch (reason) {
                    case LOGINING:
                        updateConnectionStatus("Connecting to voice room...");
                        break;

                    case LOGINED:
                        updateConnectionStatus("Connected - Ready to talk");
                        onSuccessfulRoomJoin();
                        break;

                    case LOGIN_FAILED:
                        updateConnectionStatus("Failed to join voice room");
                        handleConnectionError(errorCode);
                        break;

                    case RECONNECTING:
                        updateConnectionStatus("Connection lost - Reconnecting...");
                        break;

                    case RECONNECTED:
                        updateConnectionStatus("Reconnected successfully");
                        break;

                    case LOGOUT:
                        updateConnectionStatus("Left voice room");
                        onRoomExit();
                        break;
                }
            });
        }

        @Override
        public void onRoomUserUpdate(String roomID, ZegoUpdateType updateType,
                                   ArrayList<ZegoUser> userList) {
            // Track users joining and leaving the voice room
            runOnUiThread(() -> {
                for (ZegoUser user : userList) {
                    if (updateType == ZegoUpdateType.ADD) {
                        Log.d("VoiceCall", "User joined room: " + user.userID);
                        showToast(user.userID + " joined the call");
                    } else {
                        Log.d("VoiceCall", "User left room: " + user.userID);
                        showToast(user.userID + " left the call");
                    }
                }
            });
        }

        @Override
        public void onPublisherStateUpdate(String streamID, ZegoPublisherState state,
                                         int errorCode, JSONObject extendedData) {
            // Monitor your own audio publishing status
            runOnUiThread(() -> {
                if (errorCode != 0) {
                    showToast("Audio publishing error: " + errorCode);
                } else {
                    switch (state) {
                        case PUBLISHING:
                            updateMicrophoneStatus("Microphone active");
                            break;
                        case NO_PUBLISH:
                            updateMicrophoneStatus("Microphone inactive");
                            break;
                    }
                }
            });
        }
    });
}
These event handlers provide real-time feedback about call status, participant changes, and audio stream management throughout the voice calling session.
Step 7. Implement Call Functions
Create the core functionality for joining voice rooms, managing audio streams, and handling user controls:
public void startVoiceCall() {
    if (engine == null) {
        showToast("Voice engine not initialized");
        return;
    }

    currentRoomID = AppConfig.generateRoomID();
    currentUserID = AppConfig.generateUserID();
    currentStreamID = AppConfig.createStreamID(currentUserID);

    ZegoUser user = new ZegoUser(currentUserID);
    ZegoRoomConfig roomConfig = new ZegoRoomConfig();
    roomConfig.isUserStatusNotify = true;

    engine.loginRoom(currentRoomID, user, roomConfig, new IZegoRoomLoginCallback() {
        @Override
        public void onRoomLoginResult(int errorCode, JSONObject extendedData) {
            runOnUiThread(() -> {
                if (errorCode == 0) {
                    // Successfully joined room - start audio transmission
                    beginAudioPublishing();
                    isInCall = true;
                    updateCallUI(true);
                } else {
                    showToast("Failed to join voice room: " + errorCode);
                    updateCallUI(false);
                }
            });
        }
    });
}

private void beginAudioPublishing() {
    // Disable camera since this is voice-only calling
    engine.enableCamera(false);

    // Configure audio settings for optimal voice quality
    engine.setAudioConfig(new ZegoAudioConfig(ZegoAudioConfigPreset.STANDARD_QUALITY));

    // Start publishing your audio stream to other participants
    engine.startPublishingStream(currentStreamID);

    Log.d("VoiceCall", "Started publishing audio stream: " + currentStreamID);
}

public void endVoiceCall() {
    if (engine != null && isInCall) {
        // Stop sending your audio to others
        engine.stopPublishingStream();

        // Leave the voice room
        engine.logoutRoom(currentRoomID);

        isInCall = false;
        isMicMuted = false;

        updateCallUI(false);
        showToast("Voice call ended");
    }
}

public void toggleMicrophone() {
    if (engine != null && isInCall) {
        isMicMuted = !isMicMuted;
        engine.muteMicrophone(isMicMuted);

        updateMicrophoneButton(isMicMuted);
        showToast(isMicMuted ? "Microphone muted" : "Microphone unmuted");
    }
}

public void toggleSpeaker() {
    if (engine != null && isInCall) {
        boolean enableSpeaker = !engine.getAudioRouteType().equals(ZegoAudioRoute.SPEAKER);
        engine.setAudioRouteToSpeaker(enableSpeaker);

        updateSpeakerButton(enableSpeaker);
        showToast(enableSpeaker ? "Speaker enabled" : "Earpiece enabled");
    }
}
Step 8. Create the User Interface
Design a clean and functional interface for voice call controls. Update your activity_main.xml layout:
<?xml version="1.0" encoding="utf-8"?>
<LinearLayout xmlns:android="http://schemas.android.com/apk/res/android"
    android:layout_width="match_parent"
    android:layout_height="match_parent"
    android:orientation="vertical"
    android:padding="24dp"
    android:gravity="center"
    android:background="#f8f9fa">

    <TextView
        android:id="@+id/statusText"
        android:layout_width="wrap_content"
        android:layout_height="wrap_content"
        android:text="Ready for voice calling"
        android:textSize="18sp"
        android:textColor="#333333"
        android:layout_marginBottom="32dp"
        android:gravity="center" />

    <TextView
        android:id="@+id/participantsText"
        android:layout_width="wrap_content"
        android:layout_height="wrap_content"
        android:text="No active participants"
        android:textSize="14sp"
        android:textColor="#666666"
        android:layout_marginBottom="24dp" />

    <LinearLayout
        android:layout_width="wrap_content"
        android:layout_height="wrap_content"
        android:orientation="horizontal"
        android:layout_marginBottom="24dp">

        <Button
            android:id="@+id/startCallButton"
            android:layout_width="140dp"
            android:layout_height="56dp"
            android:text="Start Call"
            android:textColor="#ffffff"
            android:background="#28a745"
            android:layout_marginEnd="16dp" />

        <Button
            android:id="@+id/endCallButton"
            android:layout_width="140dp"
            android:layout_height="56dp"
            android:text="End Call"
            android:textColor="#ffffff"
            android:background="#dc3545"
            android:enabled="false" />

    </LinearLayout>

    <LinearLayout
        android:layout_width="wrap_content"
        android:layout_height="wrap_content"
        android:orientation="horizontal">

        <Button
            android:id="@+id/muteButton"
            android:layout_width="120dp"
            android:layout_height="48dp"
            android:text="Mute"
            android:layout_marginEnd="12dp"
            android:enabled="false" />

        <Button
            android:id="@+id/speakerButton"
            android:layout_width="120dp"
            android:layout_height="48dp"
            android:text="Speaker"
            android:enabled="false" />

    </LinearLayout>

</LinearLayout>
Connect the interface elements to your voice calling functions:
private void setupUserInterface() {
    Button startCallButton = findViewById(R.id.startCallButton);
    Button endCallButton = findViewById(R.id.endCallButton);
    Button muteButton = findViewById(R.id.muteButton);
    Button speakerButton = findViewById(R.id.speakerButton);

    startCallButton.setOnClickListener(v -> startVoiceCall());
    endCallButton.setOnClickListener(v -> endVoiceCall());
    muteButton.setOnClickListener(v -> toggleMicrophone());
    speakerButton.setOnClickListener(v -> toggleSpeaker());
}

private void updateCallUI(boolean inCall) {
    Button startCallButton = findViewById(R.id.startCallButton);
    Button endCallButton = findViewById(R.id.endCallButton);
    Button muteButton = findViewById(R.id.muteButton);
    Button speakerButton = findViewById(R.id.speakerButton);

    startCallButton.setEnabled(!inCall);
    endCallButton.setEnabled(inCall);
    muteButton.setEnabled(inCall);
    speakerButton.setEnabled(inCall);

    if (!inCall) {
        muteButton.setText("Mute");
        speakerButton.setText("Speaker");
    }
}

private void updateConnectionStatus(String status) {
    TextView statusText = findViewById(R.id.statusText);
    statusText.setText(status);
}

private void updateParticipantsList(String info) {
    TextView participantsText = findViewById(R.id.participantsText);
    participantsText.setText(info);
}
Step 9. Handle App Lifecycle
Manage the voice engine properly throughout your app’s lifecycle to ensure clean resource handling:
@Override
protected void onResume() {
    super.onResume();

    // Resume audio session if call was active
    if (engine != null && isInCall) {
        engine.setAudioSessionActive(true);
    }
}

@Override
protected void onPause() {
    super.onPause();

    // Pause audio session when app goes to background
    if (engine != null && isInCall) {
        engine.setAudioSessionActive(false);
    }
}

@Override
protected void onDestroy() {
    super.onDestroy();

    // Clean up voice call resources
    if (isInCall) {
        endVoiceCall();
    }

    // Destroy the voice engine
    if (engine != null) {
        engine.setEventHandler(null);
        ZegoExpressEngine.destroyEngine(null);
    }
}

// Helper methods for UI updates and user feedback
private void onSuccessfulRoomJoin() {
    updateCallUI(true);
    updateConnectionStatus("Voice call active - Room: " + currentRoomID.substring(11));
}

private void onRoomExit() {
    updateCallUI(false);
    updateParticipantsList("No active participants");
}

private void handleConnectionError(int errorCode) {
    String errorMessage = "Connection error: " + errorCode;
    if (errorCode == 1002033) {
        errorMessage = "Authentication failed - Check your credentials";
    } else if (errorCode == 1002053) {
        errorMessage = "Network timeout - Check your internet connection";
    }

    showToast(errorMessage);
    updateCallUI(false);
}

private void showToast(String message) {
    Toast.makeText(this, message, Toast.LENGTH_SHORT).show();
}

private void updateMicrophoneButton(boolean muted) {
    Button muteButton = findViewById(R.id.muteButton);
    muteButton.setText(muted ? "Unmute" : "Mute");
}

private void updateSpeakerButton(boolean speakerOn) {
    Button speakerButton = findViewById(R.id.speakerButton);
    speakerButton.setText(speakerOn ? "Earpiece" : "Speaker");
}
Run a Demo
Install your completed application on two separate Android devices to test the voice calling functionality. Launch the app on both devices and ensure microphone permissions are granted. Tap “Start Call” on the first device, then quickly open the app on the second device and tap “Start Call” as well.
You can also test with our web testing interface. You just have to establlish connection with the same credential and then connect to the same room ID as the one on your device.
Conclusion
You now have a working voice calling app for Android devices. Users can join calls, talk with others, and control their microphone and speaker settings. The app handles connections automatically and reconnects when the network has problems.
Your voice calling app is ready to use, but you can add more features to make it better. You might want to add call history so users can see their past calls. Group calling would let more people talk together at the same time. You could also add contacts so users can call specific friends easily.
With the core voice technology working properly, you can build the features that make your app better. The basic calling foundation gives you everything needed to create a complete communication app.
FAQ
Q1: How can I implement voice calling in my Android app?
You can implement voice calling using native Android APIs with low-level audio handling, or more efficiently by using third-party SDKs like ZEGOCLOUD, Agora, or Twilio that provide built-in voice call features.
Q2: What’s the best SDK for Android voice calling?
Popular options include ZEGOCLOUD, Agora, Twilio, and Jitsi. ZEGOCLOUD is known for its ultra-low latency and easy integration with UIKits, making it ideal for real-time apps.
Q3: How do I use WebRTC for Android voice calls?
WebRTC offers peer-to-peer communication. You can integrate the WebRTC Android library, manage signaling (via your server or a service), and handle audio streams manually or through SDK wrappers.
Q4: What’s the difference between SIP and WebRTC in Android voice calls?
A8: SIP is a signaling protocol often used in VoIP, while WebRTC provides full-stack peer-to-peer communication including media transport. WebRTC is more modern and suitable for mobile-first apps.
Let’s Build APP Together
Start building with real-time video, voice & chat SDK for apps today!
