


A video chat room is a form of video chat configuration that allows about 50 users to communicate simultaneously in real time. If you’ve used Messenger’s Room before, then there’s a chance you have a pretty good idea of what a video chat room is. Here I will demonstrate how to create a free video chat room app with ZEGOCLOUD in this article.
Why ZEGOCLOUD SDK for Your Video Chat Room
One of the powerful SDKs that ZEGOCLOUD offers is the Video Call SDK. It is an audiovisual, reliable, and incredibly scalable component that enables the interchange of real-time video and audio data between two connected places.
With this SDK, creating a free video chat room is quite simple. You can create a fully functional app for video chat rooms with only a few lines of code and minimal SDK configuration.
Features of ZEGOCLOUD’s Video Call SDK
Regarding video chat services, ZEGOCLOUD’s Video Call SDK is the best because of its various capabilities. Below are some of the features.
1. Makes real-time video communications possible.
The cloud video architecture of ZEGOCLOUD is established and incredibly scalable. Hence, you can set up a complete real-time video and audio communication system as a video chat using this SDK.
2. Maintain contact wherever you are.
The video Call SDK from ZEGOCLOUD is essentially location-agnostic, unlike many other real-time video SDKs available today. It is in use in more than 200 nations. Consequently, you won’t need to circumvent anything to get in.
3. Improvement of the audio and video
This is where the programming creativity of the ZEGOCLOUD team shines. In fact, the Video Call SDK delivers high-quality video and audio transmissions in a continuous, stable stream while managing system resources.
4. Dependable network management.
ZEGOCLOUD manages the app’s total reliance on the network using efficient algorithms. Additionally, it offers advanced network exception management and reconnection.
5. Options for standard UI customization
For UI automation, ZEGOCLOUD provides UIKits. It has SDK-level customization, which gives you additional freedom to customize the user interface.
How to Make Your Video Chat Room with ZEGOCLOUD
Express Video SDK from ZEGOCLOUD is straightforward to integrate. The steps are as follows:
Preparation
- A ZEGOCLOUD developer account – –Sign up
- Code editor of choice.
- computer with audio and video support.
- Basic understanding of web development
Create a new project for your video chat room.
- Make a project that has the files
index.html,index.css, andindex.js. The filetree below serves as an example of how the folder structure should appear:
├── index.html
├── js
│   └── index.js
└── css
└── index.css- Copy the codes to the
index.htmlfile:
<!DOCTYPE html>
<html>
<head>
    <meta charset="UTF-8">
    <title>Zego RTC Video Call</title>
    <link rel="stylesheet" href="./css/index.css">
</head>
<body>
    <h1>
        Zego RTC Video Call
    </h1>
    <h4>Local video</h4>
    <video id="local-video" autoplay muted playsinline controls></video>
    <h4>Remote video</h4>
    <video id="remote-video" autoplay muted playsinline controls></video>
    <script src="./js/index.js"></script>
</body>
</html>
3. Copy the codes to the index.css file:
*{
    font-family: sans-serif;
}
h1,h4{
    text-align: center;
}
video {
    width: 300px;
    height: auto;
}
#local-video{
    position: relative;
    margin: 0 auto;
    display: block;
}

#remote-video{
    display: flex;
    height: auto;
    margin: auto;
    position: relative !important;
}- Run and test out your project on the local Web server.
Import the SDK
We’re done creating the skeleton project for our app. Now the next step is importing Video Call SDK into our project. You can do so by following the steps below:
- Execute the
npm i zego-express-engine-webrtccommand to install the dependencies. - Import the SDK into index.js file.
var ZegoExpressEngine = require('zego-express-engine-webrtc').ZegoExpressEngineImplement a Basic Video Call for your Video Chat Room
Our SDK has been imported into the project. Hence, we now move forward with adding video chat capabilities.
The illustration below demonstrates how User A uses a stream made available by User B:
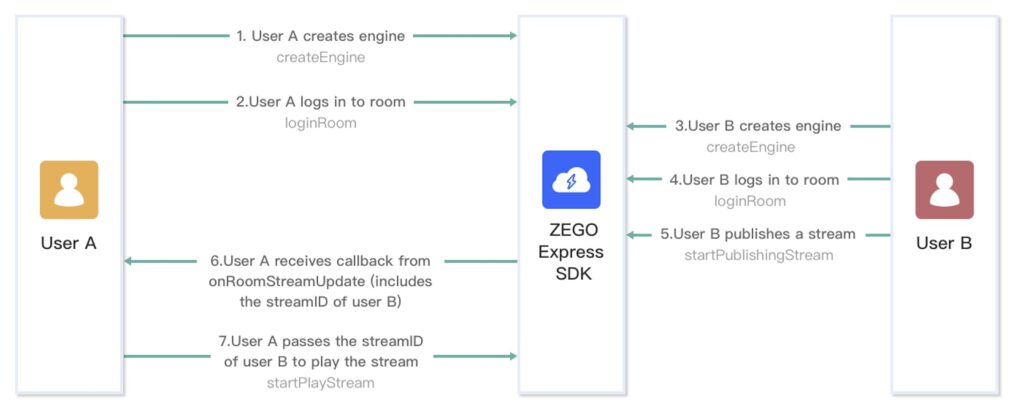
To implement a basic video calling functionality, follow these instructions:
Make a new ZegoExpressEngine instance.
Before clients A and B may play or publish a stream, we must initialize the ZegoExpressEngine SDK. Simply create a ZegoExpressEngine instance and supply your AppID as the appID parameter, along with the Server URL as the Server parameter, to accomplish this. You can obtain the credentials from the ZegoCloud Admin Console.
// Initialize the ZegoExpressEngine instance
const zg = new ZegoExpressEngine(appID, server);
Check your browser’s WebRTC support.
ZegoExpressEngine supports modern browsers. to be sure that your browser is supported, run the codes below:
const result = await zg.checkSystemRequirements();
// The [result] indicates whether it is compatible. It indicates WebRTC is supported when the [webRTC] is [true]. For more results, see the API documents.
console.log(result);
// {
//   webRTC: true,
//   customCapture: true,
//   camera: true,
//   microphone: true,
//   videoCodec: { H264: true, H265: false, VP8: true, VP9: true },
//   screenSharing: true,
//   errInfo: {}
// }
Log in to a room
You must log in before you can speak with other users in a room or even start your own room. Call the loginRoom with the appropriate parameters to accomplish this:
- Use your unique room ID in the
roomIDparameter. - The token parameter is the place for the login token you got in the previous step..
- The user ID and user name are the
roomIDuserNameparameters.
// Log in to a room. It returns `true` if the login is successful.
// The roomUserUpdate callback is disabled by default. To receive this callback, you must set the `userUpdate` property to `true` when logging in to a room.
const result = await zg.loginRoom(roomID, token, {userID, userName}, {userUpdate: true});
Note: Entering a nonexisting roomID will trigger the creation of a new room.
You must implement a few callbacks to view the room’s status. Apply the following code to implement callbacks to track room status:
roomStateUpdate: Use this callback to know the quality of the user’s connection to the room.
// Callback for updates on the current user's room connection status.
zg.on('roomStateUpdate', (roomID,state,errorCode,extendedData) => {
    if (state == 'DISCONNECTED') {
        // Disconnected from the room
    }

    if (state == 'CONNECTING') {
        // Connecting to the room
    }

    if (state == 'CONNECTED') {
        // Connected to the room
    }
})
roomUserUpdate: A callback process that receives information regarding the state of other users in the space.
 // Callback for updates on the status of the users in the room.
zg.on('roomUserUpdate', (roomID, updateType, userList) => {
    console.warn(
        `roomUserUpdate: room ${roomID}, user ${updateType === 'ADD' ? 'added' : 'left'} `,
        JSON.stringify(userList),
    );
});
roomStreamUpdate: A callback that receives status updates for the streams in the room.
// Callback for updates on the status of the streams in the room.
zg.on('roomStreamUpdate', async (roomID, updateType, streamList, extendedData) => {
    if (updateType == 'ADD') {
        // New stream added, start playing the stream.
    } else if (updateType == 'DELETE') {
        // Stream deleted, stop playing the stream.
    }
});
Publishing Streams
To create a stream, call the createStream method. The engine prepares itself by default to record audio and video data from the microphone.
// After calling the CreateStream method, you need to wait for the ZEGOCLOUD server to return the local stream object before any further operation.
const localStream = await zg.createStream({camera :{audio:true,video:true}});
// Get the audio tag.
const localAudio = document.getElementById('local-video');
// The local stream is a MediaStream object. You can render audio by assigning the local stream to the srcObject property of video or audio.
localVideo.srcObject = localStream;
Call the startPublishingStream function with the following arguments to begin publishing a local audio and video stream to distant users:
- a stream ID in the
streamIDparameter - The media stream object was obtained in the previous step as a
localStreamparameter.
// localStream is the MediaStream object created by calling creatStream in the previous step.
zg.startPublishingStream(streamID, localStream)
To check the status and information of a published stream, use the callbacks listed below:
publisherStateUpdate: A callback that receives updates on the level of stream publishing.
zg.on('publisherStateUpdate', result => {
    // Callback for updates on stream publishing status.
})
publishQualityUpdate: A callback for reporting the quality of stream publishing.
zg.on('publishQualityUpdate', (streamID, stats) => {
    // Callback for reporting stream publishing quality.
})
Playing Streams
By using the startPlayingStream method and passing the appropriate stream ID to the streamID parameter, we can play streams.
const remoteStream = await zg.startPlayingStream(streamID);

// The remoteVideo object is the <video> or <audio> element on your webpage.
remoteVideo.srcObject = remoteStream;
The following are some joint event callbacks we can use in streaming:
playerStateUpdate: A callback with new information regarding the stream’s performance.
zg.on('playerStateUpdate', result => {
    // Callback for updates on stream playing status.
})
playQualityUpdate: A callback for reporting the quality of the stream’s playback.
zg.on('playQualityUpdate', (streamID,stats) => {
    // Callback for reporting stream playing quality.
})
Stop publishing streams
Call the stopPublishingStream the method with the stream ID of the stream that needs to be stopped in the streamID parameter.
zg.stopPublishingStream(streamID)Destroy Stream
To destroy a local media stream, call the destroyStream method.
// localStream is the MediaStream object created when calling the createStream method.
zg.destroyStream(localStream)
Stop playing stream
Call the stopPlayingStream the method with the relevant stream ID provided to the stream parameter to stop a remote video stream.
zg.stopPlayingStream(streamID)Log out of a room
Call the logoutRoom method with the roomID the parameter passed the relevant room ID of the space that needs to be logged out.
zg.logoutRoom(roomID)Run a demo.
You can download this article’s sample demo source code to make audio and video applications.
Use our Core SDK if you have more complex requirements, such as streaming mix, noise reduction, censorship, etc.
Conclusion
We’ve already talked about video chat rooms and how to create them for free with ZEGOCLOUD. We can fit more individuals into our space by using video chat rooms. Therefore, spreading information to a large group of individuals will be simple!
Let’s Build APP Together
Start building with real-time video, voice & chat SDK for apps today!
