


Instagram is one of the most popular apps in the world, with hundreds of millions of users. It offers many unique and amazing features, including Instagram Avatar. In case you haven’t used it before, this is a virtual representation of yourself in the Instagram app. This article will guide you on how to make Instagram Avatar and its uses.
What is Instagram Avatar?
The Instagram Avatar, as mentioned before, is your virtual representation in the app. It allows you to emulate yourself in the app through an in-built feature called Instagram Avatar Maker. While it isn’t the perfect representation of you, it is as close as you can get without using your actual photo. Users normally create their Instagram Avatars for many reasons.
These reasons include privacy concerns, giving stickers and emojis a personal touch, or using the avatar when playing games. In simple words, creating Instagram Avatar makes using the app more fun, protects your privacy, and helps personalize your content.
How to Make an Instagram Avatar
Want to know how to make an Instagram Avatar? It is an easy process, even if you have never created an avatar. The Instagram Avatar Maker has an easy-to-understand, clean interface that helps new users create avatars without problems. Follow these basic instructions to create an Avatar on Instagram:
Step 1: On your smartphone, launch the Instagram app and tap the “Profile” icon from the bottom right corner. Now, access the “Edit Profile” option and select “Create Avatar.”
Step 2: Here, tap “Get Started” and start by choosing a skin color for your avatar. After choosing the skin color, hit “Next,” and it will give you an avatar that you can now edit to make it a look-alike of yourself.
Step 3: In the first screen, you will need to choose hairstyle and hair color, followed by face shape and outfit. Following this, if you want to customize your Avatar more than tap on the “More Personalization” button from the bottom of the screen.
Step 4: After that, you will be able to edit nose shape and size along with adding nose piercings if you want. Next is the mouth shape, fullness, and lip color you need to define. When done, you can work on face shape, width, jawline, and face marking and lines.
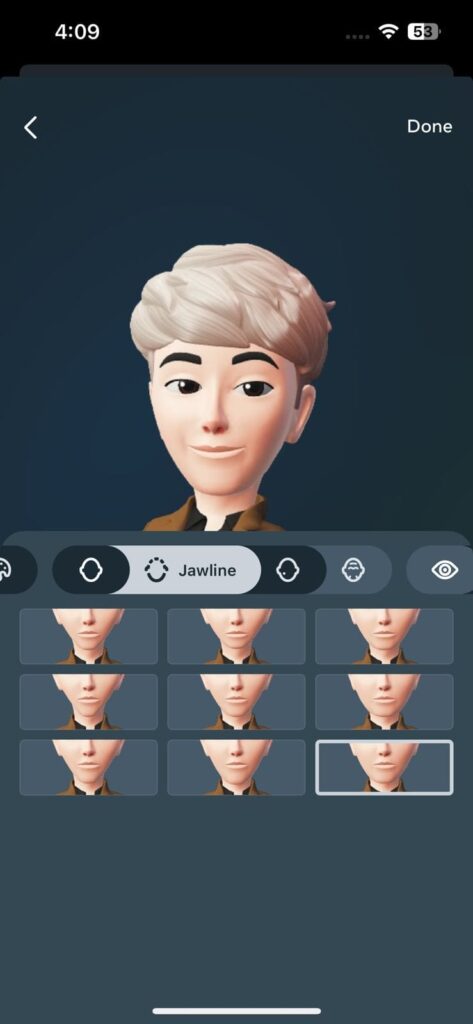
Step 5: Now is the time to add facial hair and its color, along with ear piercings and hearing devices and its color. Lastly, you can add glasses and headwear if you want, along with the color of your choice. After you have made all the changes, press “Done.” Next, tap “Save Changes” and press “Next” to complete your Instagram Avatar creation.
How to Use Your Avatar on Instagram
Now that you have learned how to make an Instagram Avatar and created one, the question is, what can you do with it? To answer this question, you can use your avatar in many ways, like stories, chats, comments, etc. Here are the most popular uses of Instagram Avatar:
- Instagram Stories: If you love uploading stories on your Instagram account, the newly created avatar can improve them. You can add a virtual avatar to the stories to give them a personalized touch.
- Chats: It is also possible to use the Instagram Avatar in your chats when talking to your friends. Moreover, you can use the avatar as a form of greeting or as reaction emoji.
- Comments: Instagram also lets you give your comments and posts on the app a personal touch. Since you can personalize the emojis and stickers using your avatar, it makes commenting fun and interesting.
- Profile Pictures: In case you don’t want to use your picture as a display photo, the Instagram Avatar can take its place. With the avatar, you can give the profile picture a realistic touch without having to use your actual picture.
Best Voice Call SDK & API – ZEGOCLOUD SDK
ZEGOCLOUD emerges as the premier choice for developers seeking the best voice call SDK & API provider, offering state-of-the-art solutions that redefine seamless communication. By integrating ZEGOCLOUD’s advanced technologies, developers can effortlessly incorporate crystal-clear voice-calling capabilities into their applications, enhancing user engagement and interaction.
Key Features of ZEGOCLOUD:
- High-Quality Voice Calls: ZEGOCLOUD delivers superior audio clarity and crispness, ensuring every conversation feels as natural and clear as if it were in person.
- Ultra-Low Latency: Designed for real-time communication, ZEGOCLOUD minimizes delays, enabling instant voice transmission that is essential for interactive apps and services.
- Global Scalability: With a robust infrastructure spread across the globe, ZEGOCLOUD ensures reliable and stable voice call functionality, regardless of user location, accommodating growth and spikes in demand effortlessly.
- Cross-Platform Support: ZEGOCLOUD provides comprehensive SDKs and APIs for iOS, Android, and web platforms, making it easy for developers to offer a consistent voice call experience across all devices.
- Easy Integration: ZEGOCLOUD prioritizes developer convenience, offering well-documented and straightforward integration processes that significantly reduce development time and complexity.
- Enhanced Security: Implementing industry-leading encryption and security practices, ZEGOCLOUD protects all voice communications, ensuring privacy and compliance with international standards.
Conclusion
Creating your Instagram avatar allows you to inject personality and creativity into your digital presence. With a few simple steps, you can craft an avatar that not only stands out but also truly represents you or your imaginative alter ego. Dive into this creative process, and let your Instagram avatar become a vibrant extension of your unique identity in the social media landscape.
Let’s Build APP Together
Start building with real-time video, voice & chat SDK for apps today!
