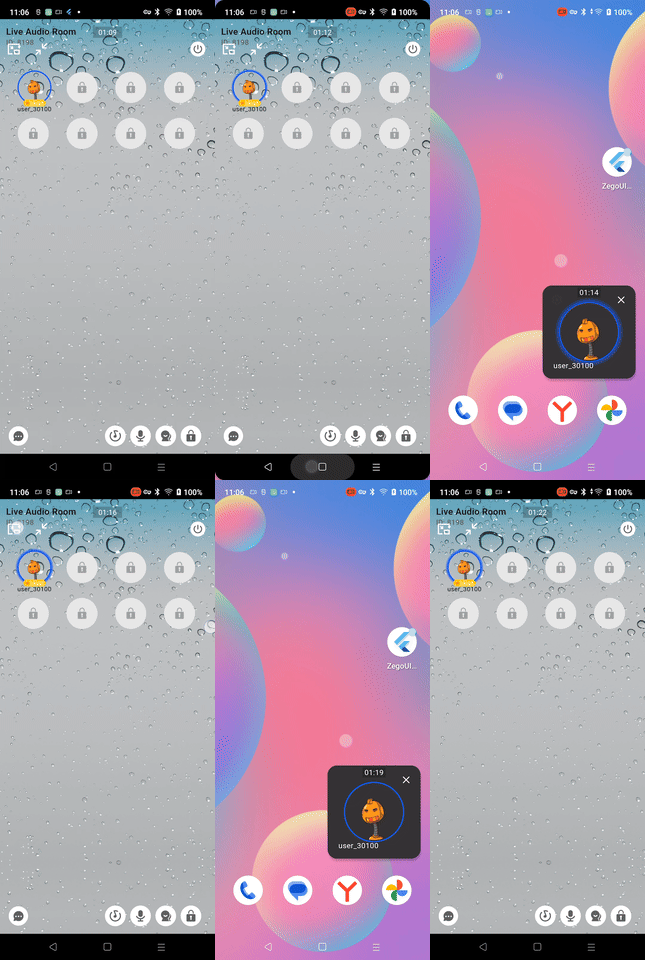
Minimize audio room window
In-app minimization
With only two simple steps, you can achieve the effect of minimizing the audio room window within the application. Ideally, the final effect will look like this:

Integrate in-app minimization
Display minimize button
To display the minimize button, configure the ZegoUIKitPrebuiltLiveAudioRoomConfig's topMenuBar, and add the ZegoLiveAudioRoomMenuBarButtonName.minimizingButton button to the top menu bar.
class LivePage extends StatelessWidget {
  const LivePage({Key? key, required this.roomID, this.isHost = false})
      : super(key: key);

  final String roomID;
  final bool isHost;

  @override
  Widget build(BuildContext context) {
    return SafeArea(
      child: ZegoUIKitPrebuiltLiveAudioRoom(
        appID: YourSecret.appID,
        appSign: YourSecret.appSign,
        userID: userID,
        userName: 'user_$userID',
        roomID: roomID,

        // Modify your custom configurations here.
        config: isHost
            ? ZegoUIKitPrebuiltLiveAudioRoomConfig.host()
            : ZegoUIKitPrebuiltLiveAudioRoomConfig.audience()
          ..topMenuBar.buttons = [
// !mark
            ZegoLiveAudioRoomMenuBarButtonName.minimizingButton
          ],
      ),
    );
  }
}Configure the Overlay
To achieve the effect of minimizing the window, you need to use the ZegoUIKitPrebuiltLiveAudioRoomMiniOverlayPage component and insert it into the Overlay of the app.
// !mark(1:2)
///  Step 1/3: Declare a NavigatorState
final navigatorKey = GlobalKey<NavigatorState>();

void main() async {
  WidgetsFlutterBinding.ensureInitialized();

  ZegoUIKit().initLog().then((value) {
    runApp(const MyApp());
  });
}

class MyApp extends StatelessWidget {
  const MyApp({Key? key}) : super(key: key);
  @override
  Widget build(BuildContext context) {
    return MaterialApp(
// !mark(1:3)
      home: ZegoUIKitPrebuiltLiveAudioRoomMiniPopScope(
        child: YourHomePage(),
      ),
      /// Step 2/3: Assign the NavigatorState to MaterialApp
// !mark
      navigatorKey: navigatorKey,
      builder: (BuildContext context, Widget? child) {
        return Stack(
          children: [
            child!,
            ///  Step 3/3: Insert ZegoUIKitPrebuiltLiveAudioRoomMiniOverlayPage into Overlay, and return the context of NavigatorState in contextQuery.
// !mark(1:5)
            ZegoUIKitPrebuiltLiveAudioRoomMiniOverlayPage(
              contextQuery: () {
                return navigatorKey.currentState!.context;
              },
            ),
          ],
        );
      },
    );
  }
}In ZegoUIKitPrebuiltLiveAudioRoomMiniOverlayPage, there are the following configs that can be configured:
-
bool
showLeaveButton:If you don't want to display the leave button, you can set it to false.
-
Widget?
leaveButtonIcon:you can change the icon of leave button by leaveButtonIcon
-
bool
supportClickZoom:If you don't want to zoom on click, you can set it to false.
-
Widget?
foreground:If you want to add some additional widgets on top, you can set it.
-
Size?
size:If you want to change the initial size, you can set this parameter.
-
double
padding:If you want to change the padding, you can set this parameter.
-
double
borderRadius:If you want to change the border radius, you can set this parameter.
-
Color
borderColor:If you want to change the border color, you can set this parameter.
-
Color
backgroundColor:If you want to change the background color, you can set this parameter.
-
Color
soundWaveColor:If you want to change the sound wave color, you can set this parameter.
-
Offset
topLeft:If you want to change the position, you can set this parameter.
-
bool
showDevices:If you don't want to display the close button, you can set it to false.
-
bool
showUserName:If you don't want to display the use name, you can set it to false.
-
Widget Function(ZegoUIKitUser? activeUser)?
builder:If you want to redraw the minimized widget, you can override the builder and ensure that the click-to-restore functionality is preserved.
-
Widget Function( BuildContext context, Size size, ZegoUIKitUser? user, Map<String, dynamic> extraInfo, )
foregroundBuilder:same as ZegoAudioVideoView.foregroundBuilder
-
Widget Function( BuildContext context, Size size, ZegoUIKitUser? user, Map<String, dynamic> extraInfo, )
backgroundBuilder:same as ZegoAudioVideoView.backgroundBuilder
Prevent building multiple ZegoUIKitPrebuiltLiveAudioRoom
When you minimize the interface, if the button is not restricted, clicking the enter button again will enter the live audio room again. To avoid this situation, it is necessary to restrict the button.
Therefore, in the click event of the button, you need to handle it: if it is currently in a minimized state, do not carry out the page jump operation.
ElevatedButton(
  onPressed: () {
// !mark(1:5)
    if (ZegoUIKitPrebuiltLiveAudioRoomController().minimize.isMinimizing) {
      /// When the application is minimized (in a minimized state),
      /// Disable button clicks to prevent multiple ZegoUIKitPrebuiltLiveAudioRoom components from being created.
      return;
    }

    /// The code you used to initialize or navigate ZegoUIKitPrebuiltLiveAudioRoom previously
    Navigator.pushNamed(
      context,
      ZegoUIKitPrebuiltLiveAudioRoom(...),
    );
  },
  child: const Text('join'),
);After completing the above two steps, you can now minimize the audio room window within the application.
Out-of-app minimization
PIP, also known as Picture In Picture, is a window displayed when the application is in background.
In addition, interactive operations are not allowed at this time, so it is only in viewing mode.
The default value of ZegoLiveAudioRoomPIPConfig.enableWhenBackground is true, which means the PIP feature is enabled by default. If you don't want to enable it, you can set it to false.
If you want to display the PIP window by clicking a button, you can achieve this by adding ZegoCallMenuBarButtonName.pipButton to topMenuBar.buttons.
The final effect will look like this:

Integrate with button
ZegoUIKitPrebuiltLiveAudioRoom(
  appID: YourAppID,
  appSign: YourAppSign,
  userID: userID,
  userName: userName,
  roomID: roomID,
  config: isHost
      ? ZegoUIKitPrebuiltLiveAudioRoomConfig.host()
      : ZegoUIKitPrebuiltLiveAudioRoomConfig.audience()
// !mark(1:4)
    ..pip.enableWhenBackground = true,
    ..topMenuBar.buttons = [
      ZegoLiveAudioRoomMenuBarButtonName.pipButton
    ],
),Config
- ZegoLiveAudioRoomPIPConfig
| Attribute | Description | Type |
|---|---|---|
| aspectWidth | aspect width | int |
| aspectHeight | aspect height | int |
| enableWhenBackground | android: only available on SDK higher than 31(>=31) | bool |
| android | android config | ZegoLiveAudioRoomPIPAndroidConfig |
- ZegoLiveAudioRoomPIPAndroidConfig
| Attribute | Description | Type |
|---|---|---|
| background | background widget, default is a black widget | Widget? |
| showUserName | show user name or not | bool |
| userNameTextColor | text color of user name, default is white | Color? |
