提交工单
咨询集成、功能及报价等问题
This guide describes how to integrate the SDK and implement a basic live streaming using ZEGOCLOUD's ZegoExpressEngine SDK.
Before you begin, make sure you complete the following:
Skip this step if a project already exists.
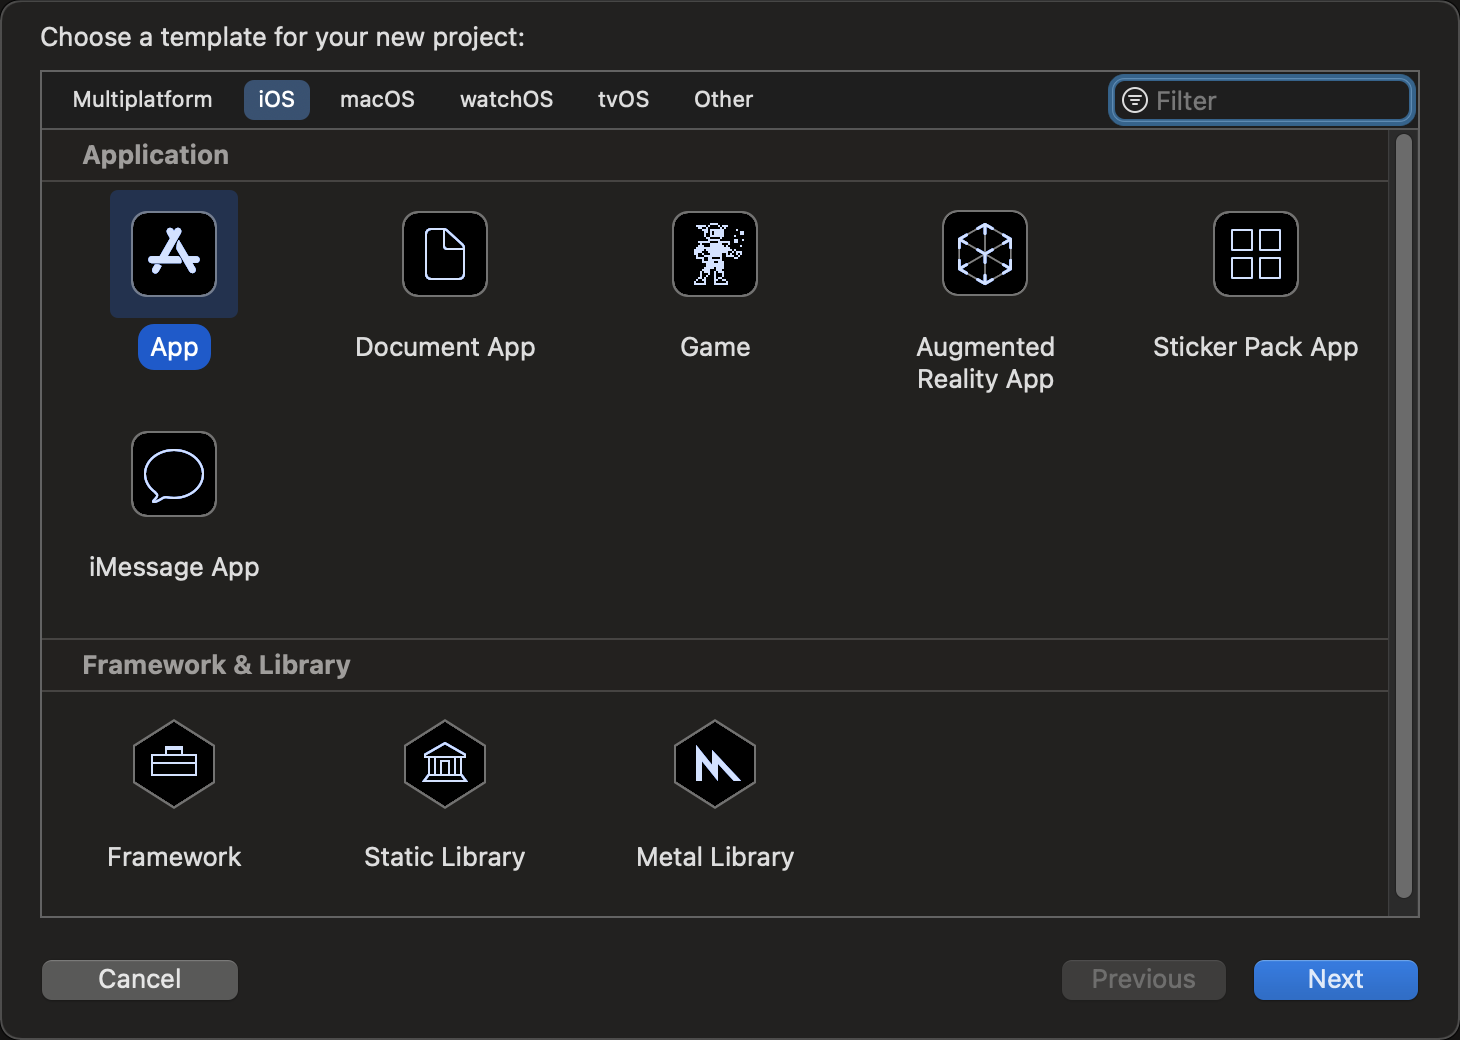
Open Xcode, select File > New > Project. In the dialog that appears, select the iOS tab, then select App in the Application section.
)
Fill in items or choose options for the new project, click Next after the configuration is completed.
Product Name and Organization Identifier are required, which will be used for creating the App Bundle Identifier.
)
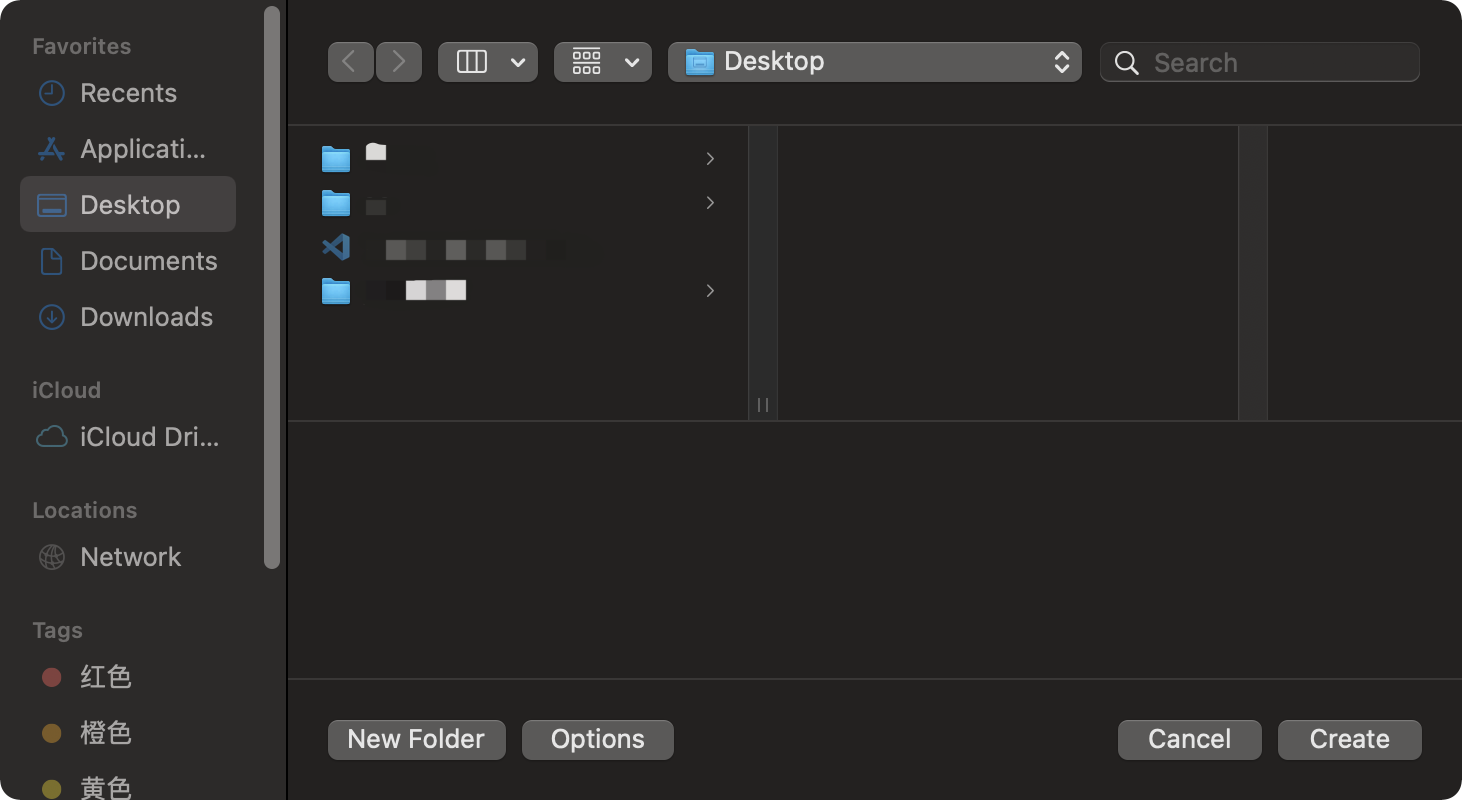
Choose a directory to store the project, and click Create to create a project.
)
Choose either of the following methods to integrate the ZegoExpressEngine SDK into your project.
Open Xcode and select File > Add Packages..., and enter the following URL in the search box of Search or Enter Package URL:
https://github.com/zegolibrary/express-video-iosSpecify the SDK version you want to integrate into Dependency Rule (Recommended: use the default rule "Up to Next Major Version"), and then click Add Package to import the SDK. For more, refer to Apple Documentation.
Install CocoaPods. For more details, see CocoaPods Installation Guide .
Open the Terminal, enter the root directory of the project, and execute the command pod init to create a Podfile.
Open Podfile, add pod 'ZegoExpressEngine', and change MyProject to your target name.
target 'MyProject' do
    use_frameworks!
    pod 'ZegoExpressEngine'
end
Because the SDK is XCFramwork, therefore, you will need to use CocoaPods 1.10.0 or later to integrate the ZegoExpressEngine SDK.
Since version v3.2.0, the Pod name of the ZegoExpressEngine SDK is changed from ZegoExpressEngine/Video to ZegoExpressEngine; the Pod name of the Voice Call SDK is changed from ZegoExpressEngine/Audio to ZegoExpressAudio.
Execute pod repo update to update the local index to make sure the latest version of SDK can be installed. For the latest version number, see ZEGOCLOUD Express-Video iOS SDK Release History .
Execute pod install to install the SDK.
Download the latest version of SDK from SDK downloads . We recommend you use XCFramework, and then extract files from the downloaded SDK package.
Copy the SDK dynamic library file ZegoExpressEngine.xcframework to the project directory.
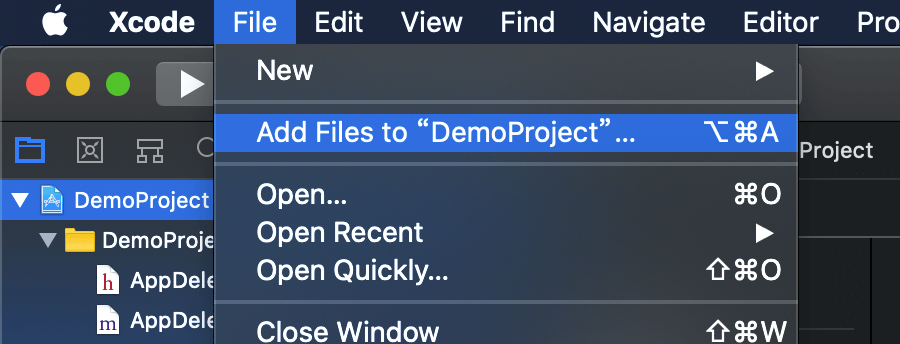
Open Xcode and select File > Add Files to "xxx" (xxx is the project name) to add the SDK dynamic library files to the project.
)
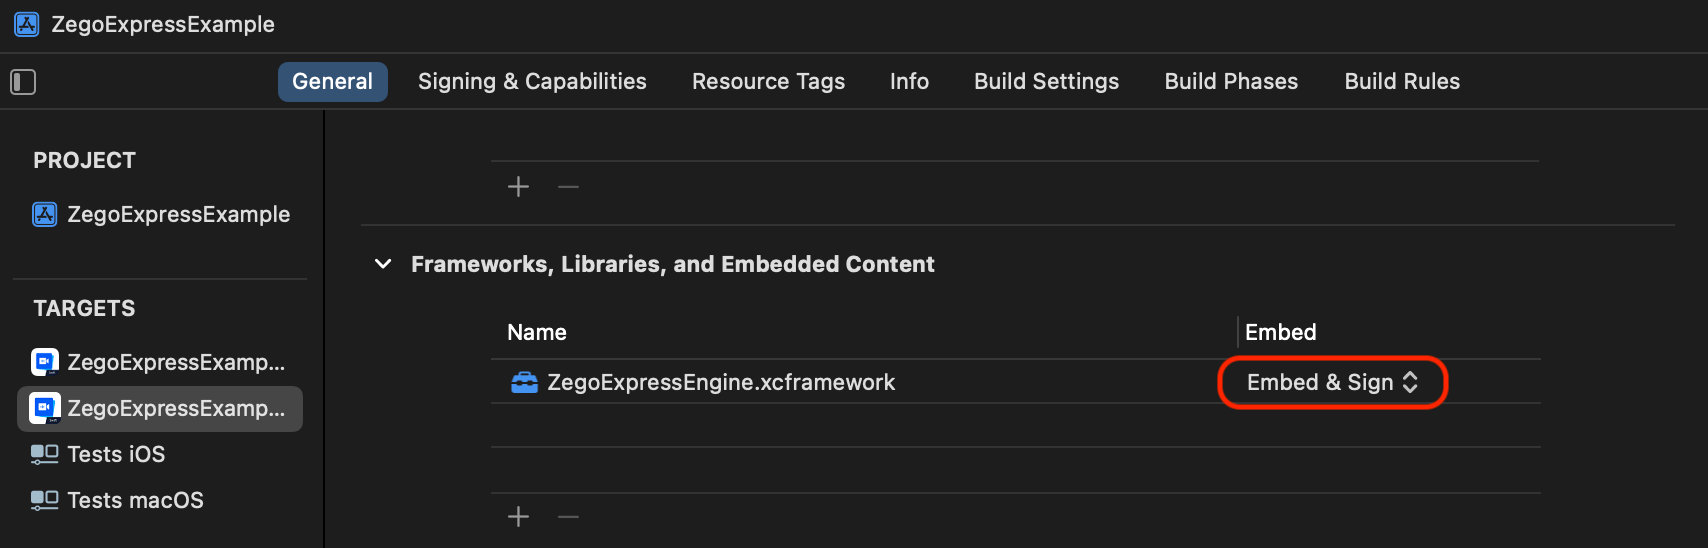
Do the following to add the framework file to the project target.
a) Select the project target.
b) Click General, then under Frameworks, Libraries, and Embedded Content, click the Add button (+) below the table.
c) Add ZegoExpressEngine.framework to the target, and set the Embed field to Embed & Sign.
)
Permissions can be set as needed.
Open Xcode, select the target object, and then click Info > Custom iOS Target Properties.
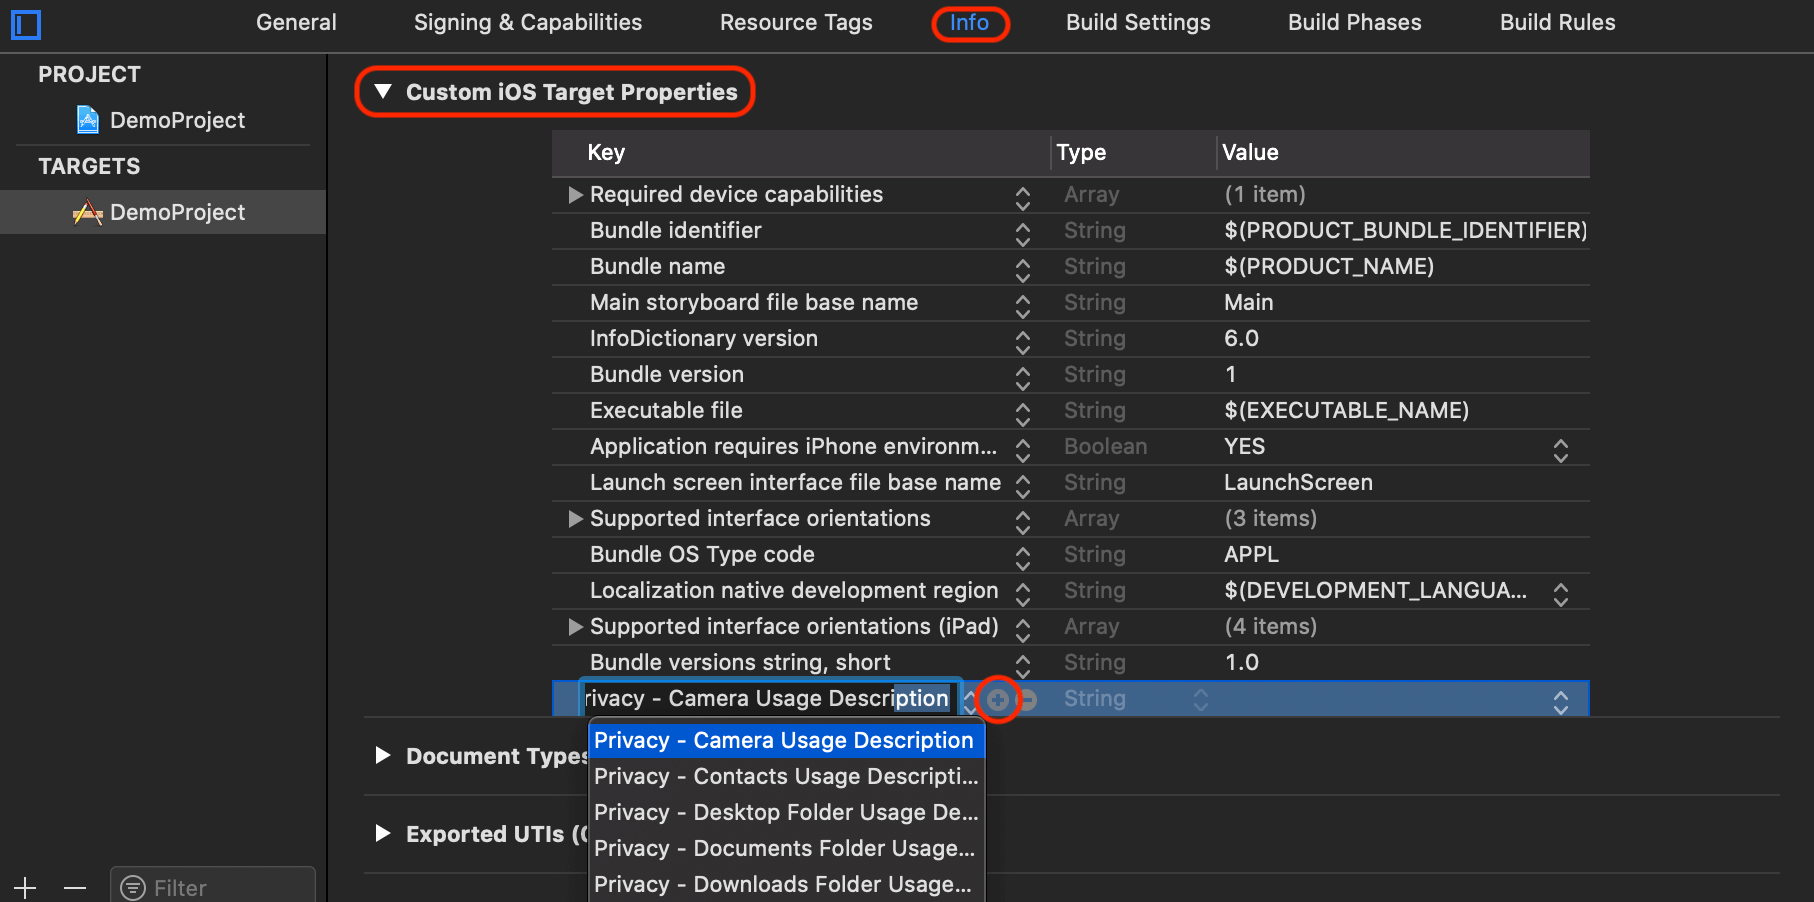)
Click the Add button (+) to add camera and microphone permissions.
Privacy - Camera Usage Description
Privacy - Microphone Usage Description
)
Here is a downloadable sample code that can be used as a reference when developing your app.
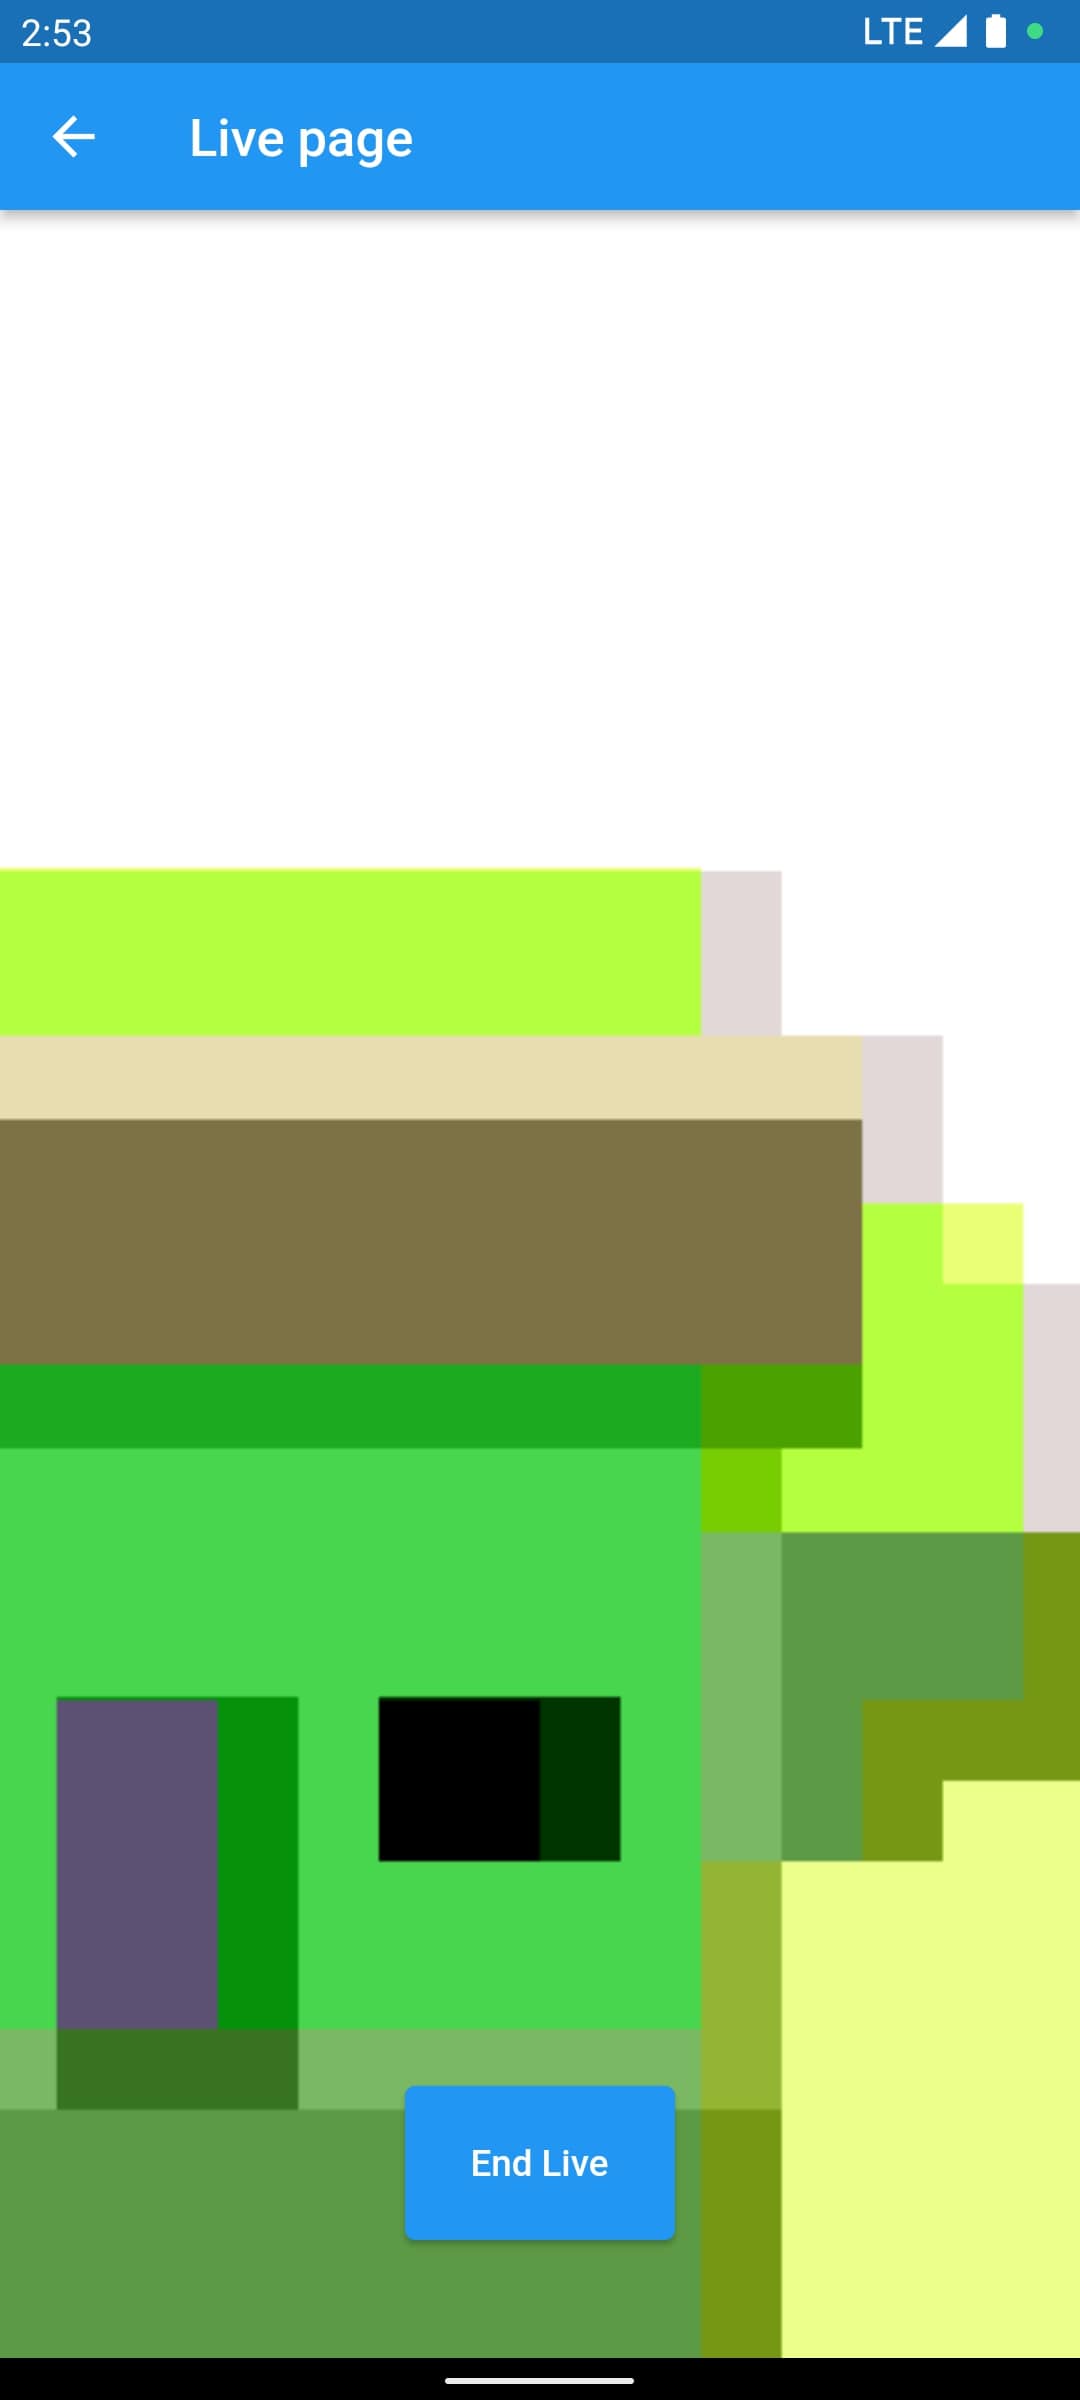
Create a UI for live streaming for your project based on your scenario requirements. We recommend you add the following UI elements to your project:
)
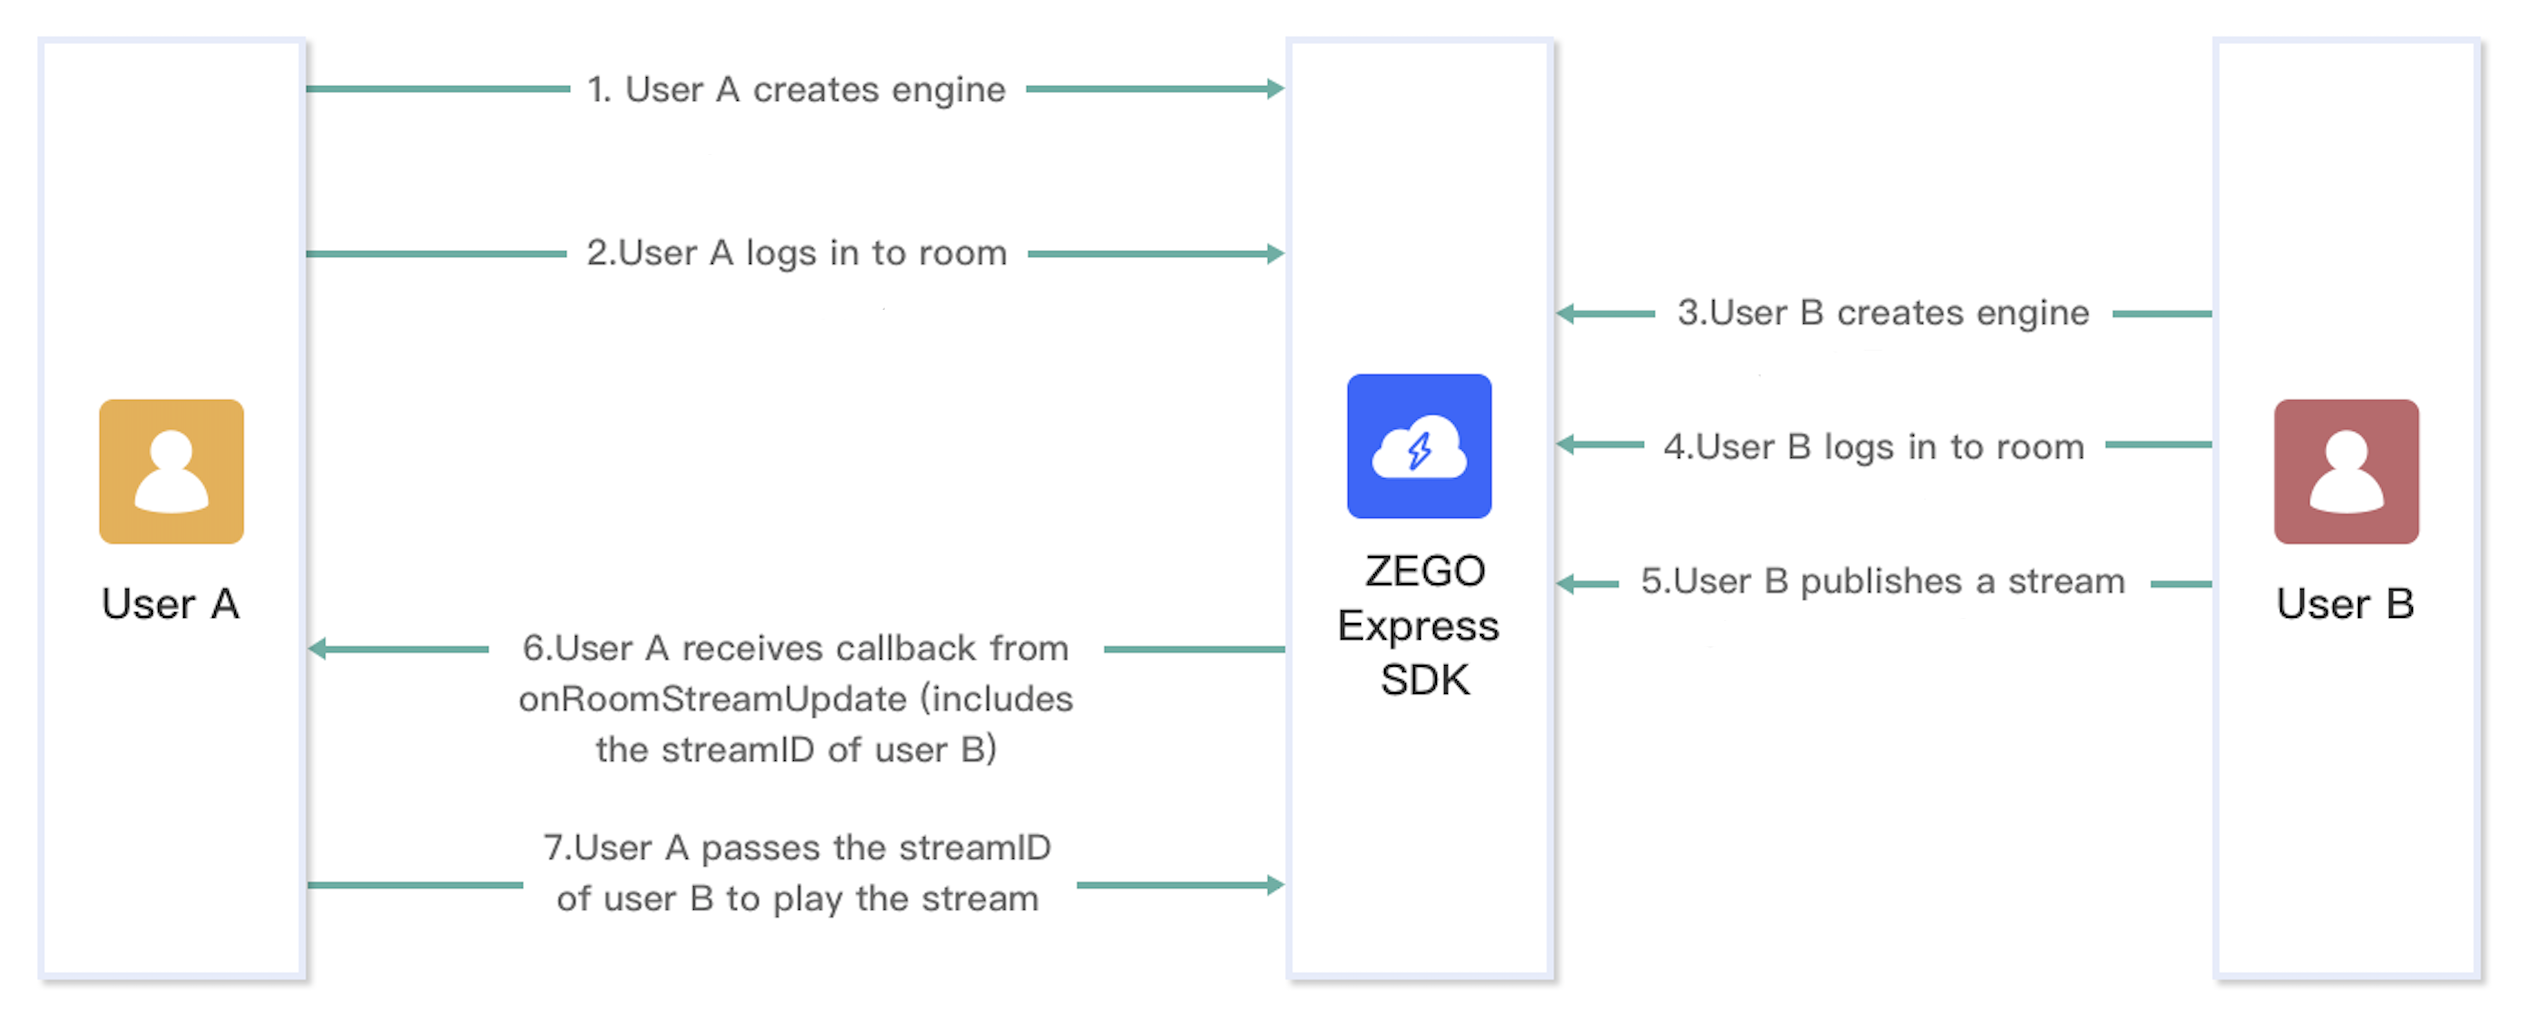
The following diagram shows the basic process of User A playing a stream published by User B:
)
For a better understanding, you can check the key concepts of ZegoExpressEngine SDK:
First, run the following to import the header file.
// Import the header file ZegoExpressEngine
import ZegoExpressEngine
Then, call the createEngineWithProfile method to initialize the ZegoExpressEngine SDK. And config the following:
profile: the ZegoEngineProfile object, used to config the appID and appSign, as well as the scenario you are applying the SDK to. eventHandler: an event handler object, used to listen for core event callbacks, such as the callback for updates on the room connection stats changes, updates on in-room participants log in or log out, and more. You can call the setEventHandler method to set up the event handler object. To destroy the SDK and release the resources it occupies, call the destroy method.
private func createEngine() {
    let profile = ZegoEngineProfile()
    // Get your AppID and AppSign from ZEGOCLOUD Console
    //[My Projects -> AppID] : https://console.zegocloud.com/project
    profile.appID = appID
    profile.appSign = appSign
    profile.scenario = .broadcast
    // Create a ZegoExpressEngine instance
    ZegoExpressEngine.createEngine(with: profile, eventHandler: nil)
}

private func destroyEngine() {
    ZegoExpressEngine.destroy(nil)
}Implement the ZegoEventHandler event handler to listen for event callbacks, such as the event callback on the updates when the in-room streams are added or deleted, the updates when in-room participants log in or log out, the updates when room connection state changes, and more.
onRoomStreamUpdate: Callback for updates on the status of the streams in the room. When new streams are published to the room or existing streams in the room stop, the SDK sends out the event notification through this callback. You can call startPlayStream() and stopPlayStream() methods in this callback.
onRoomStateUpdate: Callback for updates on current room connection status. When the current room connection status changes (for example, when the current user is disconnected from the room or login authentication fails), the SDK sends out the event notification through this callback.
onRoomUserUpdate: Callback for updates on the status of other users in the room. When other users log in or log out of the room, the SDK sends out the event notification through this callback.
extension ViewController : ZegoEventHandler {

    // Callback for updates on the status of the streams in the room.
    func onRoomStreamUpdate(_ updateType: ZegoUpdateType, streamList: [ZegoStream], extendedData: [AnyHashable : Any]?, roomID: String) {
        // If users want to play the streams published by other users in the room, call the startPlayingStream method with the corresponding streamID obtained from the `streamList` parameter where ZegoUpdateType == ZegoUpdateTypeAdd.
        if updateType == .add {
            for stream in streamList {
                startPlayStream(streamID: stream.streamID)
            }
        } else {
            for stream in streamList {
                stopPlayStream(streamID: stream.streamID)
            }
        }
    }

    // Callback for updates on the current user's room connection status.
    func onRoomStateUpdate(_ state: ZegoRoomState, errorCode: Int32, extendedData: [AnyHashable : Any]?, roomID: String) {
        if errorCode != 0 {
            self.view.makeToast("onRoomStateUpdate: \(state.rawValue), errorCode: \(errorCode)")
        }
    }

    // Callback for updates on the status of other users in the room.
    // Users can only receive callbacks when the isUserStatusNotify property of ZegoRoomConfig is set to `true` when logging in to the room (loginRoom).
    func onRoomUserUpdate(_ updateType: ZegoUpdateType, userList: [ZegoUser], roomID: String) {
    }

}To log in to a room, you can call the loginRoom method.
To log out, you can call the logoutRoom method.
private func loginRoom() {
    // The value of `userID` is generated locally and must be globally unique.
    let user = ZegoUser(userID: localUserID)
    // Users must log in to the same room to call each other.
    let roomConfig = ZegoRoomConfig()
    // onRoomUserUpdate callback can be received when "isUserStatusNotify" parameter value is "true".
    roomConfig.isUserStatusNotify = true
    // log in to a room
    ZegoExpressEngine.shared().loginRoom(self.roomID, user: user, config: roomConfig) { errorCode, extendedData in
        if errorCode == 0 {
            // Login room successful
            if self.isHost{
                self.startPreview()
                self.startPublish()
            }
        } else {
            // Login room failed
            self.view.makeToast("loginRoom faild \(errorCode)", duration: 2.0, position: .center)
        }
    }
}

private func logoutRoom() {
    ZegoExpressEngine.shared().logoutRoom()
}To start the local video preview and to render it, call the startPreview method.
And you call the stopPreview method to stop the rendering.
private func startPreview() {
    // Set up a view for the host's camera
    let canvas = ZegoCanvas(view: self.hostCameraView)
    ZegoExpressEngine.shared().startPreview(canvas)
}

private func stopPreview() {
    ZegoExpressEngine.shared().stopPreview()
}To start publishing a local audio or video stream to remote users, call the startPublishingStream method.
And you can call the stopPublishingStream method to stop the stream publishing.
private func startPublish() {
    // After calling the `loginRoom` method, call this method to publish streams.
    // The StreamID must be unique in the room.
    let streamID = "stream_" + localUserID
    ZegoExpressEngine.shared().startPublishingStream(streamID)
}

private func stopPublish() {
    ZegoExpressEngine.shared().stopPublishingStream()
}You can call startPlayingStream method to start playing a remote video stream.
And to stop the stream playing, call the stopPlayingStream method to stop.
private func startPlayStream(streamID: String) {
    // Start to play streams. Set the view for rendering the remote streams.
    let canvas = ZegoCanvas(view: self.hostCameraView)
    var config = ZegoPlayerConfig()
    config.resourceMode = .default // live streaming(cdn)
    // config.resourceMode = .onlyL3 // interactive live streaming
    ZegoExpressEngine.shared().startPlayingStream(streamID, canvas: canvas, config:config)
}

private func stopPlayStream(streamID: String) {
    ZegoExpressEngine.shared().stopPlayingStream(streamID)
}When your app starts, you need to call the createEngine method to initialize the SDK.
When your app is about to exit, you can call the destroyEngine to release SDK resources.
override func viewDidLoad() {
    super.viewDidLoad()
    // Do any additional setup after loading the view.
    createEngine()
    initViews()
}

override func viewDidDisappear(_ animated: Bool) {
    super.viewDidDisappear(animated)
    destroyEngine()
}To test your implementation, run your app project on a real device. Upon successful running, you can view the local video.
For your convenience of testing experience, we got you a Web platform for debugging. On the debugging page, you can enter the AppID and room ID of the real device user, and a different user ID to log in to the same room for communicating with the real device user. After a live streaming starts successfully, you can hear the remote audio and view the remote video.
For a detailed demo source code, check it here.
When running the App, it prompts Building for iOS Simulator, but the linked and embedded framework'ZegoExpressEngine.framework' was built for iOS + iOS Simulator.
After Xcode 12.3, the framework with iOS + iOS (Simulator) dual-platform architecture is prohibited by default. It is recommended to replace it with XCFramework recommended by Apple (you can choose to download XCFramework in the drop-down box in Download SDK Package). Or you can select "TARGETS > Build Settings > Validate Workspace" through Xcode and set the value of this parameter to YES to continue using the traditional framework.