


The metaverse and virtual reality allow us to redesign our reality or recreate our image as we prefer. As many know, creating your own Avatar for navigating many virtual places is essential.
Why Create an Avatar?
By creating an Avatar, online users can replace the classic photo profile on social media sites, forums, or chat programs. Those who want to avoid showing their appearance and face to billions of strangers worldwide are happy to use their digital version.
By overcoming the limitations of 2D technology, we can relate innovatively and engagingly. In video games, we recreate ourselves in 3D to fit into this immersive reality.
What’s good is that you don’t need particular skills to create your own Avatar. It is the easiest thing to do ever!
How and Where to Create Your Own Avatar?
Generally, the first thing to do is to choose the female or male gender. You can start customizing your Avatar from the first options tab of your favorite Avatar maker.
All Avatar makers have a face tab where you can modify or adapt the face to your appearance: face shape, nose, eyes, ears, eyebrows, lips, hair, and skin color.
You can create a realistic or fully cartoonish version. Finally, you can dress as you like and use many accessories, outfits, and styles. If you don’t have the patience to customize your look, you can also choose from the many templates Avatar makers offer. This way, creating your Avatar will take little time.
Once you create your virtual character, you can save it on your device or export it directly to your favorite social or platform. It depends on the options your favorite Avatar maker offers.
We have compiled an exhaustive list of the most popular Avatar makers; check it out with this link.
ZegoAvatar SDK for Custom Avatar Creation
We now introduce the most powerful and innovative tool to create your own Avatar. It is the new ZegoAvatar SDK developed by ZEGOCLOUD.
Its undoubted quality lies in its powerful avatar customize capabilities, which take avatar customization to a new level. Try the ZegoAvatar demo app to create your virtual self and see how easy it is by just facing your camera.
If you are a developer or passionate about these topics and want to try to integrate ZegoAvatar SDK, then this section is for you. Let’s go through this tutorial together.
Make sure to have a ZEGOCLOUD account first, so sign up to get 10,000 free minutes now. You can use it for this free trial or anytime you want to integrate features or build real-time engagement into your apps using ZEGOCLOUD products.
The SDK is available for multiple platforms and systems. Let’s pick iOS now.
Create project
After logging in to your ZEGOCLOUD account, the first step is creating a project. It’s essential for app creation, where we define many parameters for our project.
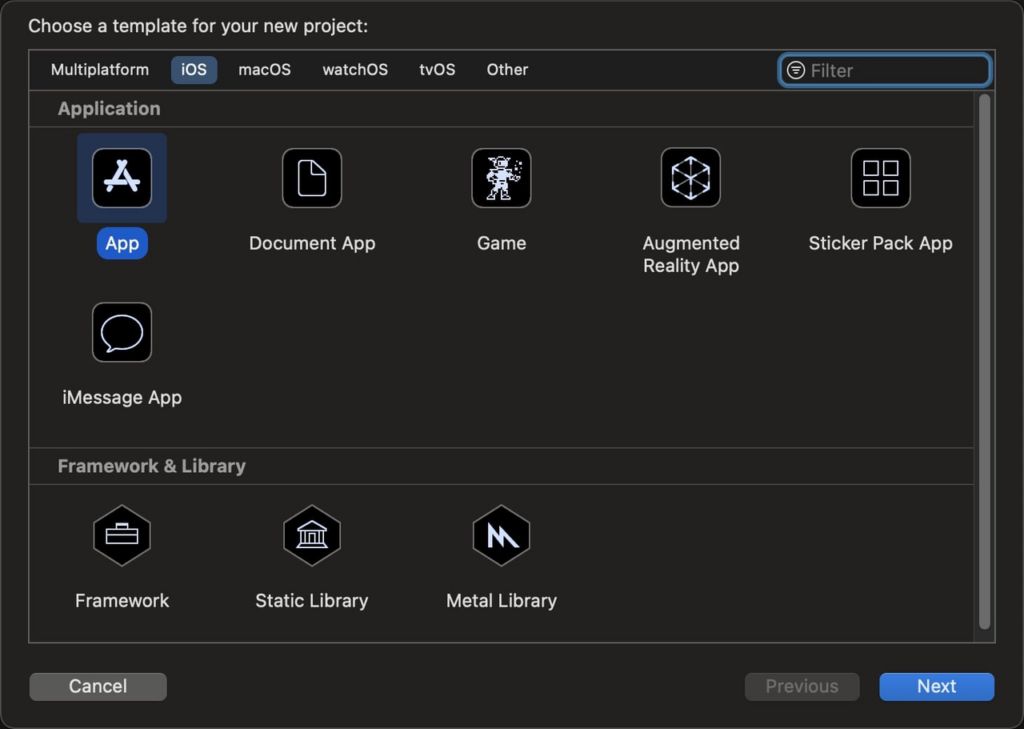
1. Launch Xcode
Launch Xcode and select Create a new Xcode project or File → New → Project. Another window will open; select the iOS application (in this example, we decided to try the iOS platform). Select Application → App, and click Next.
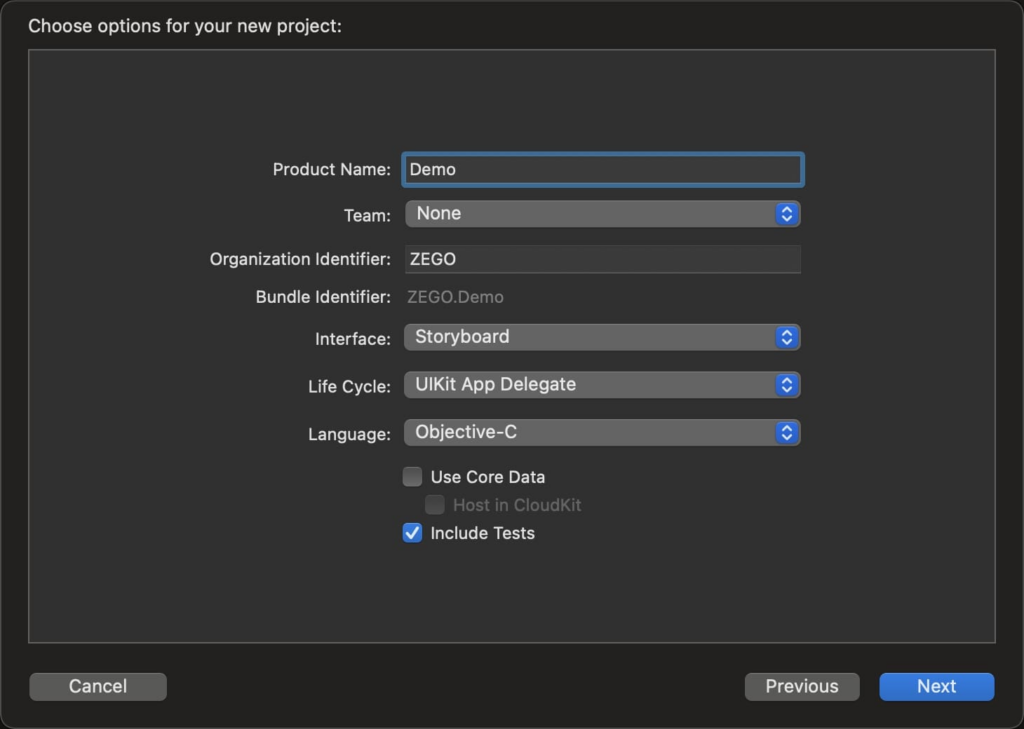
2. Add a product name and an organization identifier.
These details are essential to our application. They act as bundle identifiers that uniquely identify our app throughout the system. After entering the necessary information, click on “Next.”
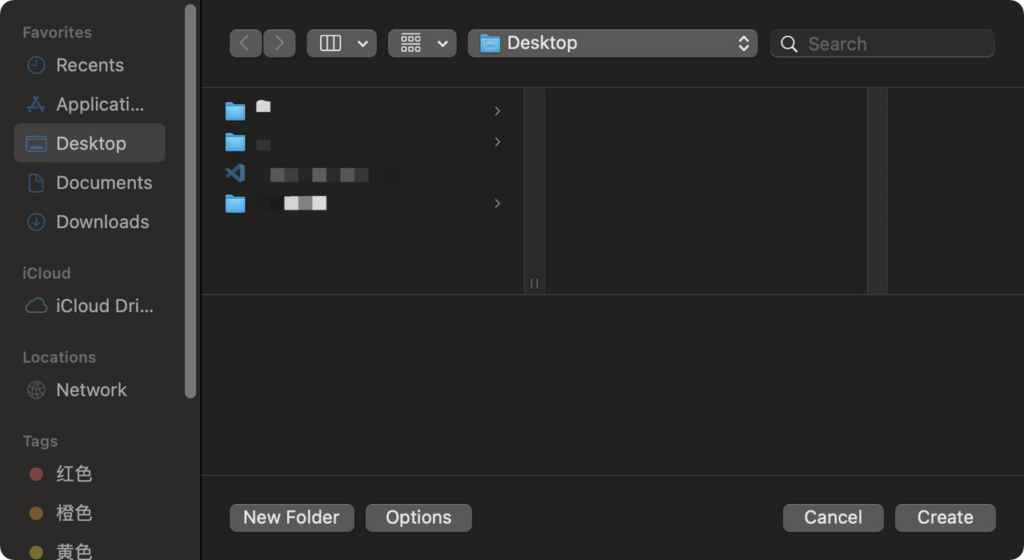
After clicking “Next,” select the project storage path, and click “Create” to create the project.
Import SDK
To import the Avatar customizer, follow these steps:
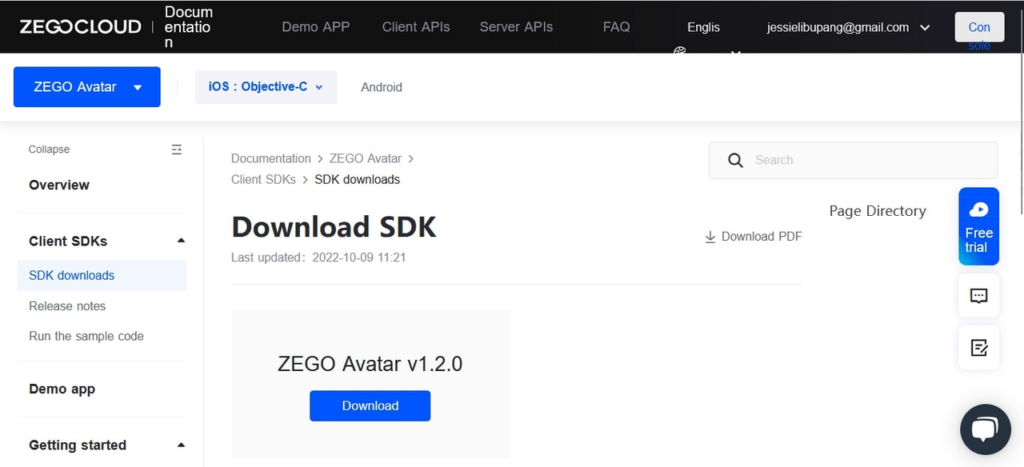
1. Download the SDK
Download and install the ZegoAvatar SDK. You will find it on the SDK download. The page is generic, like the image below.
After downloading the File, you can see that it’s compressed. Decompress the package to extract all the SDK’s files.
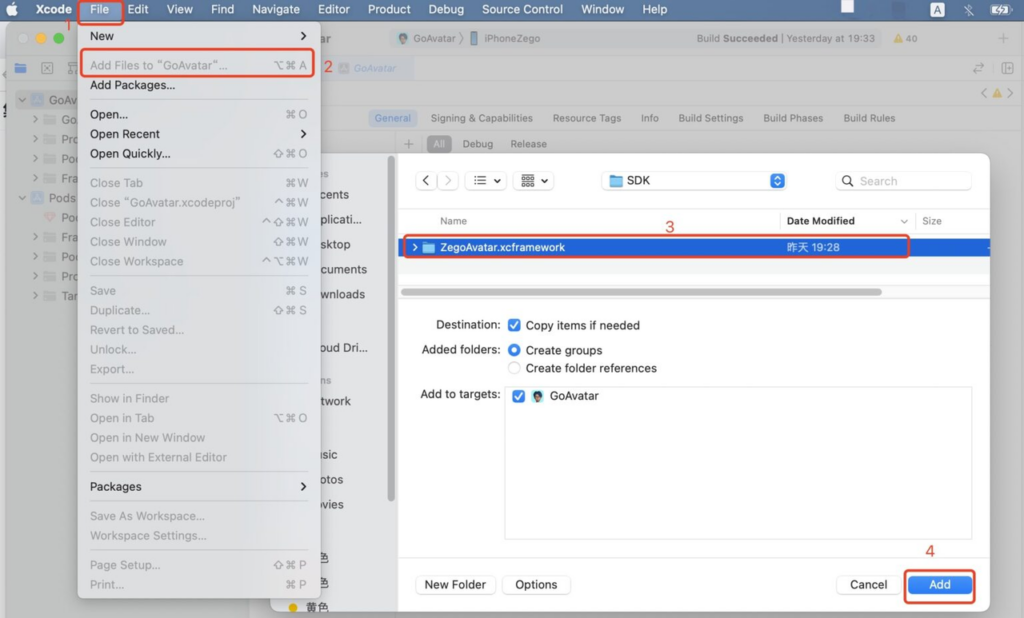
2. Adding the SDK Library to the project directory
The first library file you need to add is the dynamic library file ZegoAvatar.xcframework. It’s easy, to copy the File manually to the project’s directory. To simplify, open Xcode, select **File **→ Add Files to [Project Name], and add the SDK Library file to the project.
3. TARGETS Configurations
The TARGETS specify a product containing the instructions for building the product from a set of files in a project. You will use TARGETS to point to customize avatar creation projects and instructions from our SDK Library file.
Below are some Target configurations needed for the project:
Select Targets → General → Frameworks, Libraries, and Embedded Content, add ZegoAvatar.xcframework, and set Embed to Embed & Sign.
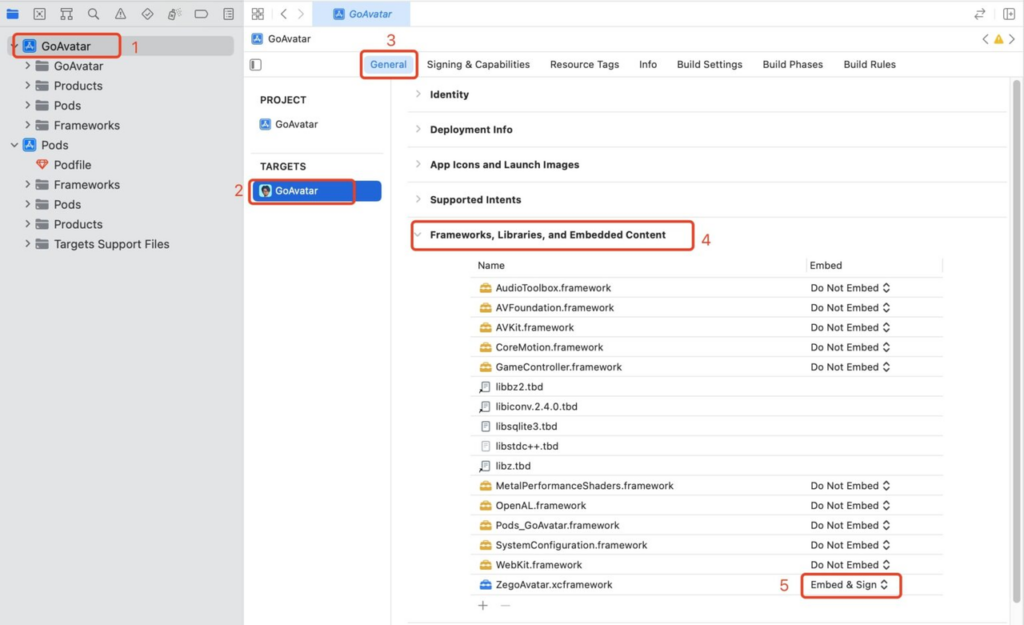
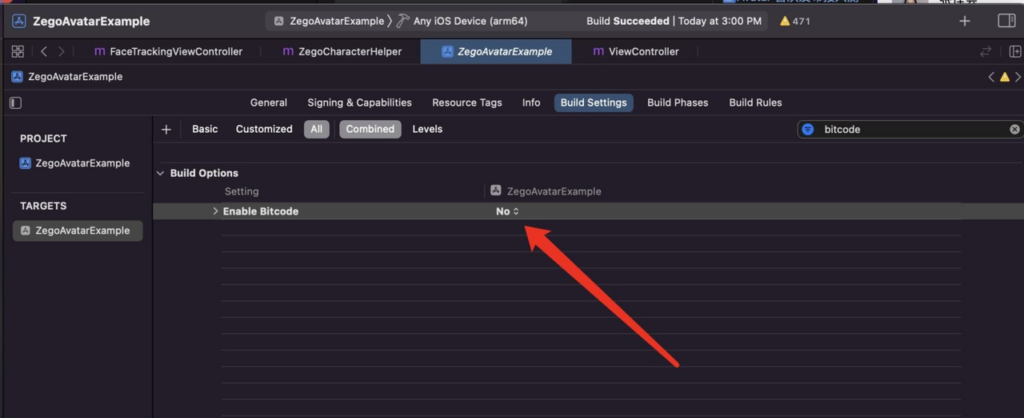
Select TARGETS → Build Settings, → Build Options, and set Enable Bitcode to NO.
4. Set Permission
Permission is needed to access device resources, like the camera and storage. This can be done through the following steps:
- Select TARGETS → Info → Custom iOS Target Properties.
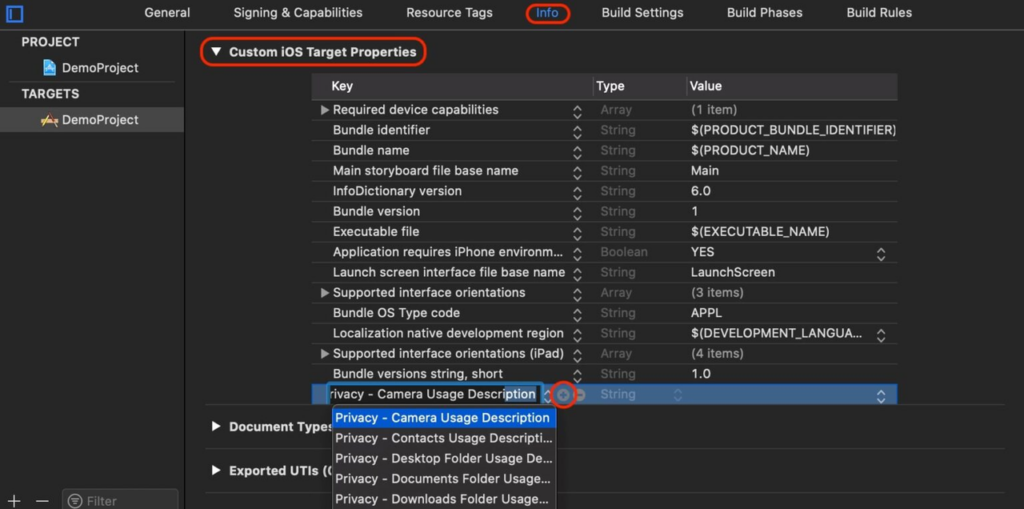
- Click the plus icon (+) and add the camera and microphone permissions: We’ll use the camera to capture facial expressions using the mirroring feature [
Privacy - Camera Usage Description]. and a microphone will be used for speech simulation [Privacy - Microphone Usage Description]

Import resource packages
To use the AI capabilities, the ZegoAvatar SDK provides, you must import the corresponding resource packages. Visit the SDK Downloads page to get the needed resource packages.
You can import these packages in “dynamic downloading” or the “added from local” method.
Follow the steps below to import packages:
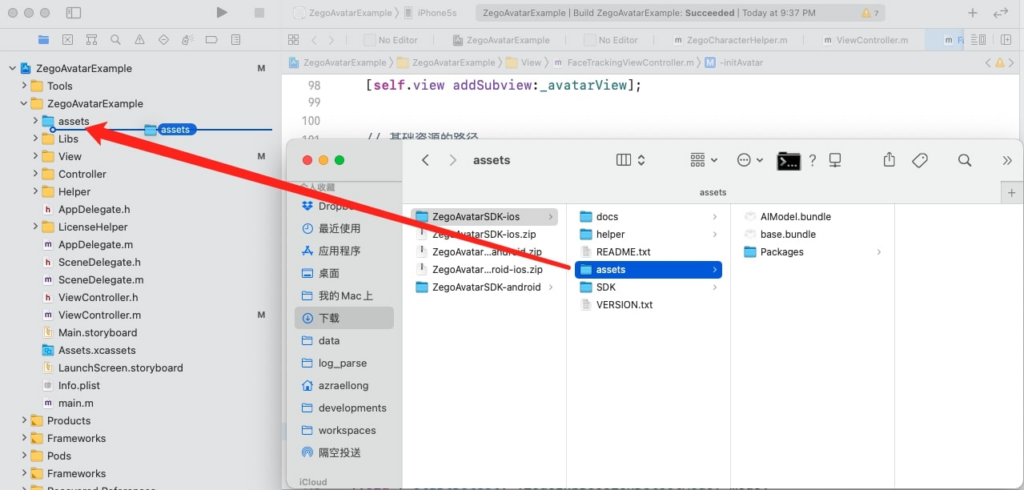
- Locate the assets folder, and drag the folder into your project folder.
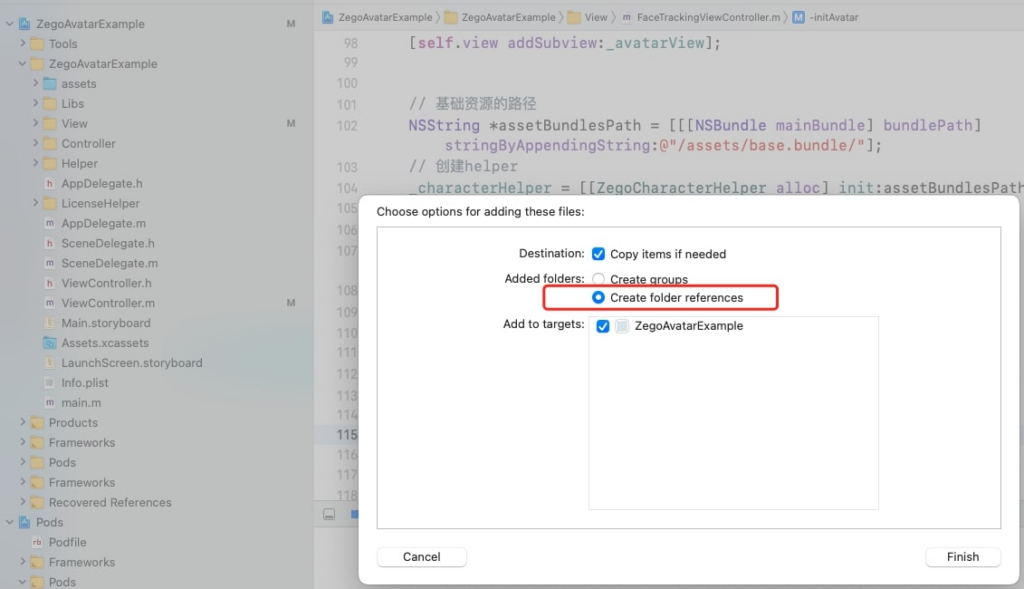
2. After dropping the package folder into your project, a dialogue box will appear. Select Create folder references to add the folder
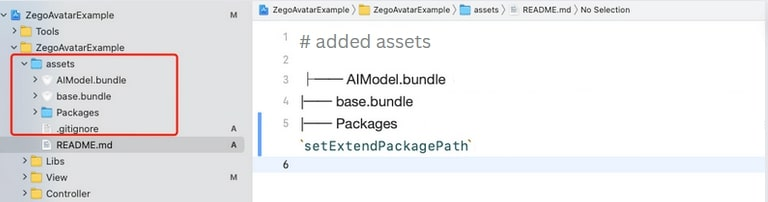
Your folder structure will change and look like the one below. This shows that the following assets: AIModel.bundle, base.bundle, and Packages have been added to the project directory.
Congratulations, you are done integrating the ZegoAvatar SDK.
Time to create your own Avatar with the unique customized options you have. If you need guidance on how to use the ZEGOCLOUD Avatar maker, consult the guide at the voice ‘How to create a custom Avatar‘.
Read more:
Talk to Expert
Learn more about our solutions and get your question answered.
