提交工单
咨询集成、功能及报价等问题
You can refer to this document to understand the effects of the offline call invitation (system-calling UI) and complete the basic integration.
If your project needs Firebase integration or customization of features like ringtone and UI, complete the basic integration first and then refer to Customize the call and Enhance the call for further configuration.
Offline call invitation configuration is complex. If you only require online call invitations, please skip the steps related to firebase console and apple certificate.
Recorded on Xiaomi and iPhone, the outcome may differ on different devices.
| Online call | online call (Android App background) | offline call (Android App killed) | offline call (iOS Background/Killed) |
|---|---|---|---|
) |
) |
) |
) |
If you don't know how to create a project and obtain an app ID, please refer to this guide.
@zegocloud/zego-uikit-prebuilt-call-rn.yarn add @zegocloud/zego-uikit-prebuilt-call-rnnpm install @zegocloud/zego-uikit-prebuilt-call-rnIf you are using Expo, please note that we only support Expo bare workflow. (We have only done basic testing on expo. If possible, it is recommended to integrate call kit with a standard react native project.)
call invitation feature is not compatible with "expo-notifications" and cannot be used together. If you are using "expo-notifications", it is recommended to remove this dependency or migrate to "@react-native-firebase/messaging".
Run the following command to install other dependencies for making sure the @zegocloud/zego-uikit-prebuilt-call-rn can work properly.
yarn add @zegocloud/zego-uikit-rn react-delegate-component @react-navigation/native @react-navigation/native-stack react-native-screens react-native-safe-area-context react-native-sound react-native-encrypted-storage zego-express-engine-reactnative@3.14.5 zego-zim-react-native@2.12.1 zego-zpns-react-native@2.5.0-alpha react-native-keep-awake@4.0.0npm install @zegocloud/zego-uikit-rn react-delegate-component @react-navigation/native @react-navigation/native-stack react-native-screens react-native-safe-area-context react-native-sound react-native-encrypted-storage zego-express-engine-reactnative@3.14.5 zego-zim-react-native@2.12.1 zego-zpns-react-native@2.5.0-alpha react-native-keep-awake@4.0.0If your react-native version is below 0.60, you need to run the following command in your project root directory to ensure that react-native-encrypted-storage can work properly.
react-native link react-native-encrypted-storageInternally, the react-native-sound plugin is used to play ringtones. If you encounter this error:
undefined is not an object (evaluating 'RNSound.IsAndroid')Then, you may additionally need to fully clear your build caches for Android. You can do this using:
cd android
./gradlew cleanBuildCache
After clearing your build cache, you should execute a new react-native build.
If you still experience issues, know that this is the most common build issue. And check it here and the several issues linked to it for possible resolution.
To let users transition between multiple screens, you will need to install a navigation library. In React Native, there are several different types of navigation libraries you can use to create a navigation structure. For now, we use the React navigation.
ZegoCallInvitationDialog component on the top level of the NavigationContainer.<ZegoCallInvitationDialog />ZegoUIKitPrebuiltCallWaitingScreen and ZegoUIKitPrebuiltCallInCallScreen) to your stack navigator.<Stack.Screen
options={{ headerShown: false }}
// DO NOT change the name
name="ZegoUIKitPrebuiltCallWaitingScreen"
component={ZegoUIKitPrebuiltCallWaitingScreen}
/>
<Stack.Screen
options={{ headerShown: false }}
// DO NOT change the name
name="ZegoUIKitPrebuiltCallInCallScreen"
component={ZegoUIKitPrebuiltCallInCallScreen}
/>)
useSystemCallingUI method in the index.js file.import {AppRegistry} from 'react-native';
import App from './App';
import {name as appName} from './app.json';
// Add these lines \/\/\/\/\/\/\/\/\/\/\/\/\/\/\/\/\/\/\/\/\/\/\/\/\/\/\/\/\/\/\/
import ZegoUIKitPrebuiltCallService from '@zegocloud/zego-uikit-prebuilt-call-rn'
import * as ZIM from 'zego-zim-react-native';
import * as ZPNs from 'zego-zpns-react-native';
ZegoUIKitPrebuiltCallService.useSystemCallingUI([ZIM, ZPNs]);
// Add these lines /\/\/\/\/\/\/\/\/\/\/\/\/\/\/\/\/\/\/\/\/\/\/\/\/\/\/\/\/\/\
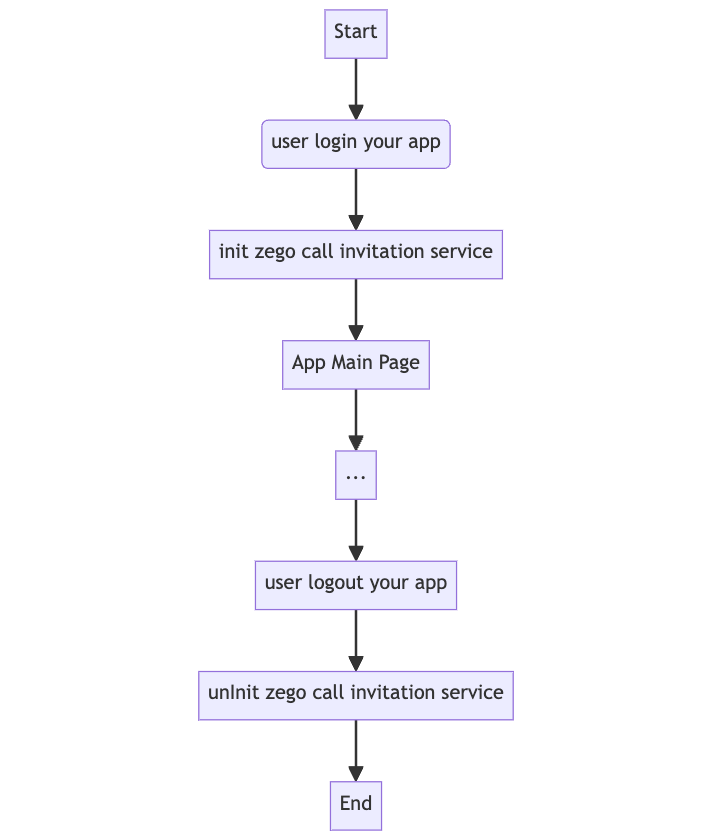
AppRegistry.registerComponent(appName, () => App);ZegoUIKitPrebuiltCallService.init method.We recommend calling this method immediately after the user logs into your app.
After the user logs in, it is necessary to Initialize the ZegoUIKitPrebuiltCallInvitationService to ensure that it is initialized only once, avoiding errors caused by repeated initialization.
When the user logs out, it is important to perform Deinitialize to clear the previous login records, preventing any impact on the next login.
)
import * as ZIM from 'zego-zim-react-native';
import * as ZPNs from 'zego-zpns-react-native';
const onUserLogin = async (userID, userName, props) => {
return ZegoUIKitPrebuiltCallService.init(
yourAppID, // You can get it from ZEGOCLOUD's console
yourAppSign, // You can get it from ZEGOCLOUD's console
userID, // It can be any valid characters, but we recommend using a phone number.
userName,
[ZIM, ZPNs],
{
ringtoneConfig: {
incomingCallFileName: 'zego_incoming.mp3',
outgoingCallFileName: 'zego_outgoing.mp3',
},
androidNotificationConfig: {
channelID: "ZegoUIKit",
channelName: "ZegoUIKit",
},
});
}
const onUserLogout = async () => {
return ZegoUIKitPrebuiltCallService.uninit()
}| Parameter | Type | Required | Description |
|---|---|---|---|
| appID | Number | Yes | You can get the App ID from ZEGOCLOUD Admin Console. |
| appSign | String | Yes | You can get the App Sign from ZEGOCLOUD Admin Console. |
| userID | String | Yes | userID can be something like a phone number or the user ID on your own user system. userID can only contain numbers, letters, and underlines (_). |
| userName | String | Yes | userName can be any character or the user name on your own user system. |
| plugins | Array | No | Set it to [ZIM, ZPNs] if you want to use the invitation functionality |
| config | Object | Yes | You can set it to empty object {} if you don't want to change any configuration |
| config.ringtoneConfig | Object | No | ringtoneConfig.incomingCallFileName and ringtoneConfig.outgoingCallFileName is the name of the ringtone file, which requires you a manual import. To know how to import, refer to the following chapter: Configure your project. |
| config.requireConfig | Function | No | This method is called when you receive a call invitation. You can control the SDK behaviors by returning the required config based on the data parameter. For more details, see Custom prebuilt UI. |
| config.androidNotificationConfig | Object | No | androidNotificationConfig.channelID must be the same as the FCM Channel ID in ZEGOCLOUD Admin Console, and the androidNotificationConfig.channelName can be an arbitrary value. |
| config.innerText | Object | No | To modify the UI text, use this property. For more details, see Custom prebuilt UI. |
Configure the "ZegoSendCallInvitationButton" to enable making calls.
<ZegoSendCallInvitationButton
invitees={[{userID: varUserID, userName: varUserName'}]}
isVideoCall={true}
resourceID={"zego_call"} // Please fill in the resource ID name that has been configured in the ZEGOCLOUD's console here.
/><ZegoSendCallInvitationButton
invitees={invitees.map((inviteeID) => {
return { userID: inviteeID, userName: 'user_' + inviteeID };
})}
isVideoCall={true}
resourceID={"zego_call"} // Please fill in the resource ID name that has been configured in the ZEGOCLOUD's console here.
/>| Property | Type | Required | Description |
|---|---|---|---|
invitees |
Array |
Yes |
The information of the callee. userID and userName are required. For example: [{ userID: inviteeID, userName: inviteeName }] |
isVideoCall |
Boolean |
Yes |
If true, a video call is made when the button is pressed. Otherwise, a voice call is made. |
resourceID |
Boolean |
No |
resourceID can be used to specify the ringtone of an offline call invitation, which must be set to the same value as the Push Resource ID in ZEGOCLOUD Admin Console. |
timeout |
Number |
No |
The timeout duration. It's 60 seconds by default. |
onPressed |
Function |
No |
Callback method after pressing the button and sending an invitation. |
onWillPressed |
Function |
No |
This method will be triggered before pressing the send invitation button. You need to return a Promise in this method. If the value of the Promise is false, the invitation will be cancelled. |
For more parameters, go to Custom prebuilt UI.
The example code uses react-native-device-info and @react-native-async-storage/async-storage to generate userID and userName. If you also need to use them, please execute the following command to install dependencies:
yarn add react-native-device-info @react-native-async-storage/async-storagenpm install react-native-device-info @react-native-async-storage/async-storageimport React, { useState, useRef, useEffect } from 'react';
import { View, Text, TextInput, Button, StyleSheet, TouchableWithoutFeedback, } from 'react-native';
import { NavigationContainer, useNavigation } from '@react-navigation/native';
import { createNativeStackNavigator } from '@react-navigation/native-stack';
import { getFirstInstallTime } from 'react-native-device-info'
import AsyncStorage from '@react-native-async-storage/async-storage';
import * as ZIM from 'zego-zim-react-native';
import * as ZPNs from 'zego-zpns-react-native';
import ZegoUIKitPrebuiltCallService, {
ZegoCallInvitationDialog, ZegoUIKitPrebuiltCallWaitingScreen, ZegoUIKitPrebuiltCallInCallScreen, ZegoSendCallInvitationButton,
} from '@zegocloud/zego-uikit-prebuilt-call-rn';
const Stack = createNativeStackNavigator();
const storeUserInfo = async (info) => {
await AsyncStorage.setItem("userID", info.userID)
await AsyncStorage.setItem("userName", info.userName)
}
const getUserInfo = async () => {
try {
const userID = await AsyncStorage.getItem("userID")
const userName = await AsyncStorage.getItem("userName")
if (userID == undefined) {
return undefined
} else {
return { userID, userName }
}
} catch (e) {
return undefined
}
}
const onUserLogin = async (userID, userName) => {
return ZegoUIKitPrebuiltCallService.init(
yourAppID, // You can get it from ZEGOCLOUD's console
yourAppSign, // You can get it from ZEGOCLOUD's console
userID,
userName,
[ZIM, ZPNs],
{
ringtoneConfig: {
incomingCallFileName: 'zego_incoming.mp3',
outgoingCallFileName: 'zego_outgoing.mp3',
},
androidNotificationConfig: {
channelID: "ZegoUIKit",
channelName: "ZegoUIKit",
},
});
}
// <<<<<<<<<<<<<<<<<<<<<<<<<<<<<<<<<<<<<<< Step 1: Config React Navigation
export default function App() {
return (
<NavigationContainer >
<ZegoCallInvitationDialog />
<Stack.Navigator initialRouteName="HomeScreen">
<Stack.Screen
name="LoginScreen"
component={LoginScreen}
/>
<Stack.Screen
name="HomeScreen"
component={HomeScreen}
/>
<Stack.Screen
    options={{ headerShown: false }}
    // DO NOT change the name
    name="ZegoUIKitPrebuiltCallWaitingScreen"
    component={ZegoUIKitPrebuiltCallWaitingScreen}
/>
<Stack.Screen
    options={{ headerShown: false }}
    // DO NOT change the name
    name="ZegoUIKitPrebuiltCallInCallScreen"
    component={ZegoUIKitPrebuiltCallInCallScreen}
/>
</Stack.Navigator>
</NavigationContainer>);
}
// <<<<<<<<<<<<<<<<<<<<<<<<<<<<<<<<<<<<<<< Step 2: Call the "ZegoUIKitPrebuiltCallService.init" method after the user login.
function LoginScreen(props) {
const navigation = useNavigation();
const [userID, setUserID] = useState('');
const [userName, setUserName] = useState('');
const loginHandler = () => {
// Simulated login successful
// Store user info to auto login
storeUserInfo({ userID, userName })
// Init the call service
onUserLogin(userID, userName).then(() => {
// Jump to HomeScreen to make new call
navigation.navigate('HomeScreen', { userID });
})
}
useEffect(() => {
getFirstInstallTime().then(firstInstallTime => {
const id = String(firstInstallTime).slice(-5);
setUserID(id);
const name = 'user_' + id
setUserName(name);
});
}, [])
return <View style={styles.container}>
<View style={{ marginBottom: 30 }}>
<Text>appID: {yourAppID}</Text>
<Text>userID: {userID}</Text>
<Text>userName: {userName}</Text>
</View>
<View style={{ width: 160 }}>
<Button title='Login' onPress={loginHandler}></Button>
</View>
</View>;
}
// <<<<<<<<<<<<<<<<<<<<<<<<<<<<<<<<<<<<<<< Step 3: Configure the "ZegoSendCallInvitationButton" to enable making calls.
function HomeScreen({ route, navigation }) {
const [userID, setUserID] = useState('')
const [invitees, setInvitees] = useState([]);
const viewRef = useRef(null);
const blankPressedHandle = () => {
viewRef.current.blur();
};
const changeTextHandle = value => {
setInvitees(value ? value.split(',') : []);
};
useEffect(() => {
// Simulated auto login if there is login info cache
getUserInfo().then((info) => {
if (info) {
setUserID(info.userID)
onUserLogin(info.userID, info.userName)
} else {
// Back to the login screen if not login before
navigation.navigate('LoginScreen');
}
})
}, [])
return (
<TouchableWithoutFeedback onPress={blankPressedHandle}>
<View style={styles.container}>
<Text>Your user id: {userID}</Text>
<View style={styles.inputContainer}>
<TextInput
ref={viewRef}
style={styles.input}
onChangeText={changeTextHandle}
placeholder="Invitees ID, Separate ids by ','"
/>
<ZegoSendCallInvitationButton
invitees={invitees.map((inviteeID) => {
return { userID: inviteeID, userName: 'user_' + inviteeID };
})}
isVideoCall={false}
resourceID={"zego_call"}
/>
<ZegoSendCallInvitationButton
invitees={invitees.map((inviteeID) => {
return { userID: inviteeID, userName: 'user_' + inviteeID };
})}
isVideoCall={true}
resourceID={"zego_call"}
/>
</View>
<View style={{ width: 220, marginTop: 100 }}>
<Button title='Back To Login Screen' onPress={() => { navigation.navigate('LoginScreen') }}></Button>
</View>
</View>
</TouchableWithoutFeedback>
);
}
const styles = StyleSheet.create({
container: {
flex: 1,
alignItems: 'center',
justifyContent: 'center',
backgroundColor: "gray"
},
inputContainer: {
flexDirection: 'row',
alignItems: 'center',
justifyContent: 'space-between',
},
input: {
borderBottomWidth: 1,
borderBottomColor: '#dddddd',
},
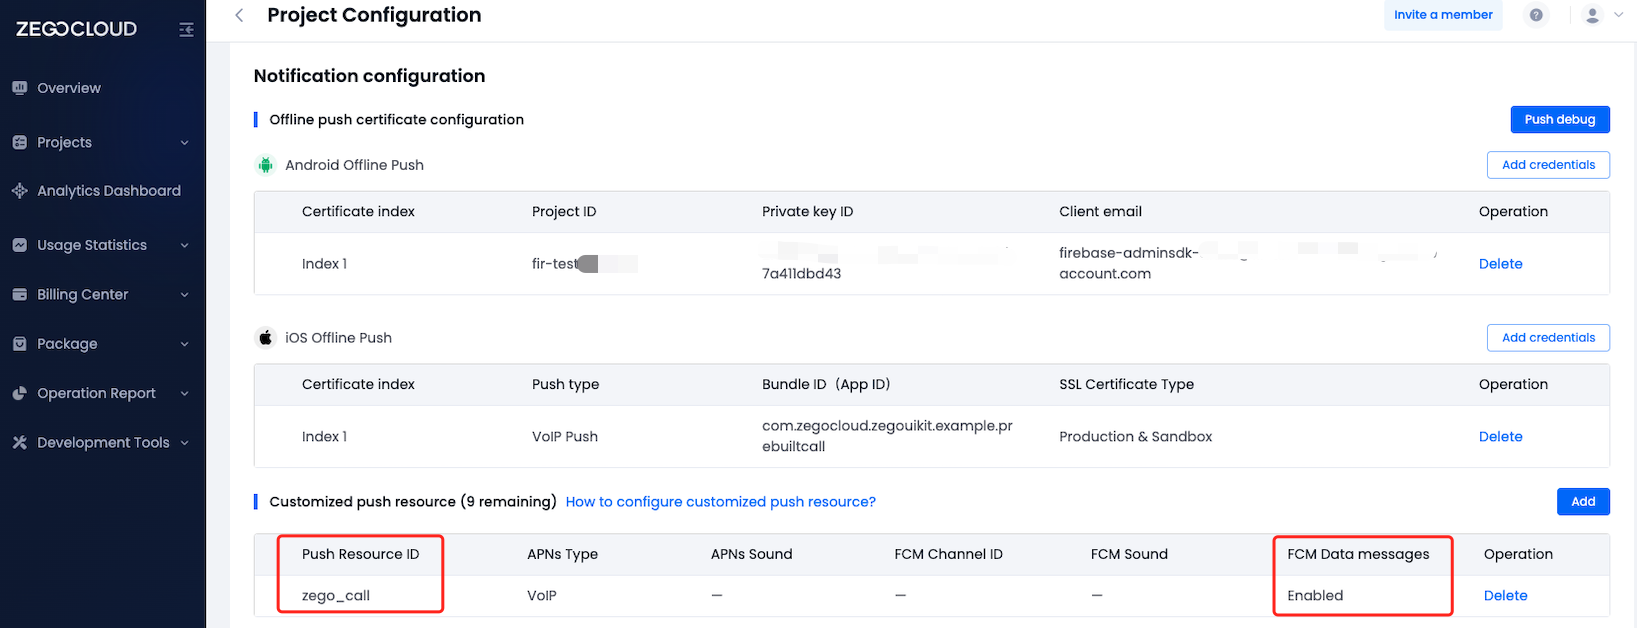
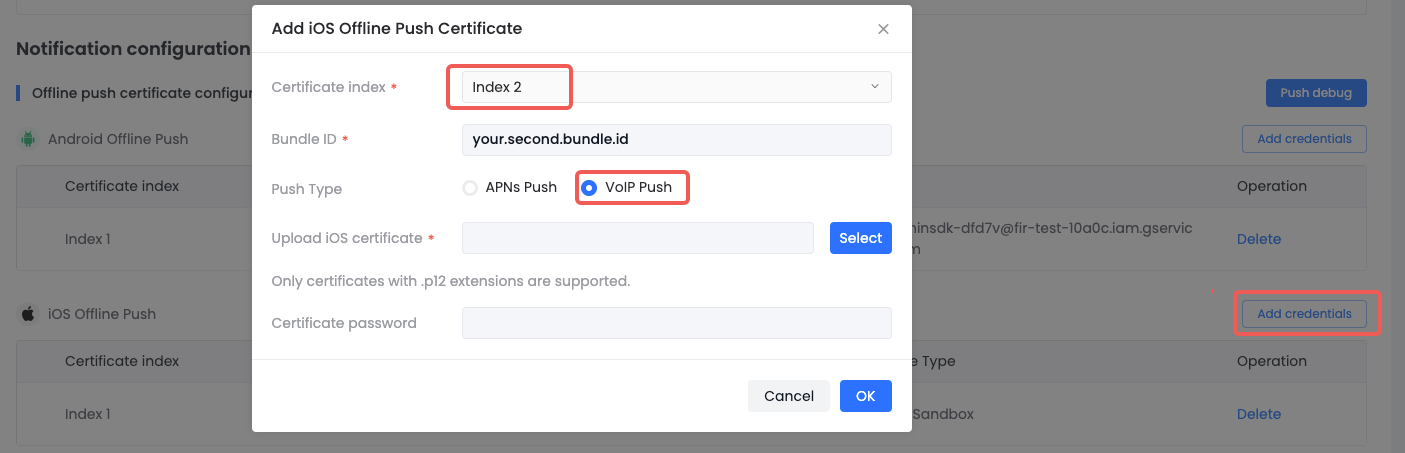
});In the create resource ID popup dialog, you should switch to the VoIP option for APNs, and switch to Data messages for FCM.
When you have completed the configuration, you will obtain the resourceID. You can refer to the image below for comparison.
)
After the above is completed, the resourceID property value of ZegoSendCallInvitationButton needs to be replaced with the resource ID you get.
<ZegoSendCallInvitationButton
    invitees={[{userID: varUserID, userName: varUserName'}]}
    isVideoCall={true}
    resourceID={"zego_call"} // Please fill in the resource ID name that has been configured in the ZEGOCLOUD's console here.
/>
<ZegoSendCallInvitationButton
invitees={invitees.map((inviteeID) => {
return { userID: inviteeID, userName: 'user_' + inviteeID };
})}
isVideoCall={true}
resourceID={"zego_call"} // Please fill in the resource ID name that has been configured in the ZEGOCLOUD's console here.
/>Appear on top permission:)
const onUserLogin = async (userID, userName, props) => {
  return ZegoUIKitPrebuiltCallService.init(
    yourAppID, // You can get it from ZEGOCLOUD's console
    yourAppSign, // You can get it from ZEGOCLOUD's console
    userID, // It can be any valid characters, but we recommend using a phone number.
    userName,
    [ZIM, ZPNs],
    {
        ringtoneConfig: {
            incomingCallFileName: 'zego_incoming.mp3',
            outgoingCallFileName: 'zego_outgoing.mp3',
        },
        androidNotificationConfig: {
            channelID: "ZegoUIKit",
            channelName: "ZegoUIKit",
        },
    }
  ).then(() => {
    // /////////////////////////
    ZegoUIKitPrebuiltCallService.requestSystemAlertWindow({
      message: 'We need your consent for the following permissions in order to use the offline call function properly',
      allow: 'Allow',
      deny: 'Deny',
    });
    // /////////////////////////
  });
}Open the my_project/android/app/proguard-rules.pro file and add the following:
)
-keep class **.zego.**  { *; }
-keep class **.**.zego_zpns.** { *; }Add this line to your project's my_project/android/app/build.gradle file as instructed.
implementation 'com.google.firebase:firebase-messaging:21.1.0'python3 zego_check_android_offline_notification.py✅ The google-service.json is in the right location.
✅ The package name matches google-service.json.
✅ The project level gradle file is ready.
✅ The plugin config in the app-level gradle file is correct.
✅ Firebase dependencies config in the app-level gradle file is correct.
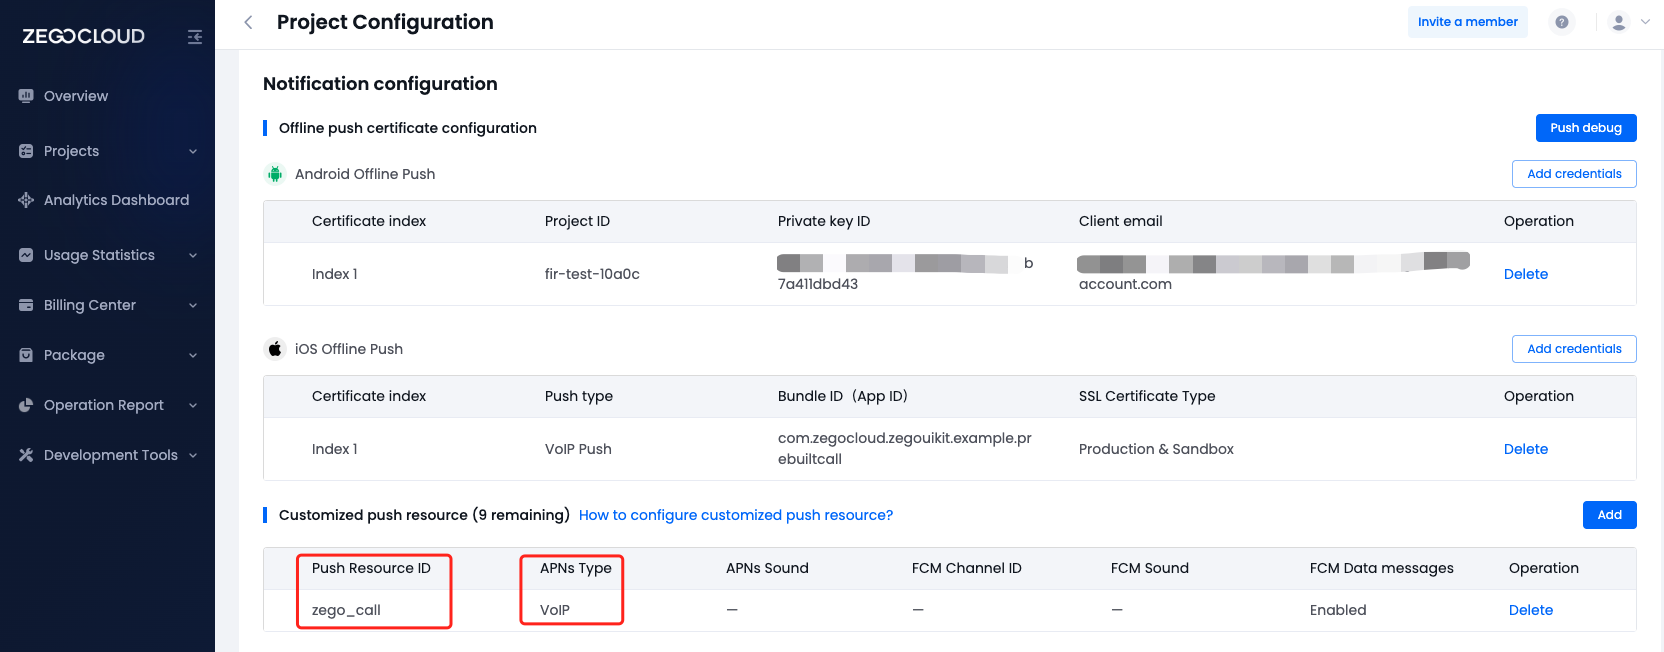
✅ Firebase-Messaging dependencies config in the app-level gradle file is correct.In the create resource ID popup dialog, you should switch to the VoIP option for APNs, and switch to Data messages for FCM.
When you have completed the configuration, you will obtain the resourceID. You can refer to the image below for comparison.
)
Open the my_project/ios/my_project/Info.plist file and add the following:
)
<key>NSCameraUsageDescription</key>
<string>We need to use the camera</string>
<key>NSMicrophoneUsageDescription</key>
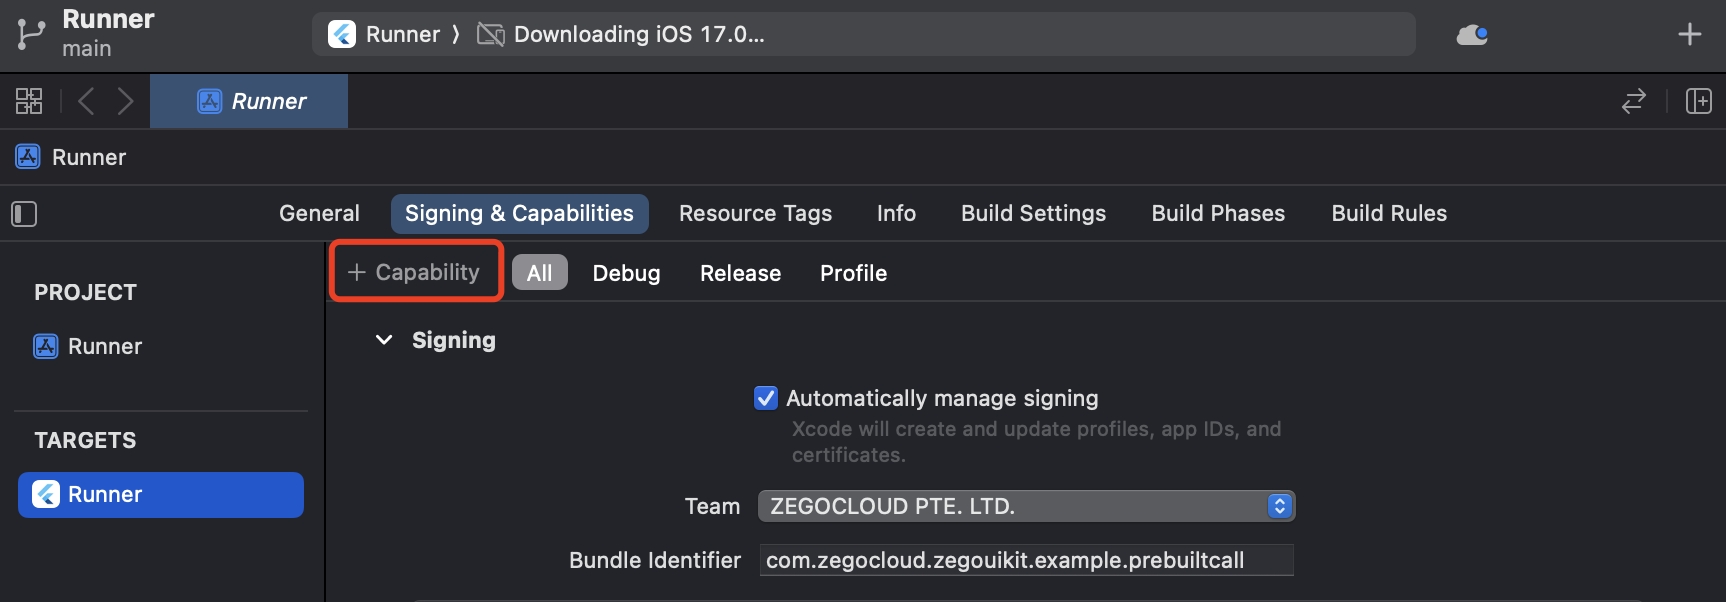
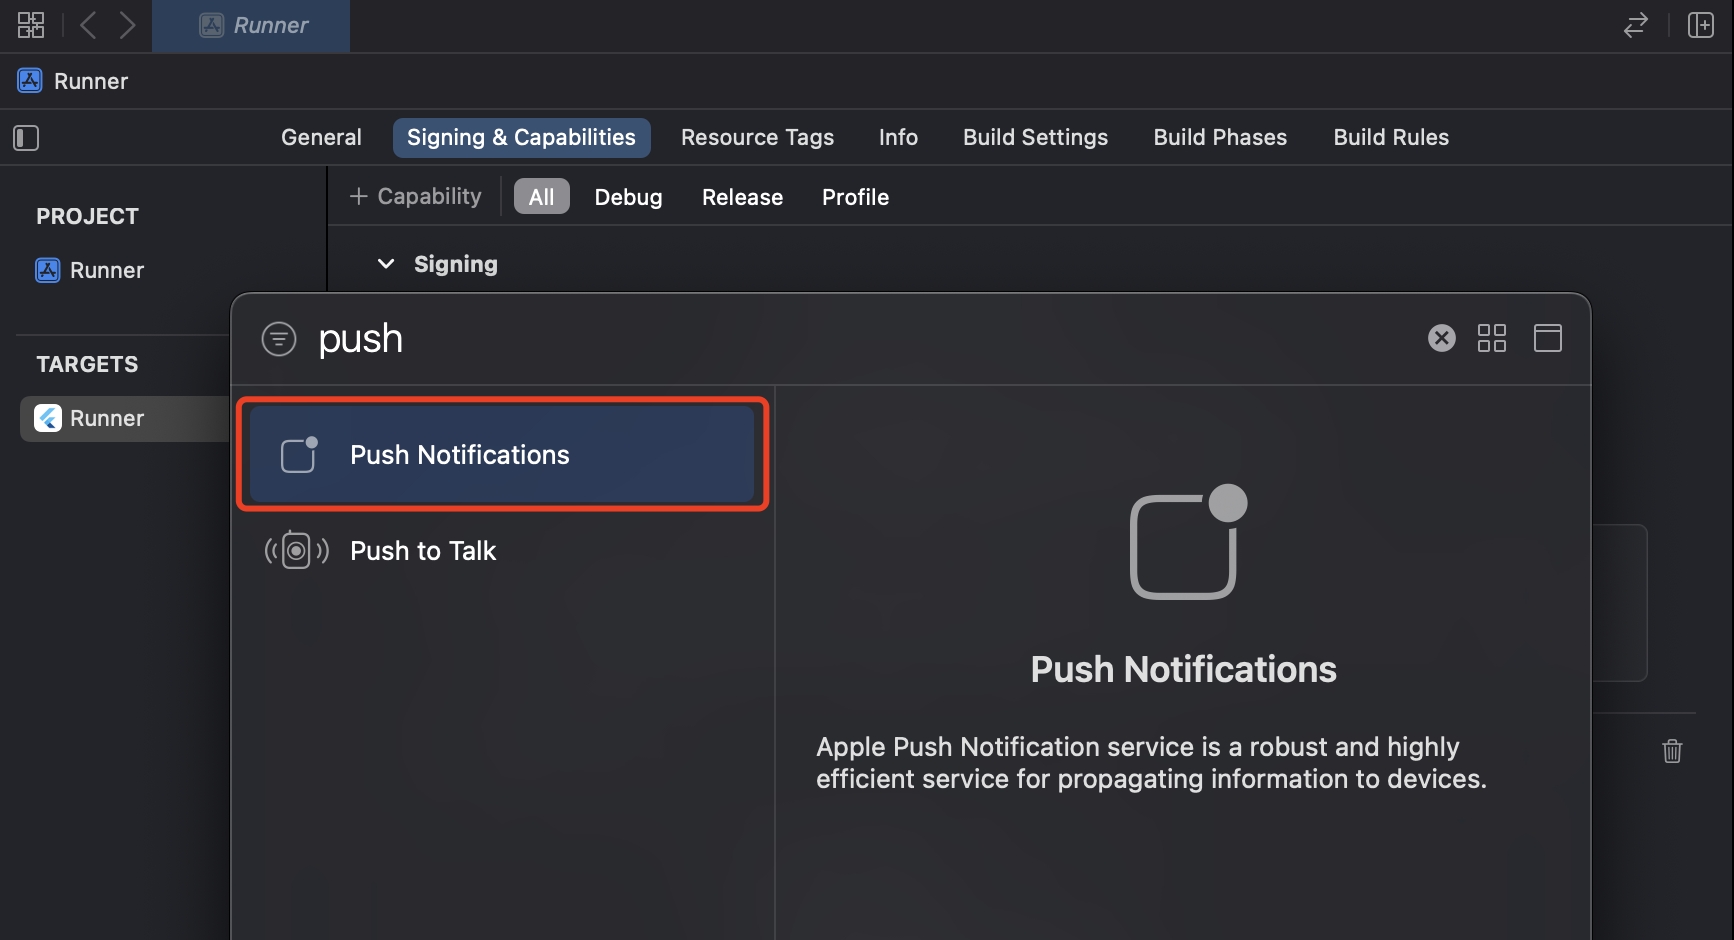
<string>We need to use the microphone</string>Open the project with Xcode, and click the+ Capability on the Signing & Capabilities page.
)
And double-click on Push Notifications to add this feature.
)
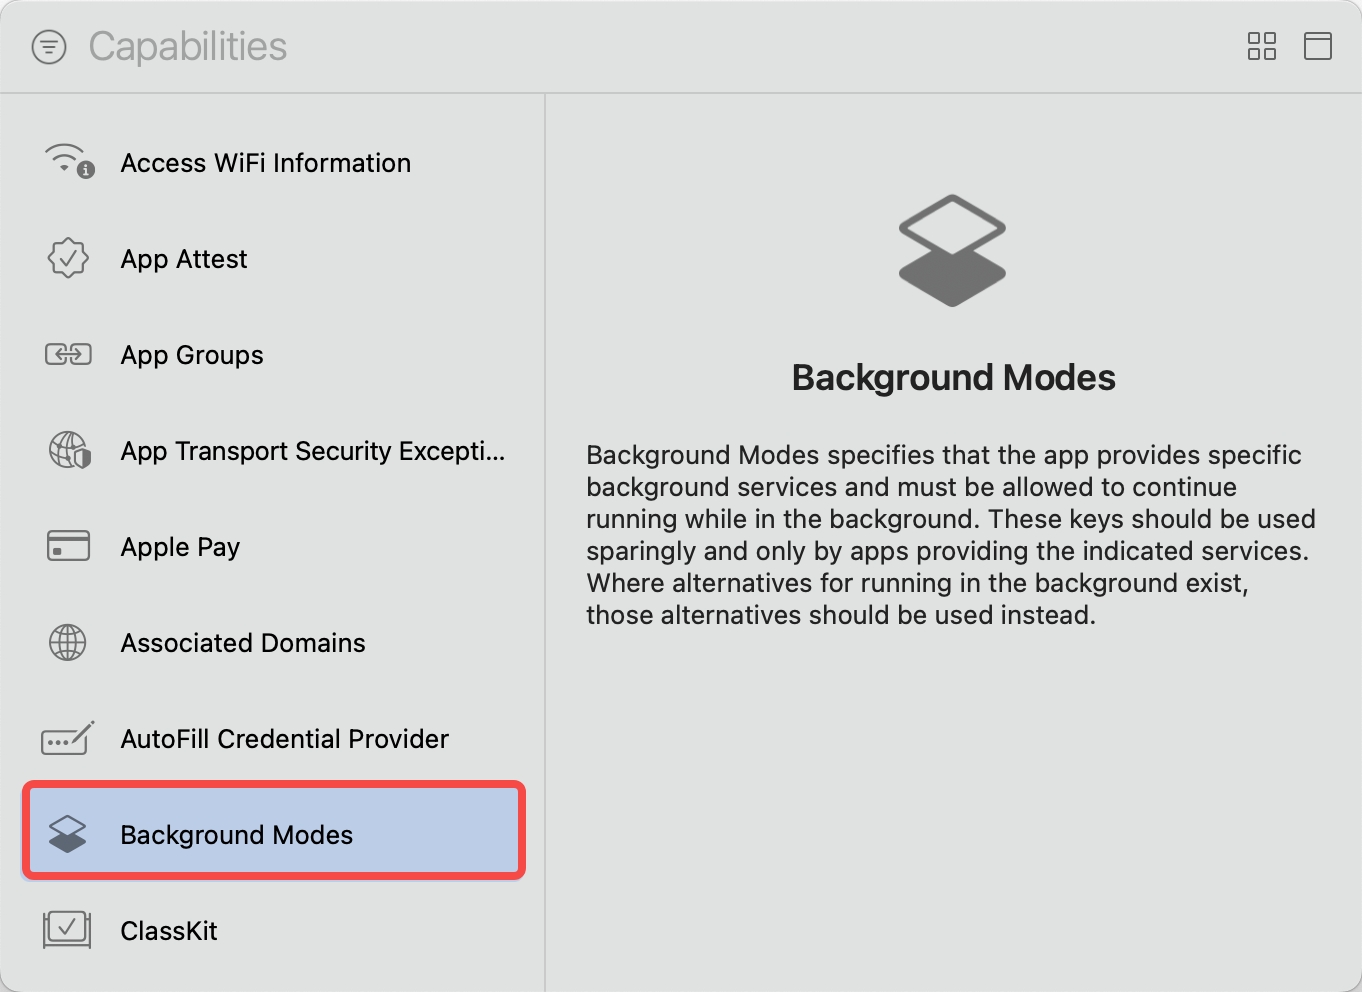
Open the project with Xcode, and click the+ Capability on the Signing & Capabilities page again.
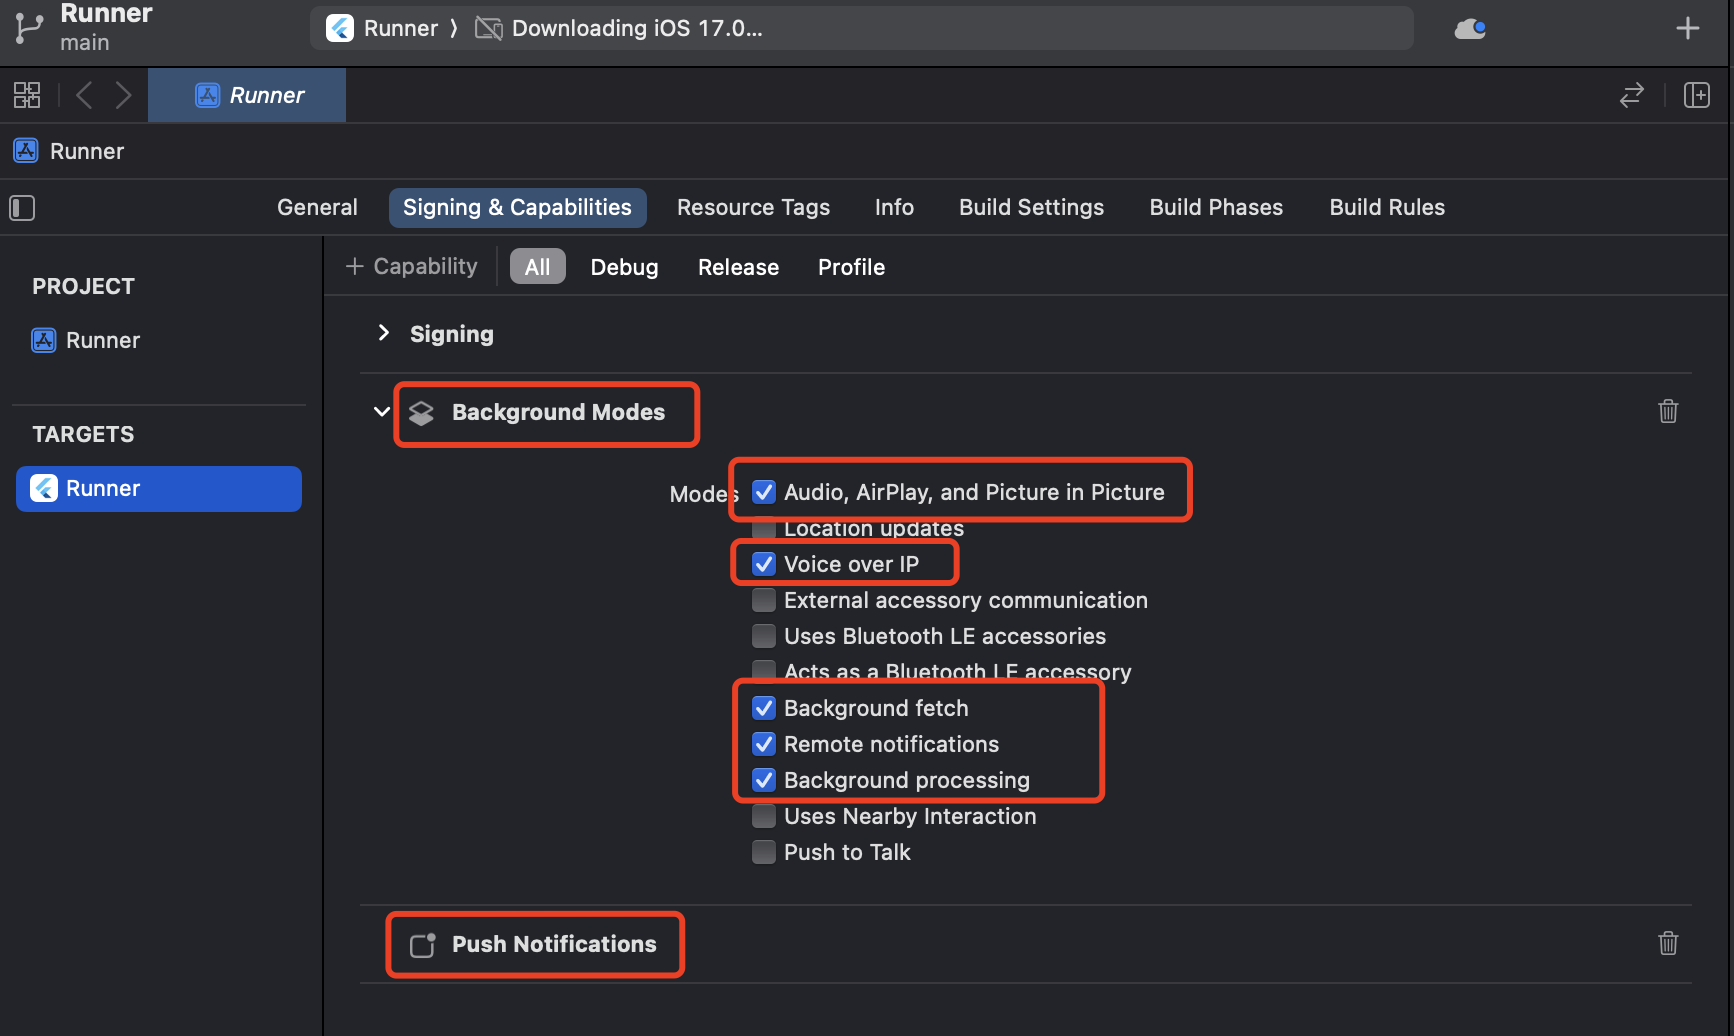
And double-click on Background Modes in the pop-up window. This will allow you to see the Background Modes configuration in the Signing & Capabilities.
)
)
)
If your device is not performing well or you found a UI stuttering, run in Release mode for a smoother experience.
yarn iosnpm run iosyarn androidnpm run androidI have two different apps that need to support offline calling with each other. How should I configure them?
)
certificateIndex of the second app to secondCertificate in the place where you initialize the ZegoUIKitPrebuiltCallService on the client side.import * as ZIM from 'zego-zim-react-native';
import * as ZPNs from 'zego-zpns-react-native';
import ZegoUIKitPrebuiltCallService, { ZegoMultiCertificate } from '@zegocloud/zego-uikit-prebuilt-call-rn';
const onUserLogin = async (userID, userName, props) => {
return ZegoUIKitPrebuiltCallService.init(
yourAppID, // You can get it from ZEGOCLOUD's console
yourAppSign, // You can get it from ZEGOCLOUD's console
userID, // It can be any valid characters, but we recommend using a phone number.
userName,
[ZIM, ZPNs],
{
ringtoneConfig: {
incomingCallFileName: 'zego_incoming.mp3',
outgoingCallFileName: 'zego_outgoing.mp3',
},
androidNotificationConfig: {
channelID: "ZegoUIKit",
channelName: "ZegoUIKit",
},
certificateIndex: ZegoMultiCertificate.second,
});
}Please ensure that the certificates on the console correspond one-to-one with the certificateIndex in your code.